
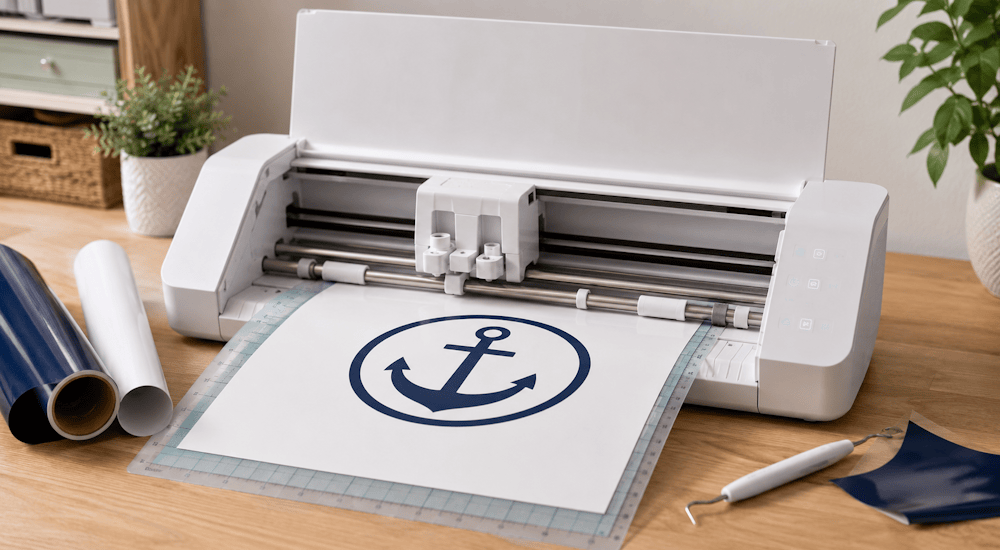
Did you recently get a Silhouette Cameo and want to start your first cutting project with it? Or maybe you're just curious about what the Silhouette Cameo can do?
In this tutorial, we'll show you how to cut your first logo with the Silhouette Cameo machine. ✅
That way, you'll be able to personalize all kinds of surfaces (clothing, cardstock, everyday items, and much more)!
What Is the Silhouette Cameo Machine?
The Silhouette Cameo is a cutting machine that lets you cut all kinds of designs from a variety of materials for your craft projects.
Some of the best-known materials the Silhouette Cameo can cut include:
Heat Transfer Vinyl:
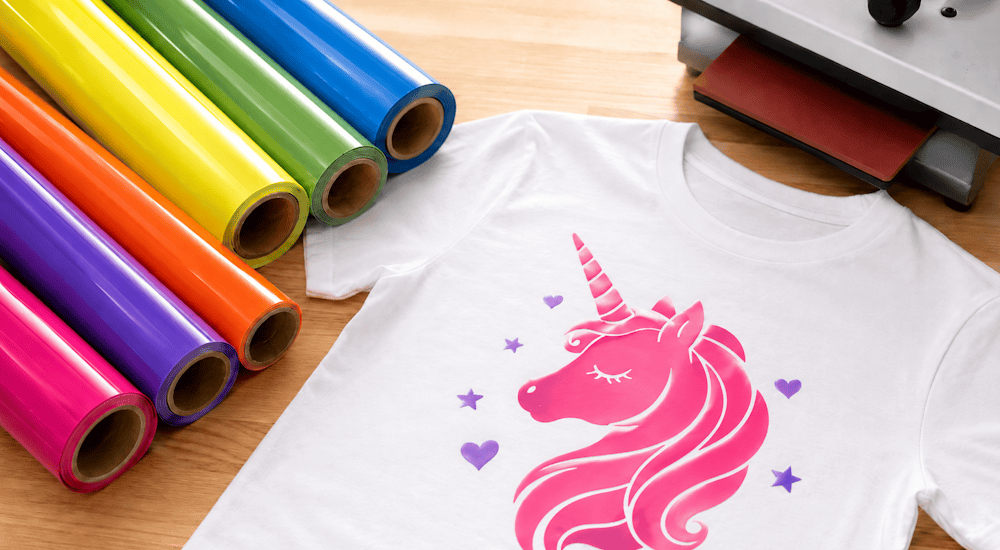
Heat transfer vinyl is the material used to personalize clothing. It's used by major clothing brands and custom apparel companies. 👕
Adhesive Vinyl:
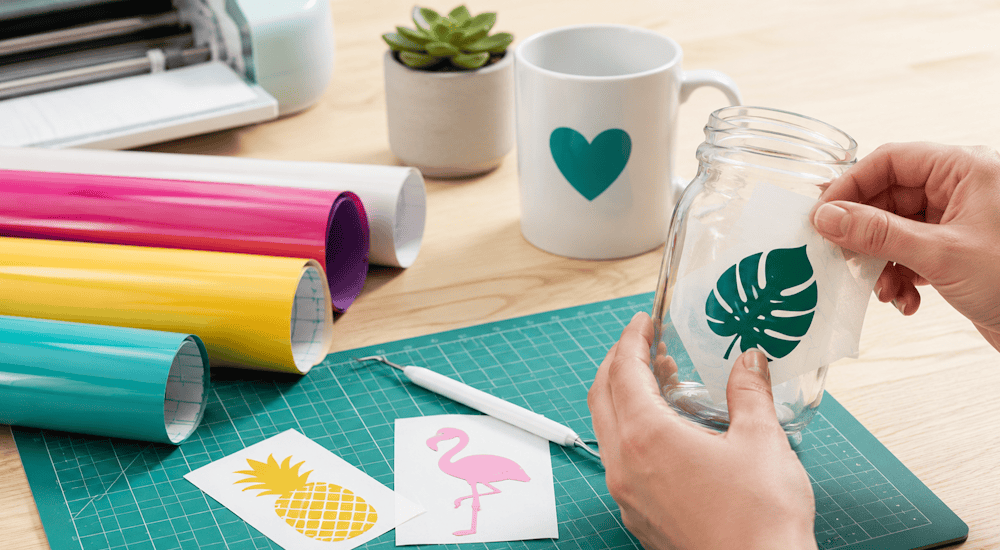
Adhesive vinyl is similar to heat transfer vinyl in that it lets you personalize a wide range of items. But unlike heat transfer vinyl, adhesive vinyl isn't meant to be applied to clothing. Instead, it's used to personalize everyday items like water bottles, mugs, cabinets, or even windows.
You can also use the Silhouette Cameo machine to cut other materials up to 3mm thick, such as cardstock, felt, or fabric.
There are currently 5 Silhouette Cameo models. The Silhouette Cameo 5 is the newest model, released in France in October 2023. 🆕
Silhouette machines are controlled with software that you install on your computer. It's called Silhouette Studio, and it's free.
In the first part of this demo, we'll use heat transfer vinyl to cut our logo with the Silhouette Cameo cutting machine.
In the second part, we'll show you how to customize a T-shirt with your heat transfer vinyl logo.
How Do You Cut Your First Logo with the Silhouette Cameo Machine?
Follow these steps to cut your logo with the machine:
1 - Add Your Logo to Silhouette Studio
As we mentioned above, Silhouette Cameo machines all work with the Silhouette Studio software (which is free). So to cut your first logo with the machine, you'll need to add your logo to the software.
There are two ways to add your logo, depending on the type of design. The first is to create your design directly in the software, and the second is to import your logo into the software:
Method 1 (create your logo in the software):
For this method, we'll create a design using text only. 🅰
- Click the "A" icon in Silhouette Studio.
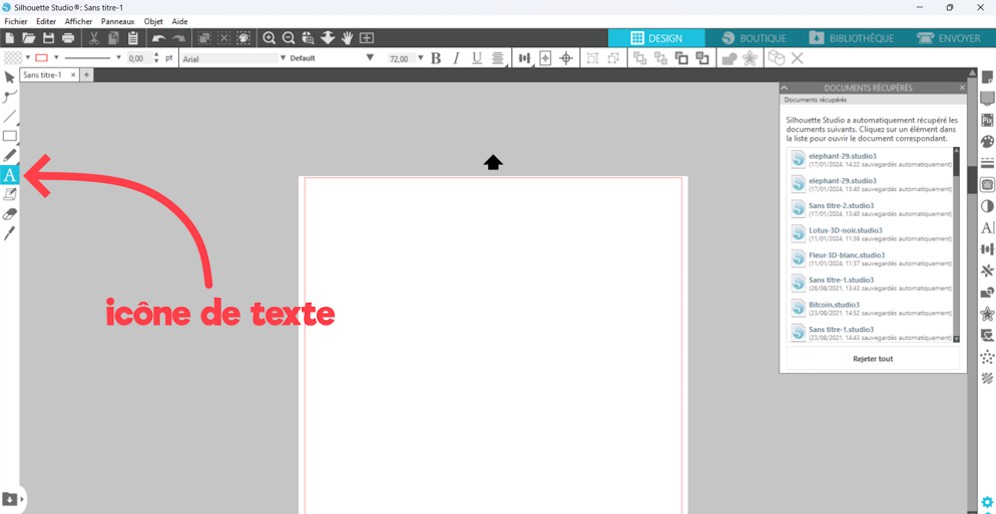
- Click inside the text box with the left mouse button, then type your text on your keyboard.
- Select the text, then choose the font you like.
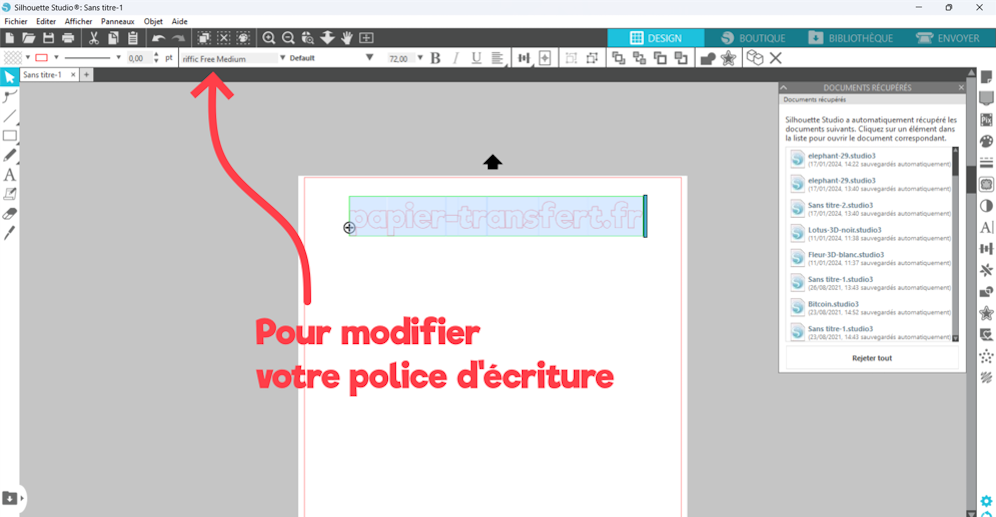
As you can see, the process is simple. Now here's a tip for making your text stand out with an outline:
- Click your text, then click the outline icon at the bottom right.
- Next, click "outline" and choose the outline size you want. Once you're happy with the size, click "apply."
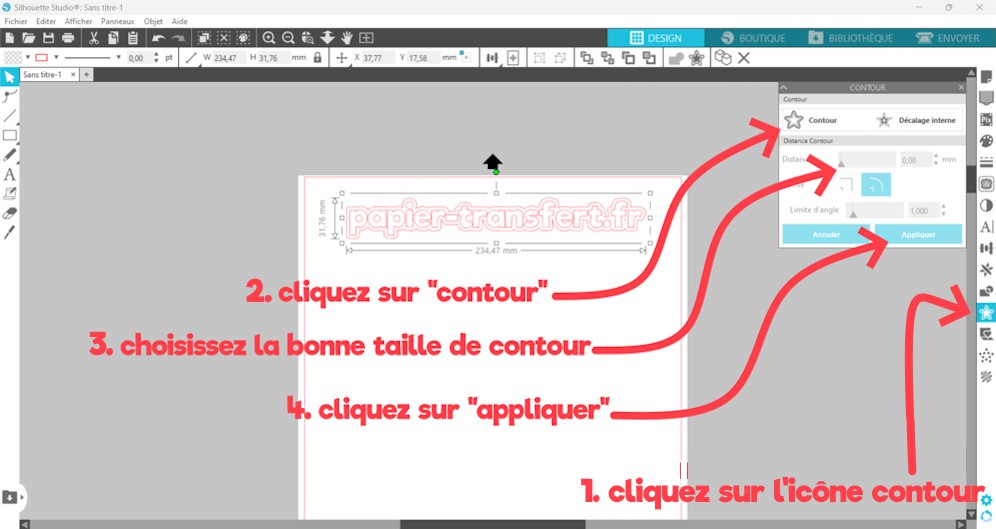
- Your text will now have a more modern look ✨:
Method 2 (import your logo directly into the software):
To import your logo into Silhouette Studio, it's best to vectorize it and convert it to DXF format first. Vectorizing removes all the pixels from your logo, so the machine can cut it with perfect precision. (Note that when you use method 1 to create a logo, the software has already vectorized it for you.)
Here's how to do it:
- You'll need to install and open the free software Inkscape. The advantage of this software is that it lets us vectorize logos (single-color ones) that we created outside of Silhouette Studio. 👍
- Import your logo into the software.
- Select your logo with a left click.
- Click "Path" ➡️ "Trace Bitmap."
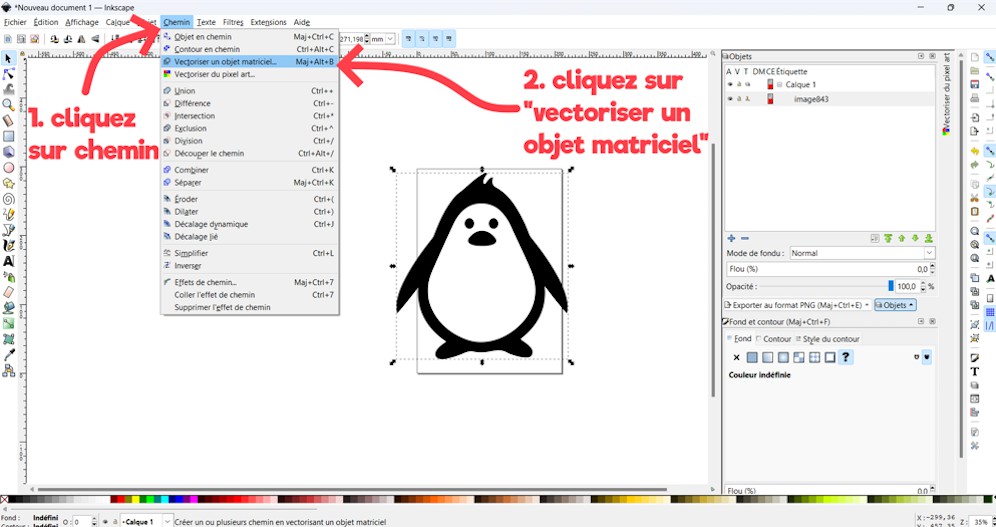
- Then click "OK." ✔️
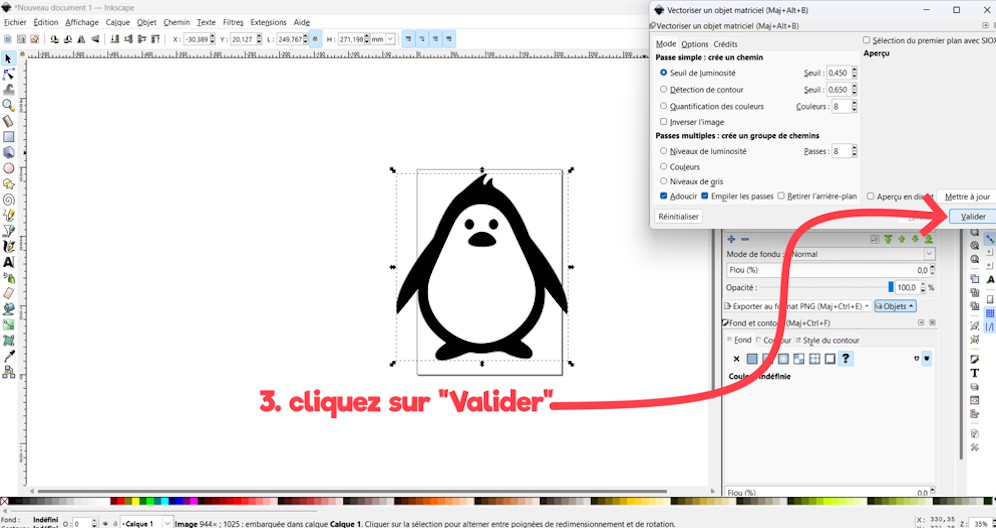
- A second logo will appear: this is the vectorized logo. (To tell which one is vectorized, zoom in on both designs. The one that isn't pixelated is the vectorized logo.) 🔎
- Delete the pixelated logo.
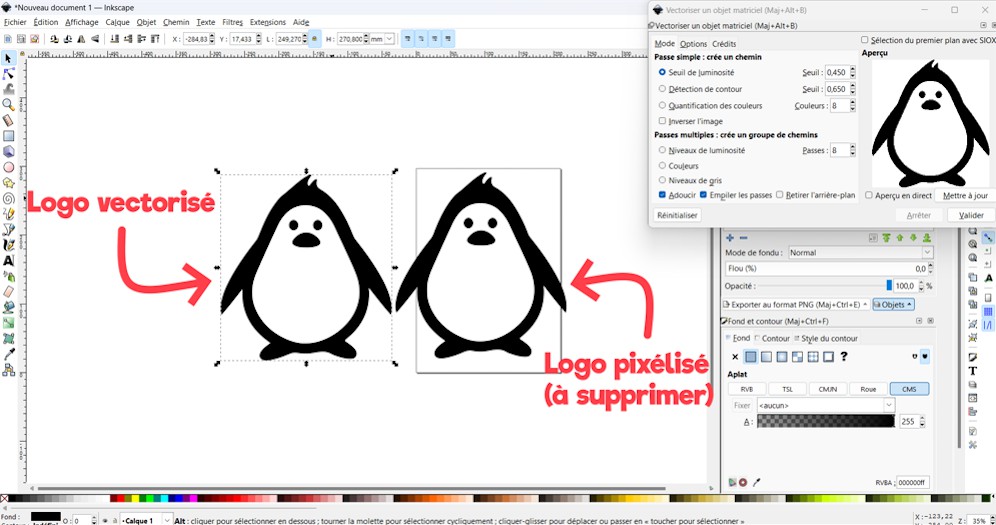
- If your logo isn't vectorized perfectly, you can adjust the settings under "Mode" and "Options" in the vectorizing panel.
- Once everything looks good, click "File" ➡️ "Save As" ➡️ Save your design in "DXF" format ➡️ Click "Save."
- Now all you have to do is go into Silhouette Studio and import your DXF logo (by clicking "File" ➡️ "Open").
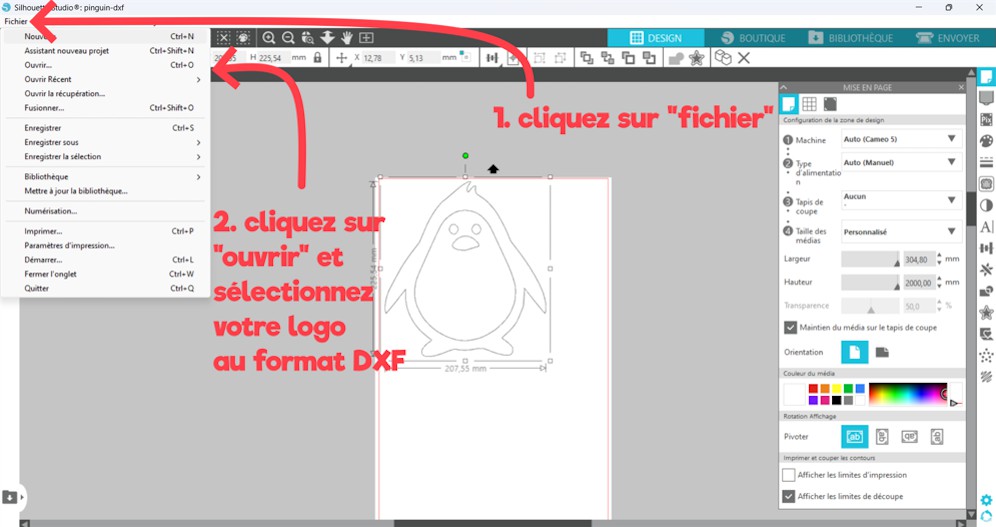
Once your logo is imported, click on it and resize it using the 4 white squares at its corners.
2 - Load the Material into the Cutting Machine
Now we're going to load the heat transfer vinyl into our Silhouette Cameo machine.
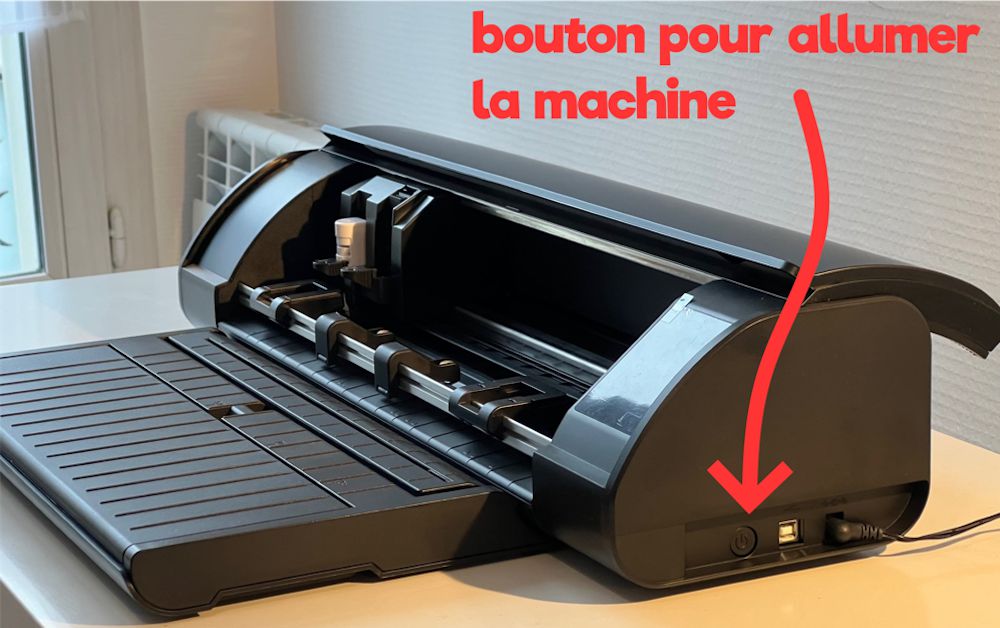
- Turn on the machine.
-
Take the cutting mat that came with the machine and place your heat transfer vinyl (or any other material you want to cut) on it the right way around. Make sure no bubbles form as you lay down the vinyl.
-
Position the mat correctly in the machine.
-
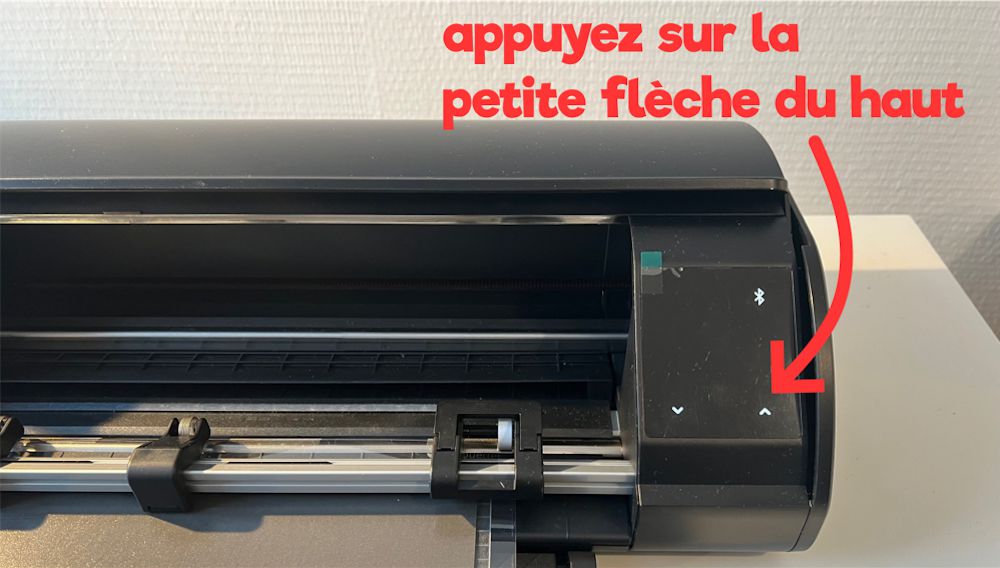
Press the small up arrow so the machine pulls the mat in with its rollers.
3 - Start Cutting the Logo
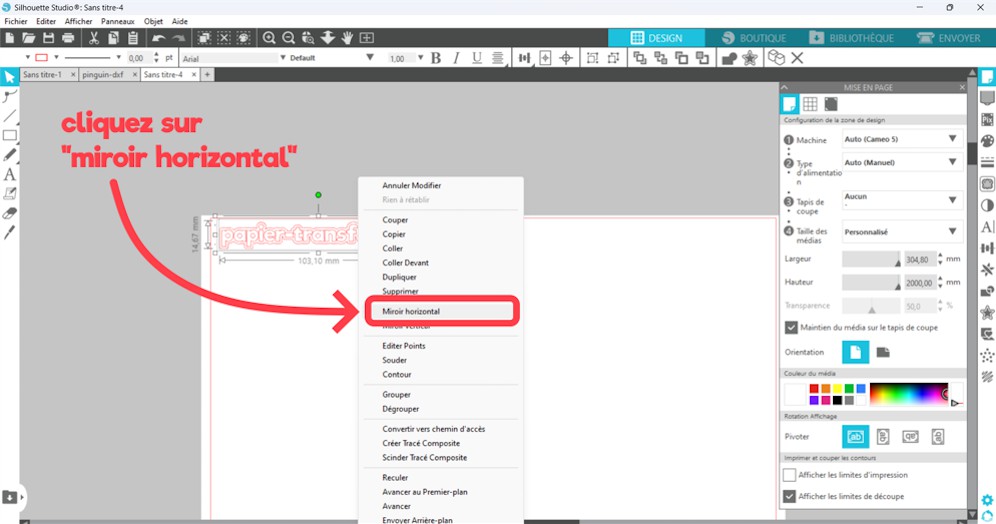
Before you start cutting, there's one important thing to point out: whenever you use heat transfer vinyl with any cutting machine, you always need to mirror your design before cutting (this only applies to heat transfer vinyl).
To mirror your logo, go back into Silhouette Studio, right-click the design, then click "Flip Horizontally." 🪞
Your logo will flip over.
Now click the "Send" tab at the top right. This is where you'll enter the cut settings so the machine can properly cut your logo.
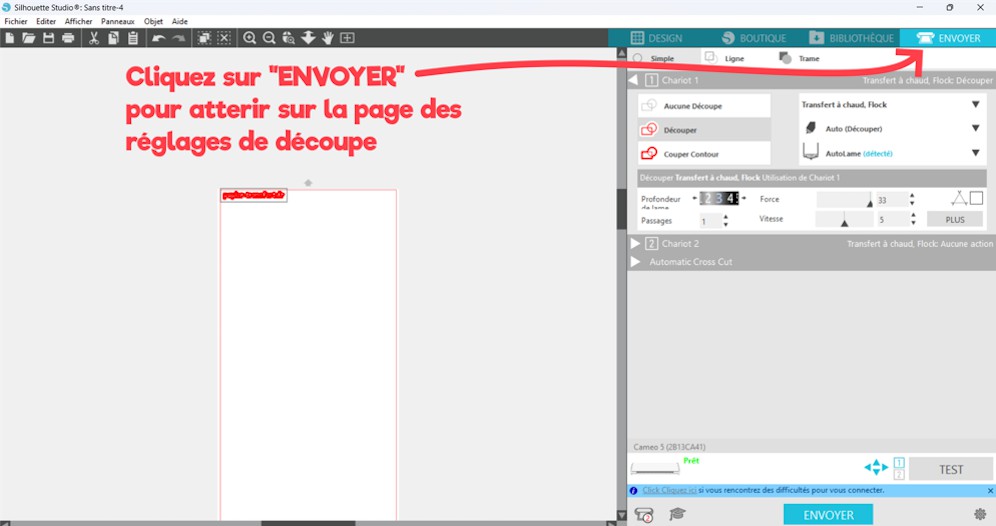
The cut settings vary depending on the type of material, and especially its thickness. So check with your material supplier to get the right settings.
For our heat transfer vinyls, the cut settings are listed in each product description. 😉
For this project, we're using 3D heat transfer vinyl.
Once you've entered the right settings, click the "SEND" button at the bottom right.
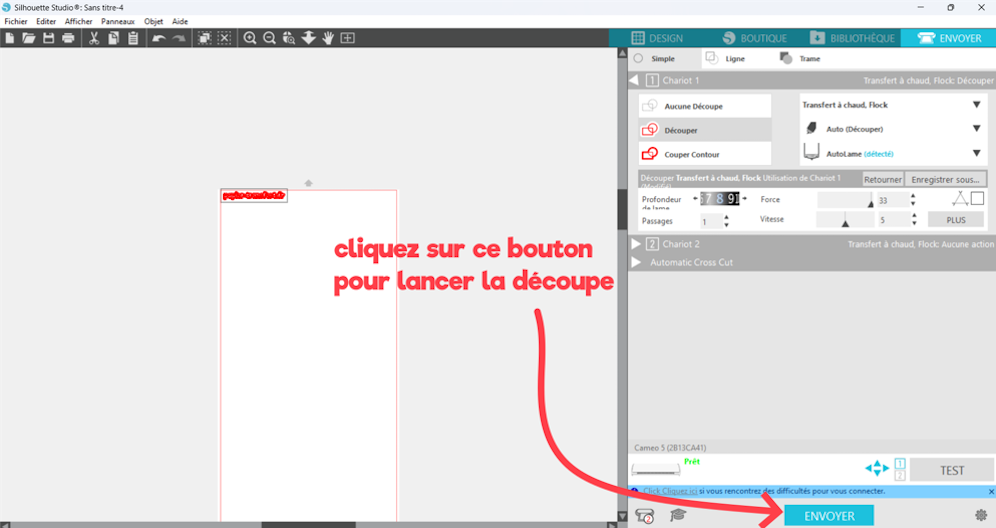
Cutting your logo with the Silhouette Cameo machine can take a little while (usually between 30 seconds and 3 minutes).
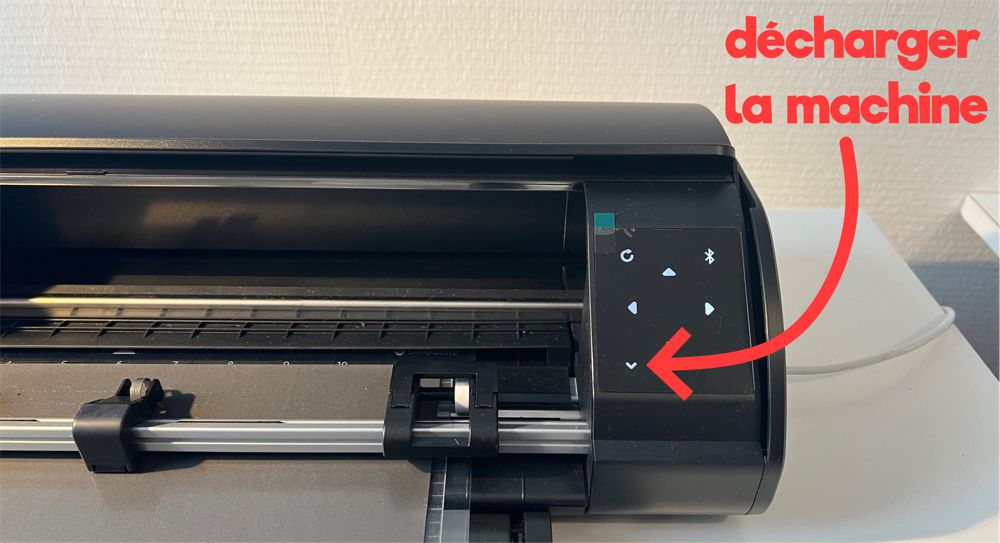
When the cut is done, the machine will stop on its own, and all you have to do is press the small down arrow on your machine to unload the mat. ⬇️
4 - Weed the Logo
Using your scissors, trim away the area around your logo without cutting into it.
Now get ready to weed your design!
Weeding means removing the excess heat transfer vinyl (all the extra vinyl around or inside your logo).
Carefully remove the excess heat transfer vinyl. If you accidentally pull off part of your logo, it'll be hard to fix, and you'll have to cut it all over again.
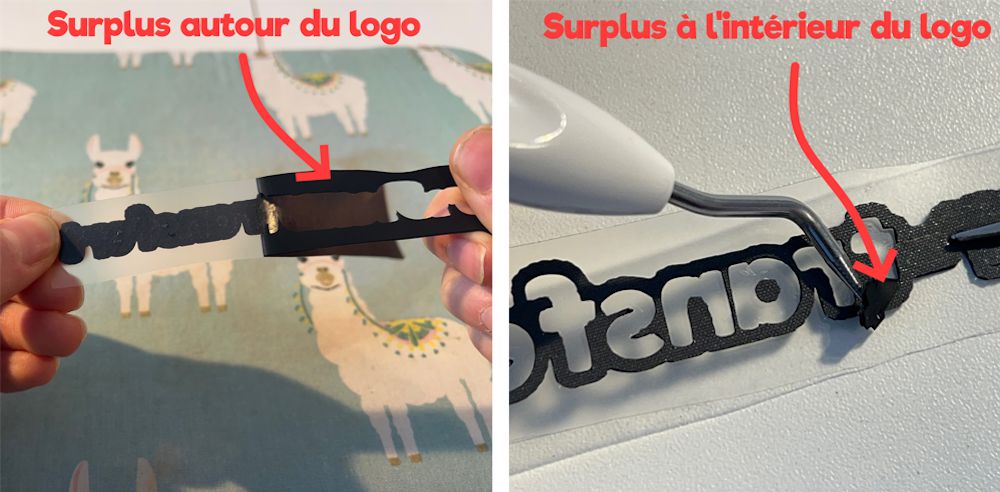
That's why we recommend using a weeding hook when you weed your logo. This tool lets you remove the excess heat transfer vinyl with precision.
And that's it! You've officially cut your first logo with the Silhouette Cameo cutting machine. 😉
Here's the finished logo cut with the machine.
How Do You Customize a T-Shirt with Your Logo?
The second part of this tutorial is for anyone who used heat transfer vinyl to make their logo. Now we'll show you how to apply it to your T-shirt! (or any other fabric item) 👚
1 - Place Your Logo in the Right Spot on the T-Shirt
There are several ways to place your logo in the right spot on a T-shirt.
Here, we'll focus on how to correctly place a logo on the front of a T-shirt, over the heart.
Method 1:
Use the edge of your T-shirt's collar as a vertical line. The center of your logo will go on this line.
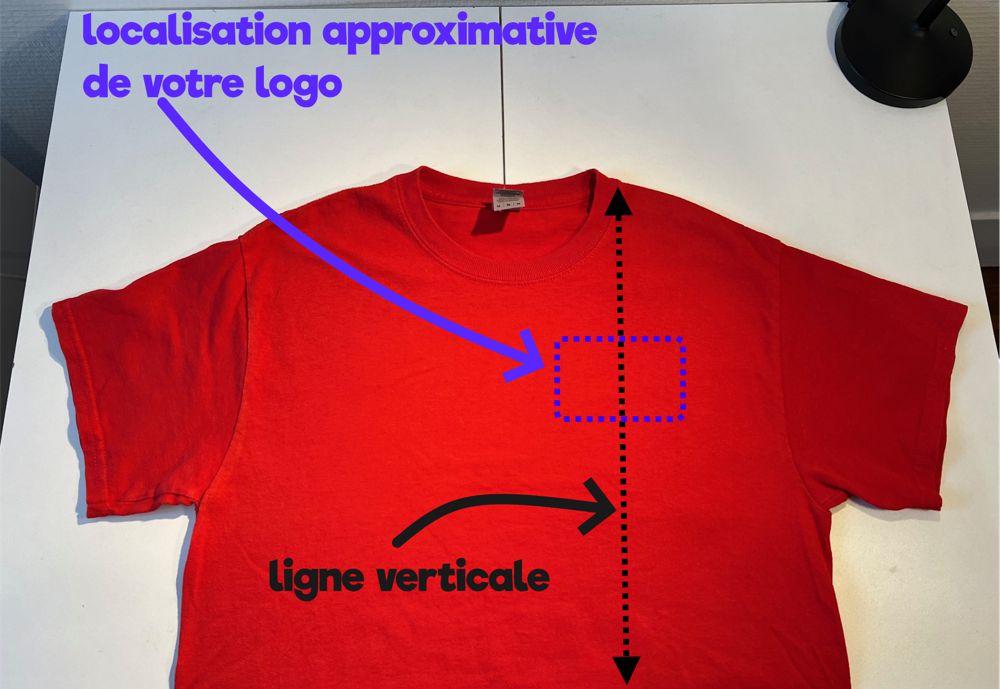
To find the perfect spot for your logo, the general rule is to measure 4 or 5 finger-widths down from the bottom of the collar. That's where the top of your logo should go. 👋
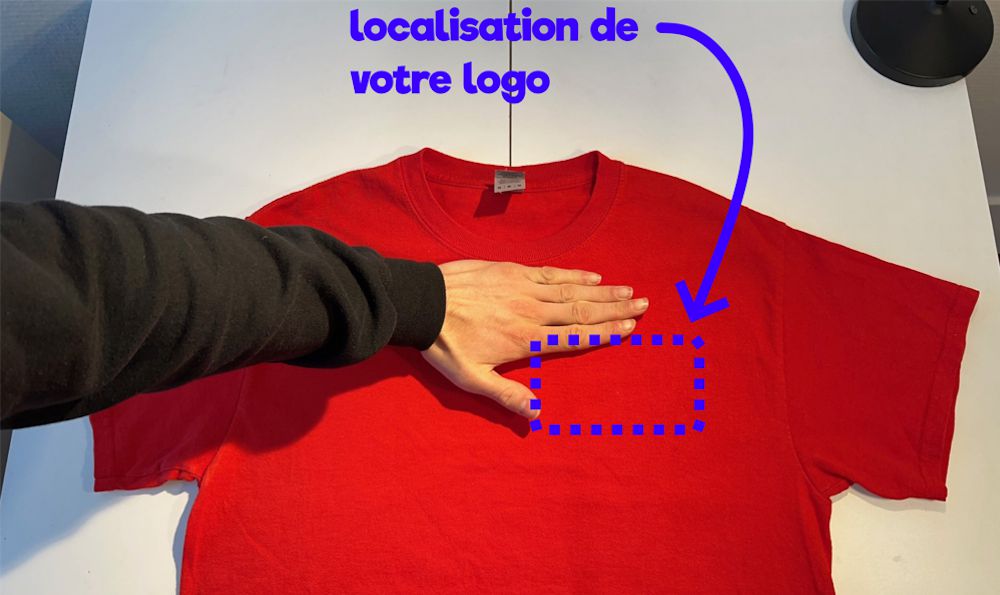
Method 2:
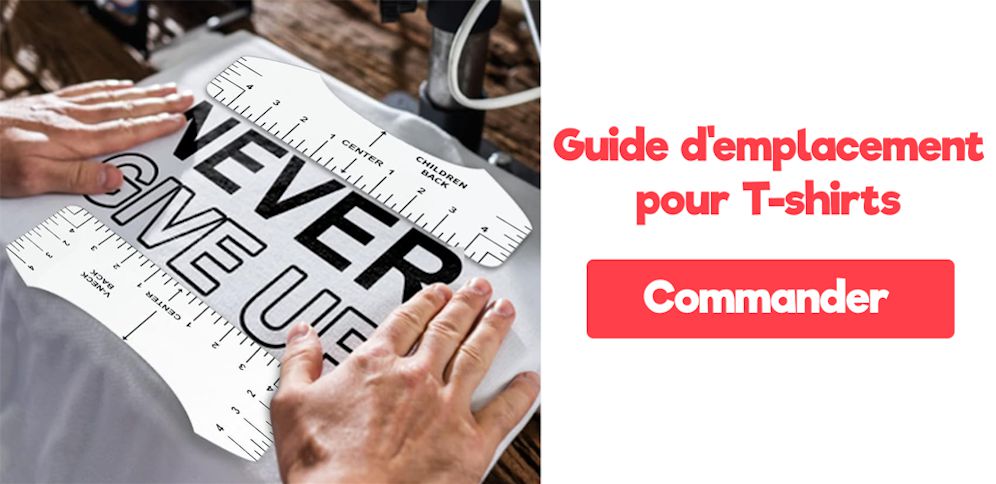
If you're never quite sure where to place your logo, the easiest option is to order a T-shirt placement guide. It can also save you time. ⌛
Just place the guide on your T-shirt to find the exact right placement for your logo.
2 - Press the Logo with Heat
Once your logo is positioned correctly, you can use either your iron or a heat press to apply it to the garment.
A heat press will make your design last longer, but if you're just taking your first steps with heat transfer vinyl, I recommend starting with your iron.
Make sure you're working in a safe area of your home, away from children.
Clear away anything flammable around you, and if you're using an iron, don't press directly on your table. Either press on an ironing board or use an ironing pad to avoid heat marks. ♨️
When you're ready, lay a sheet of parchment paper over the design to protect your T-shirt from the heat, heat your iron to 150°C, and press firmly for 20 seconds.
3 - Remove the Carrier Sheet from the Heat Transfer Vinyl
Wait a few seconds for the heat to dissipate, then peel the clear carrier sheet off the heat transfer vinyl.
4 - Become a Heat Transfer Vinyl Expert
Now you can admire your very first custom design made with heat transfer vinyl! 🤩
To make sure your logo bonds with the fabric and holds up through every wash, place the sheet of parchment paper back over the design and press again for 10 seconds.
See? Making a heat transfer vinyl logo with the Silhouette Cameo machine and customizing a T-shirt isn't that hard after all! 😀
If you'd like to become a heat transfer vinyl expert, you can explore our heat transfer vinyl collection in our shop. (For the curious among you, the vinyl we used in this tutorial is our 3D heat transfer vinyl.)



Comments
No comments yet. Be the first to share your experience.
Leave a comment