

Silhouette Studio software is a real gem for creativity, with a whole range of tools and tricks to help bring your artistic ideas to life.
Today, we're diving into this software to show you everything it can do with fonts!
1 - Changing the Font in Silhouette
To start typing in Silhouette Studio, click the "A" icon on the far left of the screen, then click once inside the Silhouette workspace, and you can type any words or phrases you like.
Silhouette Studio will use your computer's default font. To change the font, click the "A" icon again, but this time the one on the right side of the screen, not the left. Highlight all of your text and choose the font you want.
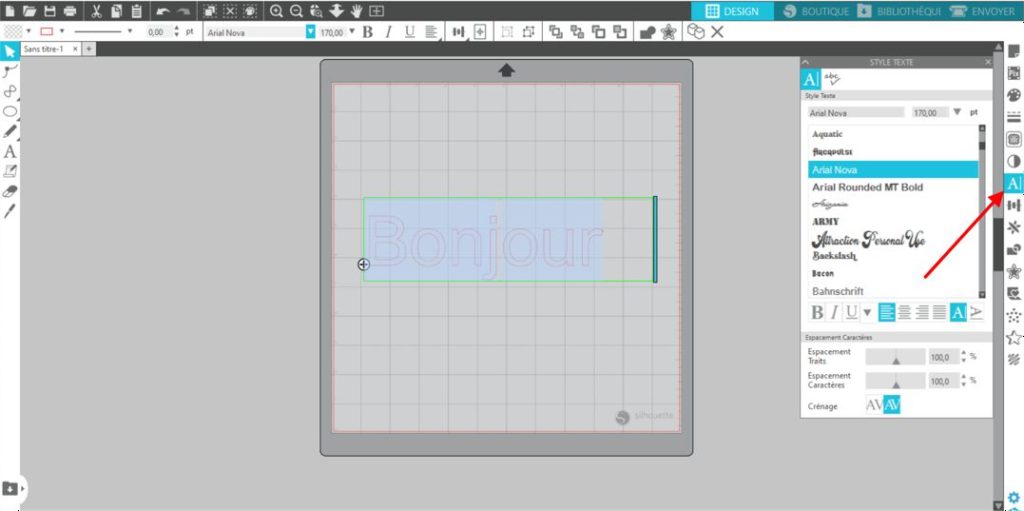
If you want to change the default font in Silhouette so you don't have to click the "A" icon every time during your session, first select the font you want to use under the "A" icon on the right, then click the "A" icon on the left. The software will remember that font, so you can keep typing in it without having to repeat the whole process.
Note: there are two ways to get more fonts. You can download fonts online. For example, the website 1001 Fonts offers thousands of them. Just keep in mind that most are free for personal use only. You can also buy fonts directly in the Silhouette software, but those aren't free and can be pretty pricey!
2 - Character Spacing
Increasing or decreasing the space between letters couldn't be easier:
Click the word you want to edit and highlight it by holding down the left mouse button. Click the "A" icon on the right side of the screen. At the very bottom of the small panel, you'll see a slider labeled "character spacing." Just move this slider up or down to adjust the spacing between characters. You can also type in a percentage with your keyboard (the maximum is 500%, but you'll find that's more than enough!)
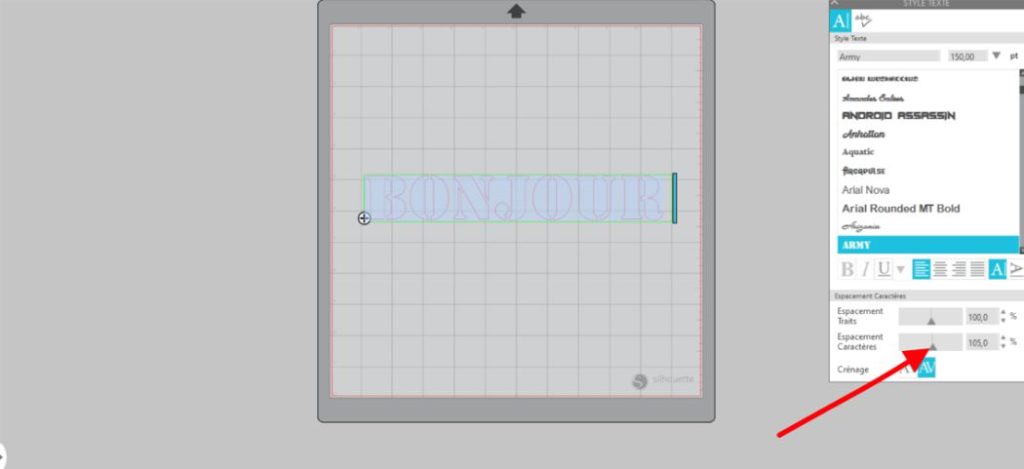
Note: If your text runs over several lines, you can also adjust the spacing between lines with the slider right above it 🙂
3 Silhouette Studio Tutorial - How Do You Make a Thin Font Thicker?
Some fonts, like script fonts, can be a little tricky to cut with your Silhouette Cameo because they're so thin. Let's look at how to make your font thicker so your machine can cut it easily.
Step 1 - Type Your Text
Type your text in the Silhouette grid workspace.
Step 2 - Add an Outline to Your Font:
Click the star-shaped icon on the right side of the screen, then click the text you typed. Now click "OUTLINE" in the small panel that appears and adjust the thickness of the text with the distance slider. Once you're happy with the thickness, click Apply.
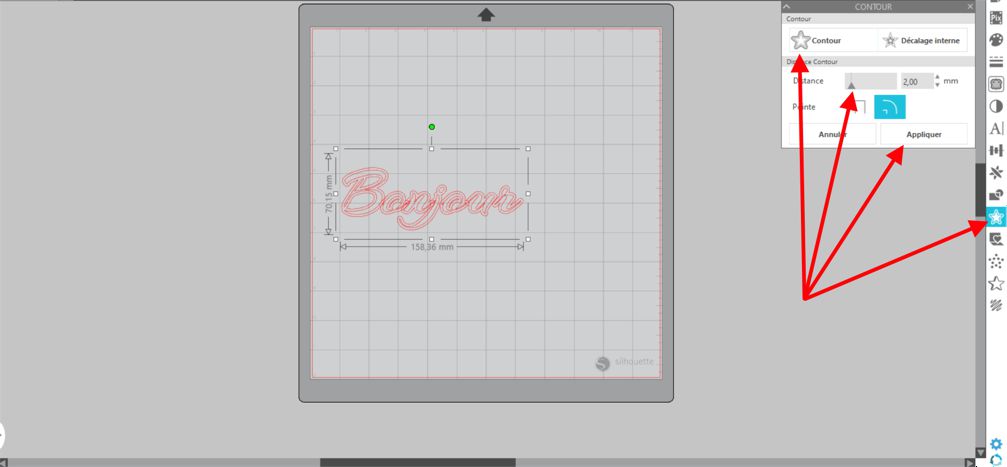
Step 3 - Move or Delete the Original Text
Click and hold your original text to drag it out of the way, and there you go: you now have thicker text.
4 Silhouette Tutorial - Fixing Overlapping Letters
Some fonts have letters that overlap, like in this image, where the O overlaps the N, which overlaps the J.
When you cut your text, the software will take this overlap into account and cut the little overlapping sections too. That means you'll see cut lines, which may not look great on fabric.
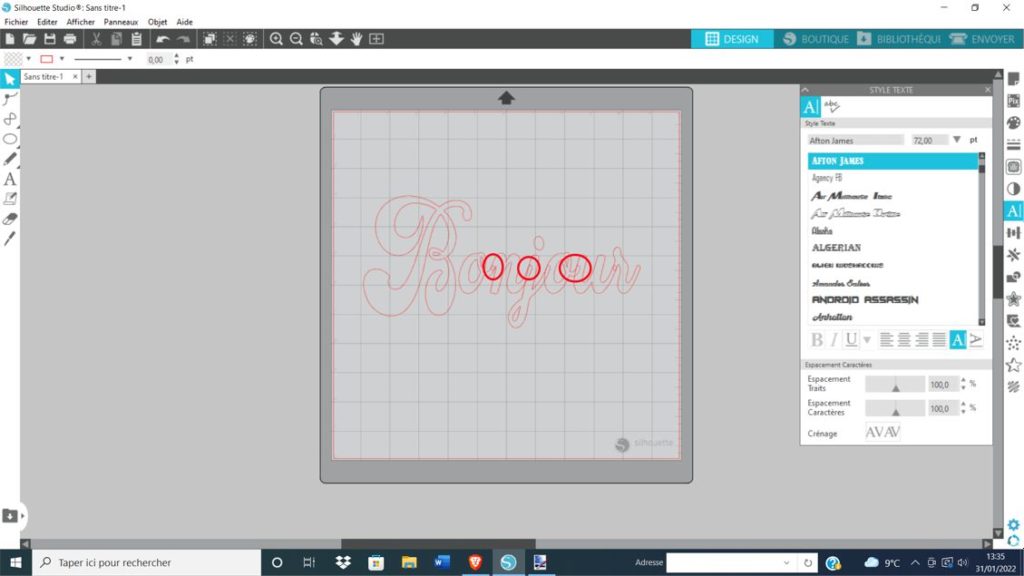
To fix this, click the word, go to the "Modify" window (the one with the circle and the rectangle), then click "WELD," and you'll see the overlap disappear like magic! 🧙
5 - How Do You Curve Text?
Lots of us like to curve our text when creating a design, since it can give it a unique look and style.
Follow these steps to curve your text in the Silhouette Studio software:
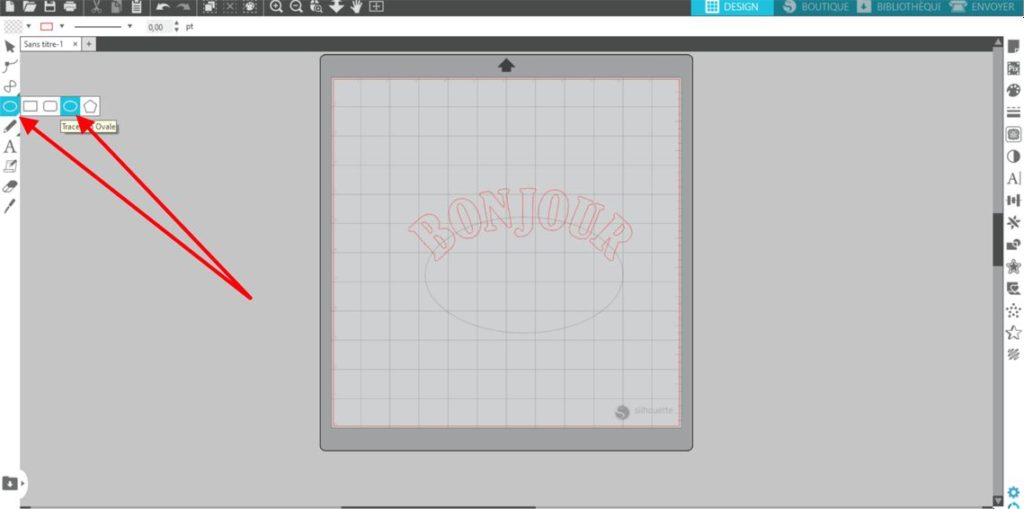
Click the window with the circle on the left side of your screen, choose the circle shape, and use your left mouse button to draw a circle in whatever size you want.
Then just click and hold your text and drag it onto the circle.
Note: as you can see, the circle has turned gray, which means it won't be included when your design is cut.
Heads up: text that's already been welded can't be curved. Curve your text first, then weld it.
6 - How Do You Make a Wave-Shaped Curve?
You can also make text in the shape of a wave.
Click the "Lines" tool on the left side of your screen, then click the icon that looks like an infinity symbol.
Click in the software's grid workspace, then click again to create the wave.
Once your wave is complete, right-click to finish drawing it.
Just like with curved text, click and hold the text you want, then drop it onto one of the curves of the wave you created. Your text will take on the shape of the wave. 😉
Now that you know how to create and edit text in Silhouette Studio, you can make beautiful designs in all kinds of styles!
The text you cut in this Silhouette Studio Tutorial can be used to customize apparel with heat transfer vinyl or to make stickers with adhesive vinyl, and there are plenty of other ways to express your creativity with this software! 🤩
For high-quality custom apparel and stickers made with your Silhouette Cameo machine, you can order gorgeous heat transfer vinyl and adhesive vinyl on our website!





Comments
No comments yet. Be the first to share your experience.
Leave a comment