
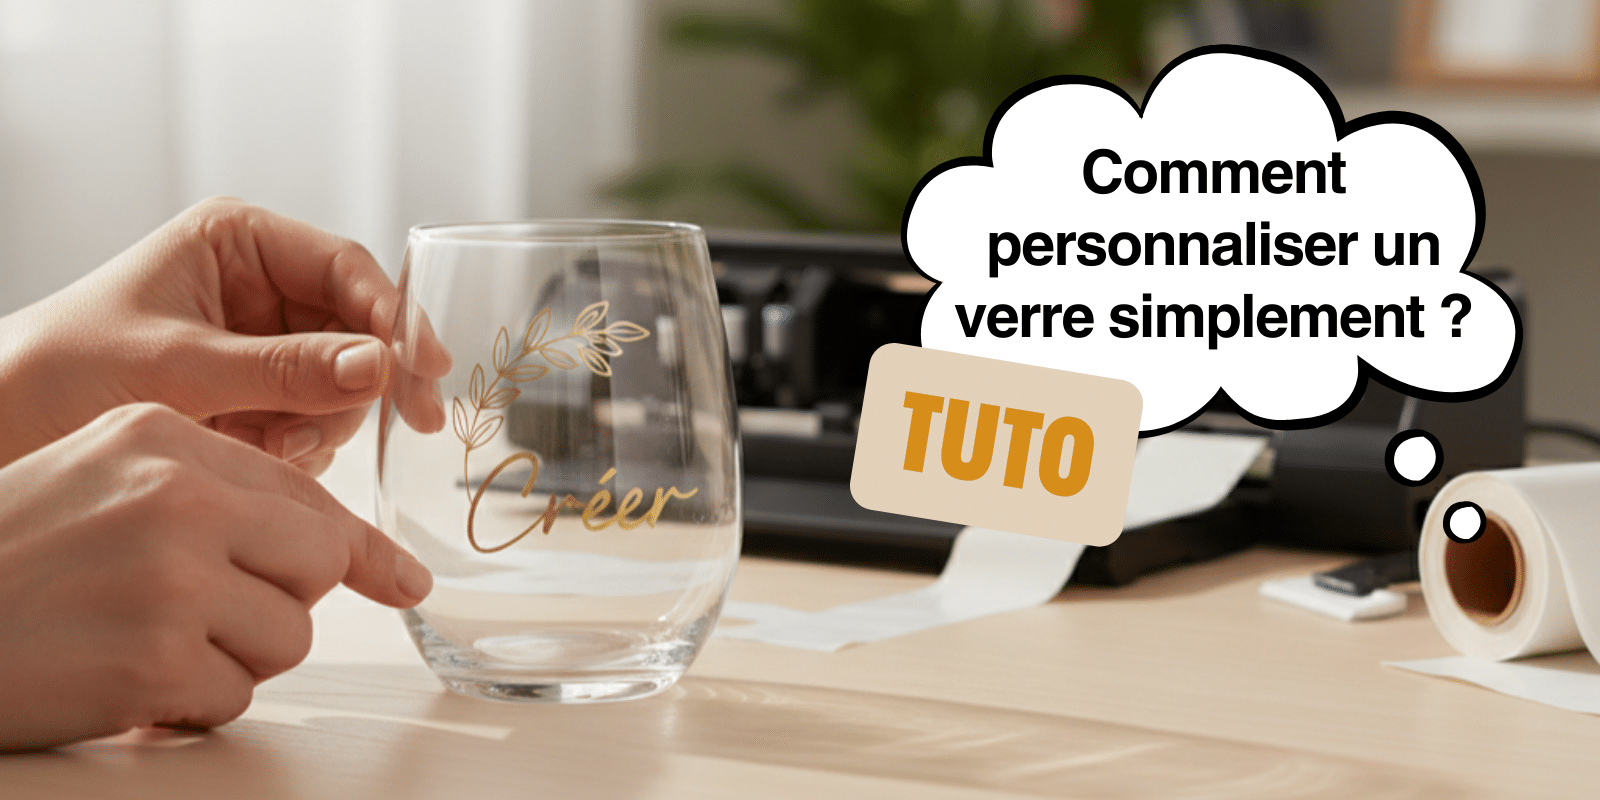
There are objects we use mechanically, without really looking at them. The drinking glass is one of them. Transparent, ordinary, sitting on a table... until an idea pops up: what if this glass became one of a kind?
That's often how a DIY project is born. Not from wanting to make things complicated, but from wanting to create something meaningful. A first name, a sweet word, an important date, a logo... In just a few minutes, a simple glass can tell a story.
Personalizing a glass is one of the most accessible projects when you're getting started with handmade crafts. No need to be an expert or to have a professional workshop. With the right materials, and above all the right adhesive vinyl, the result can be clean, durable and truly impressive.
At Paper Transfer, we support those who want to create easily, without frustration or wasted time. Whether it's to give a gift, decorate a table, mark an event or even launch a small business, personalizing a glass is an excellent way into the world of DIY.
In this article, I'm going to show you how to personalize a glass easily, step by step, even if you're a complete beginner.
1. Why personalize a glass?
Because a glass, at its core, is just... a glass.
But once personalized, its status changes completely. It's beautiful, it decorates the table, it shows a bit of thought... In short, it's always better than a glass with no personality at all!
Personalizing a glass means turning an everyday object into something that carries emotion. A first name displayed for all to see, an important date, a message that makes someone smile at breakfast or over drinks. It's no longer just a container, it's an object that tells a story.
That's also why personalized glasses work every single time (you can take it from my experience!)
For giving gifts, first of all. A personalized glass is a useful, durable and personal present. Unlike a decorative item that ends up on a shelf, this one actually gets used. And with each use, the message is right there.
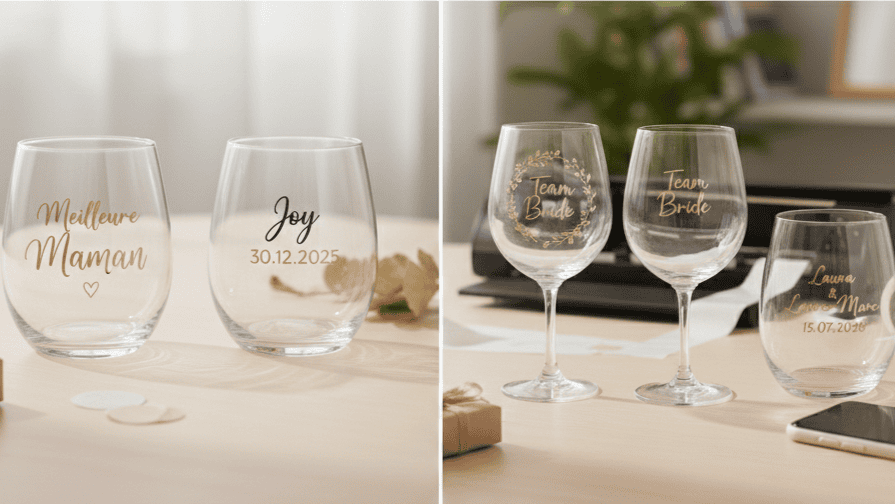
For events, next. Wedding, birthday, bachelorette party, christening, baby shower, end-of-year celebrations... Personalizing a glass lets you create a harmonious, coherent and memorable table without blowing the budget.
But that's not all.
Personalizing a glass is also a great opportunity for a brand, a creator or a small business. A discreet logo, an inspiring message, a visual identity: the glass becomes an elegant and effective communication tool.
And above all, it's a project that's perfect for getting started with DIY.
Little equipment, little risk, a quick learning curve and a result you can see right away. With an adhesive vinyl suited to glass, personalization becomes simple, clean and accessible, even with no experience.
👉 That's exactly why personalizing a glass is often one of the first projects people recommend: easy to do, rewarding, and incredibly effective.
2. What type of glass can you personalize?
Good news: almost any glass can be personalized.
But to get a clean and durable result, some types of glasses are better suited than others, especially when you're just starting out.
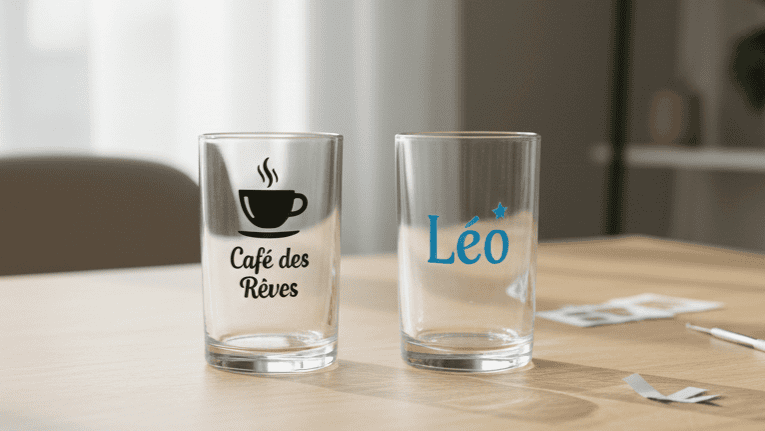
Water glasses
This is the ideal surface to start with.
Generally straight surface, little curvature, good stability: the adhesive vinyl goes on easily and the result is crisp. Perfect for first names, short words or pictograms.
👉 If this is your first project to personalize a glass, start here. It'll make your life so much easier!
Wine glasses and flutes
Very popular for events (wedding, birthday, celebrations), these glasses give an elegant and refined result.
The personalization is often done on the stem or on the upper part of the glass.
Watch out for the curvature though: a simple, well-positioned design is essential to avoid visual distortion.
Things to check before personalizing a glass
Before applying your adhesive vinyl, always take a few seconds to check:
-
That the glass is perfectly smooth
-
That there's no relief, no texture, no existing engraving
-
That the chosen area is flat enough
-
That the glass is clean, dry and grease-free
💡 Tip: the more even the surface, the easier the personalization and the more professional the result.
Personalizing a glass isn't a question of complexity, but of choosing the right surface. By selecting the right type of glass from the start, you give yourself every chance of a flawless result.
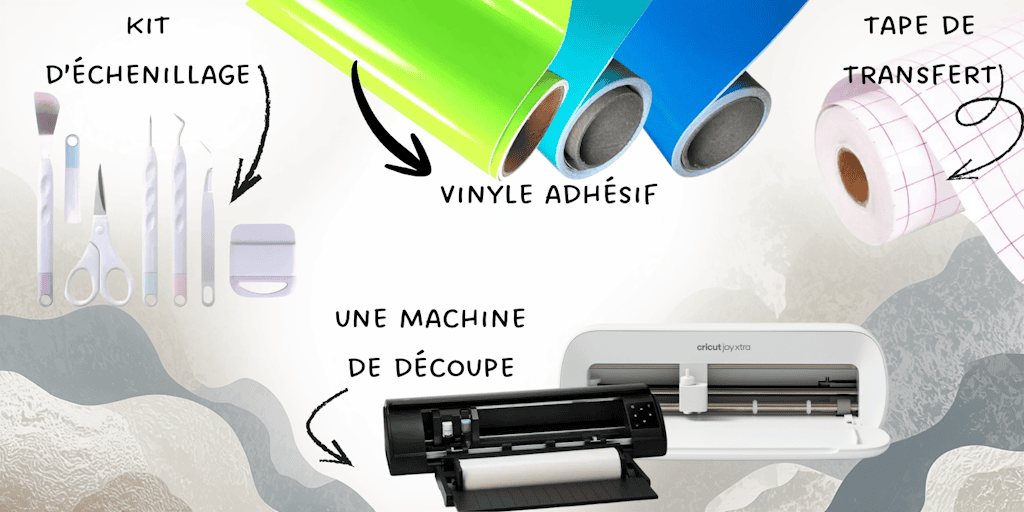
3. The essential equipment for personalizing a glass
The good news when you want to personalize a glass is that there's nothing complicated about it. No need for a professional workshop or heavy investments. With the right materials from the start, the result can be clean, durable and truly high quality.
The glass
Choose a smooth glass, with no relief or built-in pattern.
Water glass, wine glass, flute or glass mug: the key is to have an even surface to make the transfer adhere more easily.
First of all, the glass must be perfectly clean, dry and grease-free. A simple wash followed by careful drying is enough in most cases.
Some adhesive vinyl
This is the element that's going to give the glass all its identity.
First name, word, date, short phrase, logo or symbol: always favor legibility.
On a transparent surface, an overly busy design quickly loses its impact. Simplicity is often what gives the most elegant result.
Not all adhesive vinyls are equal, and even less so on a surface like glass. Using a transfer paper specially designed for rigid surfaces gives you:
-
Better adhesion
-
A crisp and precise result
-
Lasting durability over time
At Paper Transfer, the adhesive vinyls are designed to make DIY easier, even for beginners, while guaranteeing a professional result.
👉 That's clearly what makes the difference between a successful project and a disappointing result.
The cutting machine (Cricut, Silhouette type, etc.)
When you choose to personalize a glass with adhesive vinyl, the cutting machine becomes a real ally.
A machine like the Cricut or the Silhouette Cameo 5 lets you cut text and designs with great precision, even very fine ones. On a transparent surface like glass, this precision is essential to get a clean and legible result.
Thanks to a cutting machine, you can:
-
Create perfectly crisp first names
-
Use fine or elegant typography
-
Cut detailed logos or designs
-
Save time on preparation
-
Reproduce the same design identically
👉 It's entirely possible to cut adhesive vinyl by hand, but for a professional, durable and consistent result, the cutting machine remains the most comfortable solution, especially if you're a beginner or if you're working through several glasses in a row.
Useful tools
To finish the personalization in good conditions, plan for:
-
A scraper (or a flexible card) for smoothing
-
Some transfer tape (to transfer your design onto your glass)
-
A clean, dry cloth
💡 Tip from Paper Transfer: working calmly, on a clean surface, changes everything. DIY isn't about speed, it's about precision.
With this equipment, you have everything you need to personalize a glass easily and get a result worthy of a professional product (and yes, you'll never want to buy ready-made personalized glasses from the store again!).
4. How to personalize a glass step by step
This is where it all takes shape. No need to rush or force anything. By following these steps in order, personalizing a glass becomes a real moment of pleasure, with a clean and professional result.
Create your design
Even before thinking about cutting, take a few minutes to think about your visual.
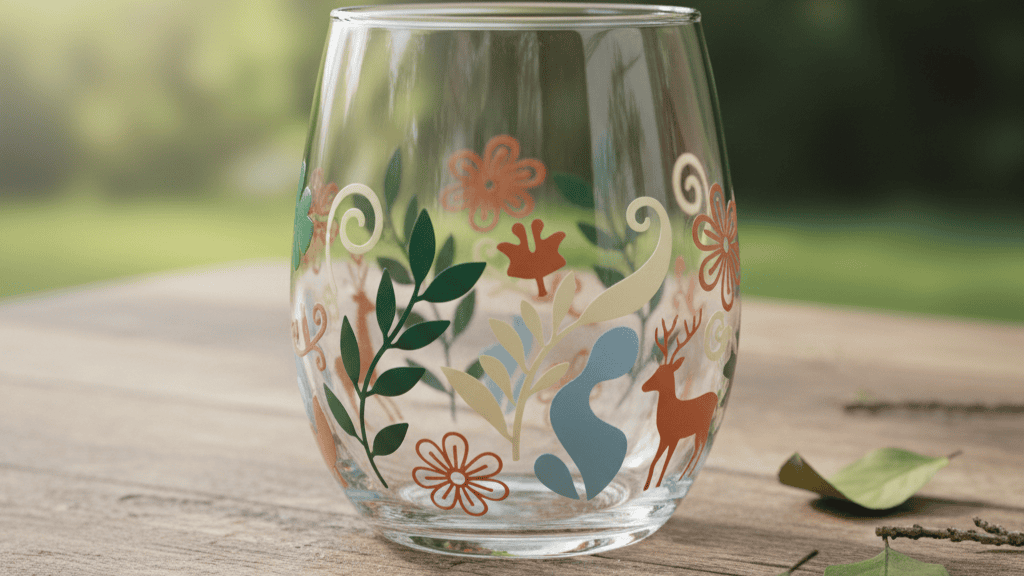
On a glass, the less there is, the better (which, of course, is just my personal opinion). A well-centered first name, a short word, a date or a simple symbol will always have more impact than an overly busy design.
Think about contrast too. The glass is transparent, so favor visible colors and legible typography. The goal is for the message to be immediately identifiable, even from a distance.
💡
Tip: visualize the result directly on the glass before printing. It avoids a lot of mistakes.
Cut your adhesive vinyl
Start the cut with your smart cutting machine (and yes, new technology is really nice, it makes life a fair bit easier!), but if you don't have one, you can always use scissors or a craft knife for simple designs.
Follow the instructions provided for your chosen adhesive vinyl to the letter (pressure, etc.).
Apply the adhesive vinyl to the glass
The moment you've been waiting for!
Weed your design using a weeding kit (if you don't have one, weeell, good luck! On fairly large designs it's relatively simple, but on small designs it's still tedious without the right tools).
Once your design is cleaned of all residue, use some transfer tape. Cut a size suited to your design, stick it on top, and then remove the backing that's underneath your adhesive vinyl. All you have to do now is place it gently on your glass (always take your time, because a crooked design will show right away, and then you'll have to start all over again!). Once your design is placed on your glass, smooth it gradually from the center outward.
5. Common mistakes to avoid when personalizing a glass
Personalizing a glass is simple... as long as you avoid a few classic mistakes. Good news: they're easy to anticipate once you know where to look.
Choosing an unsuitable glass
A glass with relief, built-in patterns or an uneven surface will inevitably make applying the adhesive vinyl harder. The result: bubbles, peeling or a sloppy finish.
👉
Always favor a smooth, even glass, especially for a first project.
Using an adhesive vinyl not suited to glass
This is the most common mistake.
Not all adhesive vinyls are made for rigid surfaces, and even less so for glass. On top of that, some are simply repositionable (not great to realize once the project is finished).
An unsuitable adhesive vinyl can lead to:
-
Poor adhesion
-
Blurry outlines
-
Limited durability over time
At Paper Transfer, every adhesive vinyl is designed for daily use (and excellent durability over time). Respecting this compatibility is already 80% of the job well done.
Neglecting the preparation of the glass
A poorly cleaned glass, with traces of grease or dust, will prevent the adhesive vinyl from adhering properly.
Before personalizing a glass, always take the time to:
-
Wash the glass
-
Dry it perfectly
-
Degrease it if necessary (dish soap and hot water do the trick)
This little detail makes a huge difference to the final result.
Choosing an overly busy design
On a transparent surface, too much information hurts legibility.
An overloaded design loses impact and often gives a less elegant result.
👉
Golden rule: simplicity = effectiveness.
Going too fast
DIY doesn't like rushing.
Positioning the visual badly, ending up with loads of tiny bubbles... That's really not great!
Taking your time, following the steps and respecting the recommended times is the key to a successful and durable personalized glass.
Avoiding these mistakes means ensuring a clean, crisp and professional result, even without experience.
6. Ideas for personalizing glasses
If you're short on inspiration, don't worry: the possibilities for personalizing a glass are almost endless. It all depends on the message you want to convey and the emotion you want to create.
To give a personalized gift
A glass with a first name, a date or a little message is a simple but always effective gift.
It's the kind of thoughtful gesture that shows you took the time to create something especially for that person.
Ideal for:
-
Birthday
-
Mother's Day or Father's Day
-
Christmas
-
Last-minute handmade gift
For an event
Wedding, bachelorette party, christening, baby shower or birthday: the personalized glass becomes a real decorative element.
Each guest can leave with their own glass, turned into a lasting keepsake of the event. It's beautiful, useful and memorable all at once.
💡 Tip: first name + date = winning combo.
For the home and decor
Why save personalization for big occasions?
A glass with an inspiring word, a minimalist symbol or elegant typography can fit perfectly into interior decor.
It's a discreet way to bring a personal touch to your daily life.
For a brand or a professional business
The glass is also an excellent communication tool.
A discreet logo, a slogan, an inspiring message: it can reinforce a brand's visual identity while staying elegant.
It's an interesting option for:
-
Client gifts
-
Photo shoots
-
Social media content
-
Selling personalized products
With a suitable transfer paper, the result can be high quality enough for professional use.
Personalizing a glass isn't just about decorating an object. It's about creating something that carries emotion, a memory or a brand image, accessible to everyone.
Personalizing a glass is much more than just a DIY project. It's a simple and accessible way to turn an everyday object into a unique creation, full of meaning.
With the right surface, a well-thought-out design and above all an adhesive vinyl suited to glass, it's entirely possible to get a clean and durable result, even without experience. Whether it's to give a gift, decorate an event, personalize your home or grow a creative business, the glass is a versatile and effective surface.
At Paper Transfer, the goal is clear: to make personalization accessible to everyone, without unnecessary complexity. By choosing the right materials and following the right steps, DIY becomes a real pleasure... and a result you can be proud of.
There's only one thing left to do: take action and create your first personalized glass.
FAQ: Personalizing a glass
Does the personalization on a glass withstand washing?
Yes, as long as you use a transfer paper suited to glass and respect the drying times. To extend its lifespan, it's recommended to favor hand washing.
Is this a project suitable for beginners?
Absolutely. Personalizing a glass is one of the simplest DIY projects to start with. With a smooth glass and a good transfer paper, the result is quick and very rewarding.
Which paper should you use to personalize a glass?
It's essential to use a transfer paper designed for rigid surfaces, specifically compatible with glass. That choice is what guarantees the adhesion and the crispness of the result.
Can you personalize a curved glass?
Yes, but with a simple, well-positioned design. The more curved the surface, the more important it is to avoid visuals that are too large or too detailed.
How long does it take to personalize a glass?
Counting the printing, the application and the drying, personalizing a glass can be done in under an hour. It's a quick project, ideal even when you don't have much time.


