

Learn all about using fonts in Silhouette Studio!
This complete guide to fonts will show you how to add your fonts to the Silhouette Studio software, how to choose the best fonts for your projects, and how to edit and work with them on your Silhouette Cameo. 🤩
Which Fonts Can I Use with My Silhouette?
You can find tons of free and paid fonts online, and you can use any of them with your Silhouette Studio software.
If a font can be installed on your computer, the software will let you use it for cutting. There are, however, a few things to keep in mind that will make a BIG difference:
✔️ Free Fonts
Free fonts are great, but be careful: they're a very common way to spread computer viruses and other malware to your computer 💻. Make sure you only download free fonts from highly reputable sources. It costs a lot more to get rid of a computer virus than to buy high-quality font files.
Dafont and 1001 Fonts are reputable websites that offer free fonts for personal use.
✔️ What Type of Font Do You Need?
If you're making things for your own personal use, any font will do!
If you plan to sell your creations (even just to friends and family), you need to use fonts that come with a commercial-use license. You can still find free fonts for commercial use, but most of them are paid. 💸
How Do I Add Fonts to the Silhouette Studio Software?
Now that you know all about fonts, all that's left is to get the fonts you've chosen into your Silhouette Studio software. The good news is that this part is EASY!
Step 1️⃣: Close Silhouette Studio if it's open.
Step 2️⃣: Download the font you want by clicking "Download" on a font website (the example below shows the Dafont site).
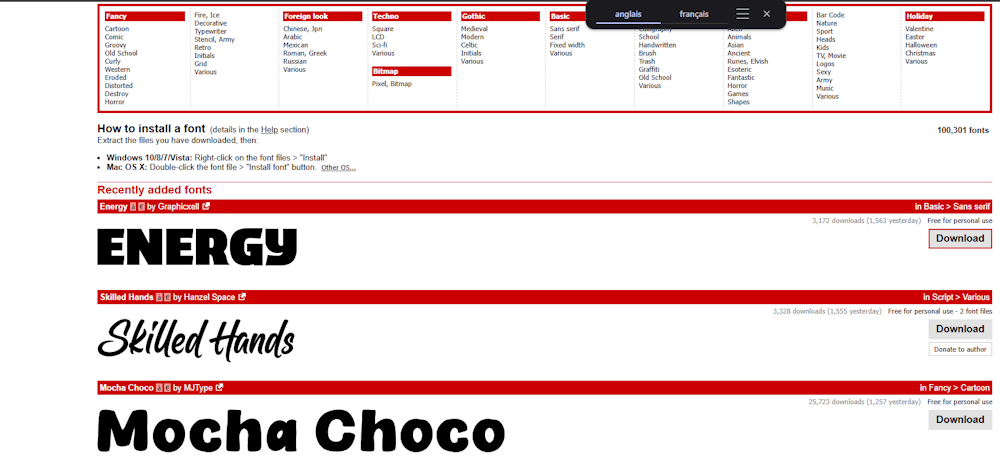
Step 3️⃣: Install the font on your computer (NOT in Silhouette Studio). The font file is usually compressed, so you'll need to unzip the folder (by clicking on it) and then open the unzipped folder.
Once that's done, find the font file you want and double-click to open it. When your font's window opens, click the "Install" button, usually located at the top left of the window.
Step 4️⃣: Once the font is installed, open Silhouette Studio. Click the font icon, and your new font will appear in the font menu! (See the image below for reference.)
Troubleshooting: In very rare cases, the font still doesn't show up, even after restarting Silhouette Studio. If that happens, try these steps:
Check the font name. Sometimes a font's name appears differently in the software. Find the font on your computer by going to your font settings, and check what it's called.
Restart your whole computer. This usually isn't necessary, but if you're having trouble getting the font to show up, restarting can help the Silhouette Studio software list your font. 👍
How Do I Edit Text?
Open the Silhouette Studio software. The text tool is on the left side of the screen. Click the "A" and type your text.
Your text starts out in a default font, but you can swap it for any font installed on your computer. Change the font using the Text Style panel or the drop-down menu at the top of the screen.
You can change the font size in Silhouette Studio using the drop-down menu at the top of the screen, or by dragging the corners of the text box to make it bigger or smaller.
To edit text you've already typed, double-click inside the text box and a cursor will appear. You can then edit the text just like you would in a word processing program. 😀
How Do I Use Script Fonts?
Script fonts are a popular style in the Silhouette software. When you type with a script font, you need to take one extra step before cutting. Because of the way these fonts are designed, each letter overlaps the next, which makes the cut lines overlap too.
To get rid of this overlap and cut your text as a single piece, you need to join the letters together using the Weld tool on the right side of your screen (the blue icon in the image below). Then click "Weld" ("Souder" in the French version) to make the overlapping lines disappear.
How Do I Create Curved Text?
Curved text comes in handy when you're making things like labels or round vinyl decals.
To curve text around a circle, first draw a circle (using the circle icon on the left side of Silhouette Studio). Then type your text next to the circle.
Next, select the text by double-clicking it and drag it onto the circle until it snaps into place. It's that simple! 😉
We hope this post has helped you learn more about fonts and creating text in the Silhouette Studio software.
If you're in the mood to take on some custom apparel projects, take a look at the heat transfer vinyl we offer in our shop!




Comments
No comments yet. Be the first to share your experience.
Leave a comment