Ti sarà sicuramente già capitato di chiederti: quale materiale usare per la stampa su tessuto?
🤔
✨
Sono sicura che ti è già capitato di vedere in giro per casa una t-shirt bianca, una felpa o una tote bag, e che sogni di aggiungerci un tocco personale: il tuo nome, una frase ispirante o magari un logo che spacca. L'idea c'è, ma c'è sempre una domanda che torna: "da cosa comincio?"… ma soprattutto, **quale materiale usare per la stampa su tessuto?
😅**
In tanti pensano che la stampa su tessuto sia riservata ai professionisti, che richieda materiale costosissimo o macchine complicate. Eppure è totalmente FALSO! Con qualche strumento di base, ma di qualità, puoi già creare pezzi unici, sia per te, sia da regalare o magari per iniziare a vendere le tue creazioni!
Allora resta con me, ti guiderò passo dopo passo. Vedremo insieme cos'è esattamente la stampa su tessuto (promesso, è semplicissima
😉
) e soprattutto quale materiale usare per la stampa su tessuto per iniziare bene senza svenarti.
Che tu sia un principiante curioso o un creativo appassionato, scoprirai che la stampa su tessuto è una tecnica accessibile e piena di possibilità
✨
!
1. Cos'è la stampa su tessuto?
Prima di chiederti quale materiale usare per la stampa su tessuto, bisogna anzitutto capire di cosa si tratta esattamente.
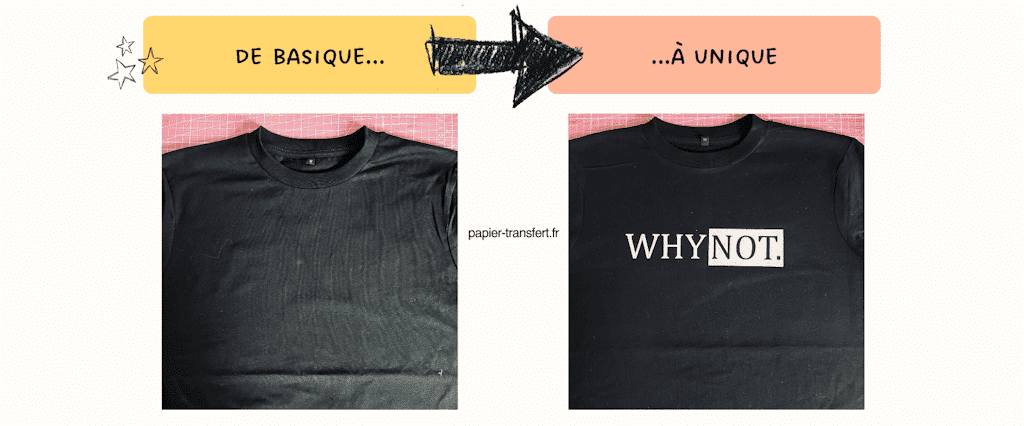
La stampa su tessuto è una tecnica di personalizzazione che consiste nel ritagliare un motivo in flex termoadesivo, per poi trasferirlo su un tessuto grazie al calore (con un ferro da stiro o una pressa a caldo). Risultato: il tuo design dura (grazie alla colla del termoadesivo) nel tempo
⏳
, resiste ai lavaggi e dà una resa professionale, anche se lavori da casa tua.
È il metodo ideale per personalizzare:
-
t-shirt per i bambini o per un evento
-
tote bag per regali originali
-
felpe o cappellini con un logo
Quando ho scoperto questa tecnica per la prima volta, pensavo fosse riservata alle grandi marche di sport o ai laboratori specializzati.
In realtà, il principio è semplice, e soprattutto accessibile a tutti. Ciò che cambia tutto non è la difficoltà della stampa, ma usare il giusto materiale di base per riuscirci fin dall'inizio (ed evitare di scoraggiarsi).
Ed è proprio questo che vedremo insieme: quale materiale usare per la stampa su tessuto senza stress e senza sprechi!
3-2-1… Si parte!
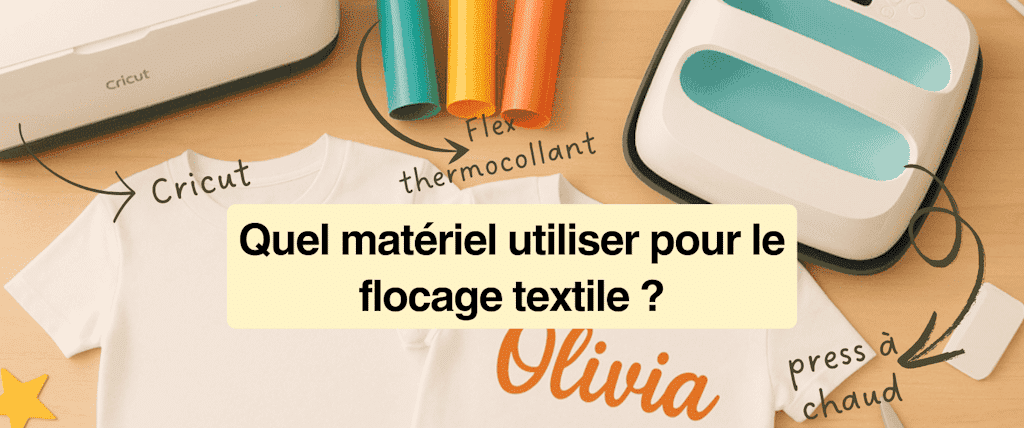
2. Quale materiale usare per la stampa su tessuto?
✂️
Ora che sai cos'è la stampa su tessuto, passiamo alla domanda essenziale: quale materiale usare per la stampa su tessuto quando si inizia? Tranquillo, non hai bisogno di un laboratorio degno di una fabbrica, bastano pochi strumenti per lanciarti (potrai investire un po' alla volta in tutti i flex termoadesivi che ti fanno venire l'acquolina
🤤
) .
Con soltanto questi 5 elementi puoi già personalizzare i tuoi primi tessuti e ottenere una resa davvero soddisfacente. È il tuo kit di sopravvivenza per lanciarti nella stampa su tessuto!
💪
E se preferisci un pacchetto di avvio completo invece di acquistare ogni articolo alla volta, abbiamo il kit perfetto per te! Trova il nostro pack per iniziare con il tessile come un pro proprio qui!
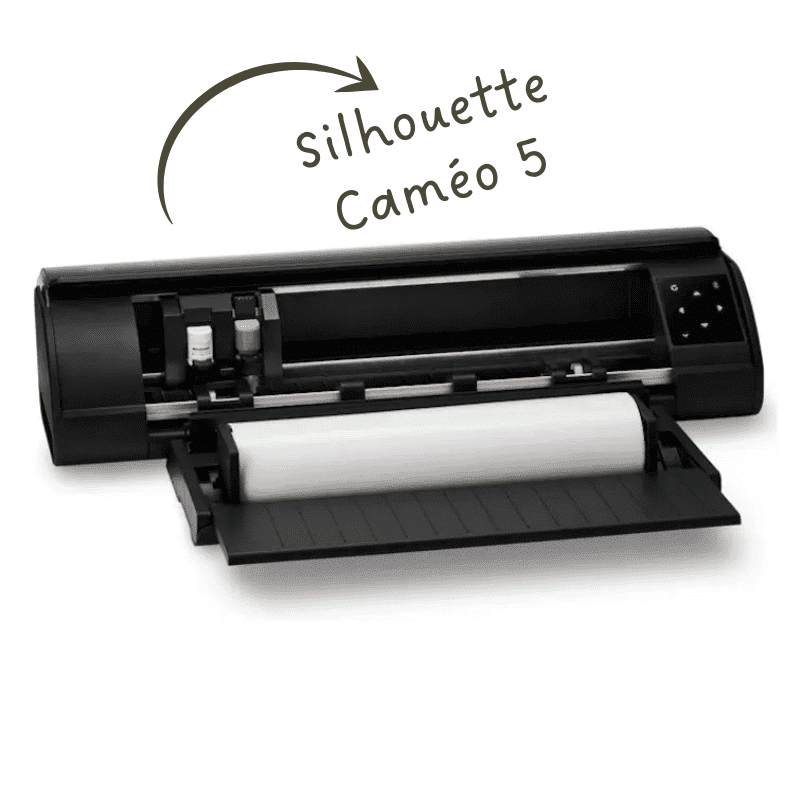
Una macchina da taglio
È l'elemento centrale. Permette di ritagliare il tuo motivo nel flex termoadesivo con precisione. Le marche più conosciute sono la Cricut e la Silhouette. Non serve prendere il modello più costoso fin dall'inizio, una macchina di base va più che bene per provare e imparare (se sei indeciso tra le varie Cricut ho creato un articolo fatto PER TE! Lo trovi proprio qui).
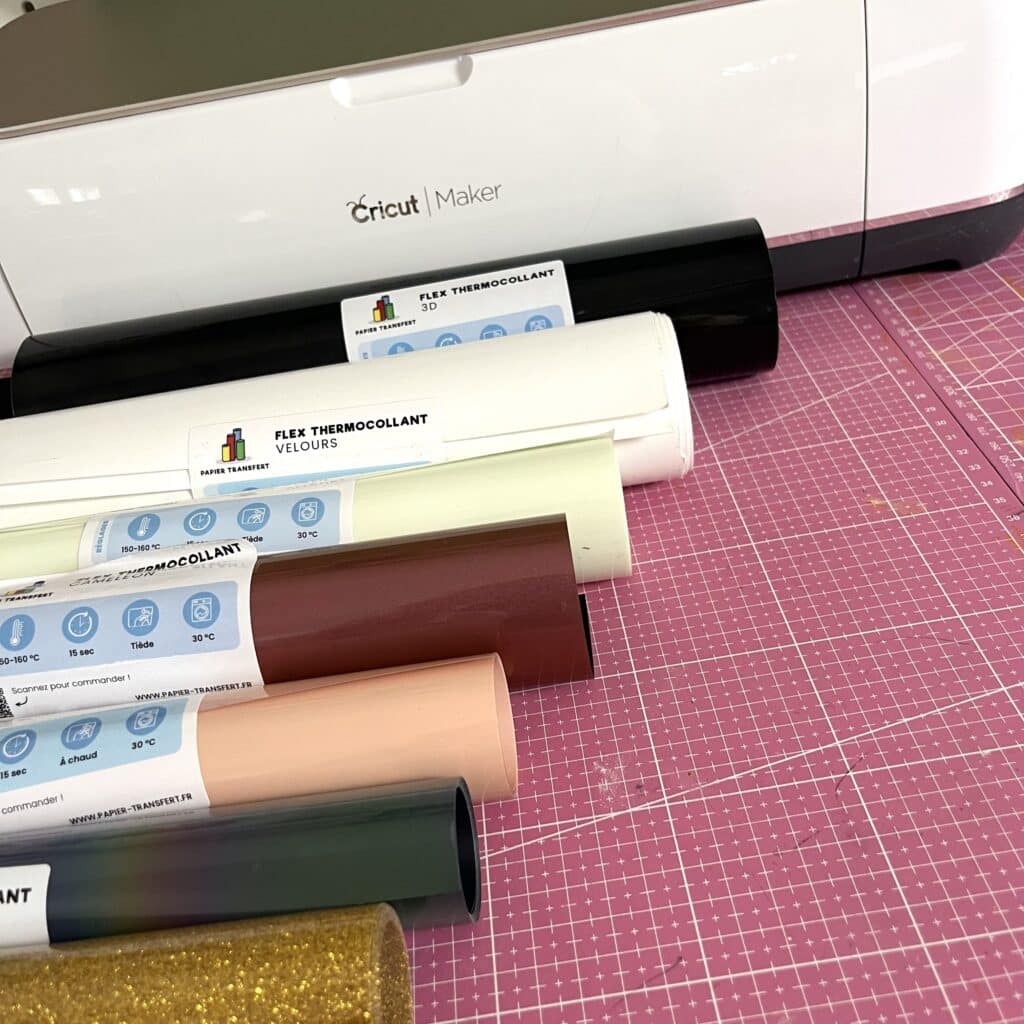
Il flex termoadesivo
È la star della stampa su tessuto! Esiste in diversi stili: opaco, glitterato ( per mettere un po' di glitter nella tua vita
😅
), olografico, effetto velluto… ( e molto altro ancora!) Puoi divertirti a variare le rese in base ai tuoi progetti.
Piccolo consiglio: inizia con un flex di qualità Premium basico, sarà più semplice da ritagliare e da applicare ( puoi anche aiutarti con una spatola per applicare il tuo flex come si deve sul tappetino).
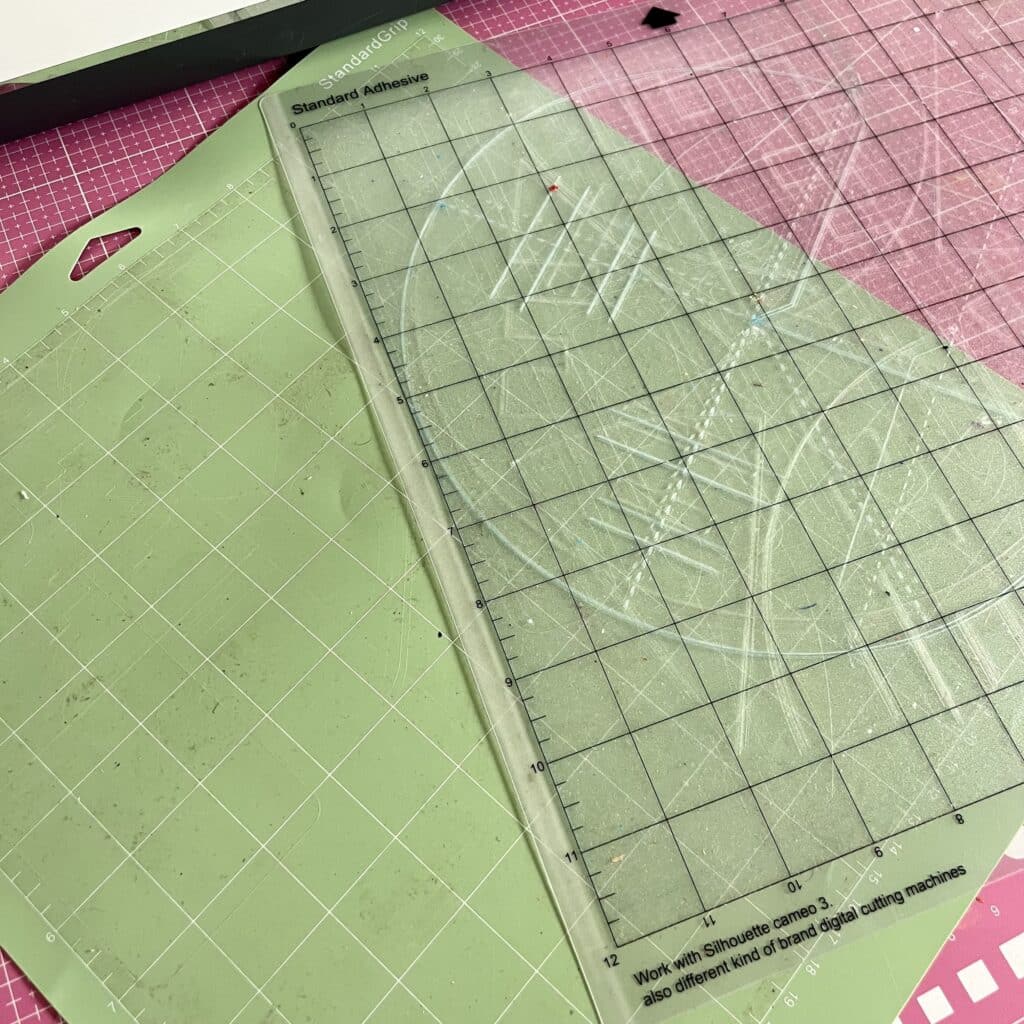
Il tappetino da taglio
Indispensabile affinché il tuo flex termoadesivo resti ben fermo nella macchina da taglio. Scegli in base alla tua macchina (tappetino da taglio Cricut o anche tappetino da taglio Silhouette Cameo) ma anche in base alle dimensioni. E per la gamma Cricut, scegli in base al suo livello di adesività (è il colore del tappetino che lo determina).
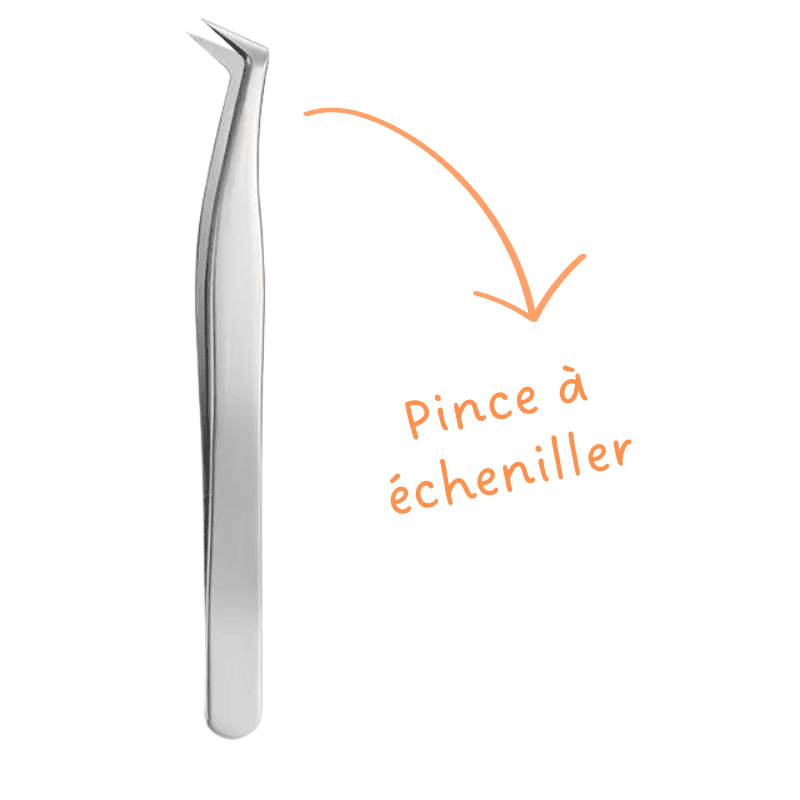
Una pinzetta per la scartavetratura
È lo strumento che ti permette di togliere le piccole parti di flex termoadesivo in eccesso dopo il taglio. Sembra una cosa da niente, ma senza di lui rischi di strapparti i capelli su certi dettagli minuscoli !
😅
Quindi, non rinunciare a questa pinzetta per la scartavetratura!
Una fonte di calore: ferro da stiro o pressa a caldo
-
Ferro da stiro: perfetto per iniziare con un piccolo budget. Funziona, ma bisogna essere precisi con la temperatura e la pressione (ricordati di non usare il vapore). Quindi sì, ma attenzione a non bruciare il tuo capolavoro!
-
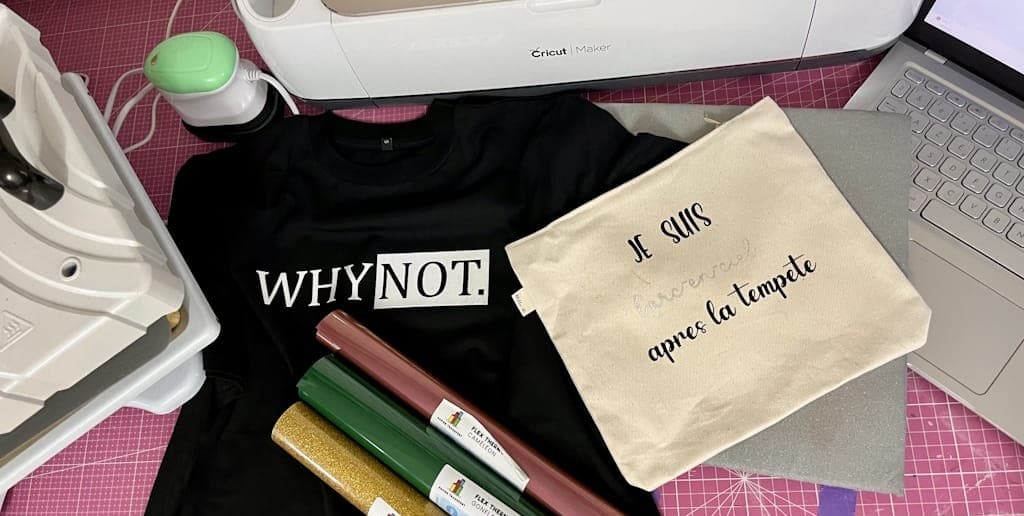
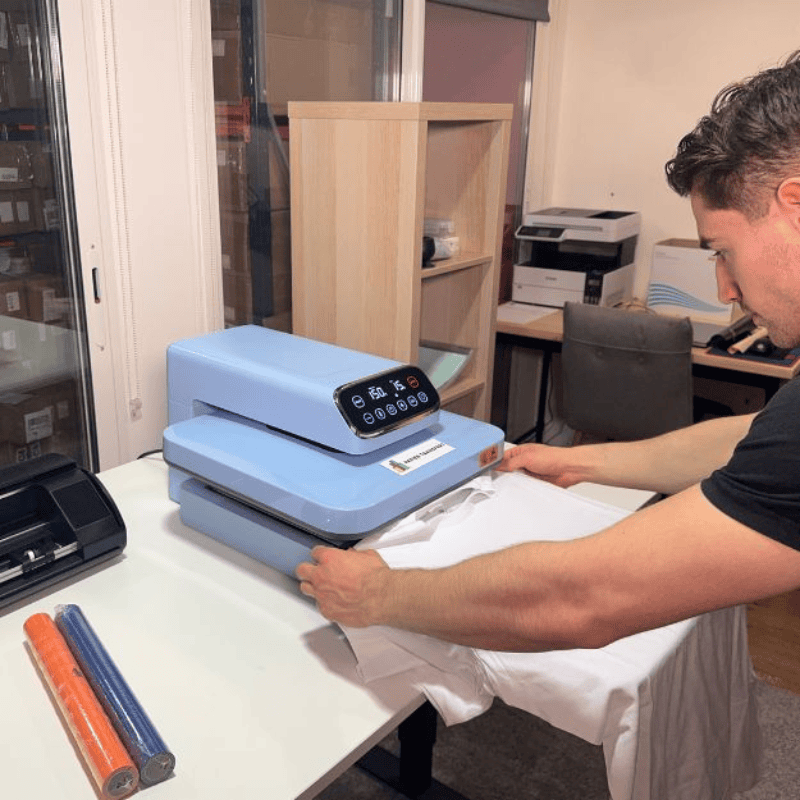
Pressa a caldo (quella che usa Tim nella foto
😊
): lo strumento dei pro ma anche degli appassionati di DIY come noi. Assicura una temperatura e una pressione costanti, ma soprattutto uniformi, per una resa impeccabile e duratura.
Puoi iniziare con un ferro da stiro, ma non appena vuoi produrre più regolarmente, la pressa a caldo diventa una vera comodità. Guadagni in precisione, in rapidità e soprattutto, i tuoi motivi resistono molto meglio ai lavaggi.
3. I bonus che cambiano tutto
Abbiamo visto quale materiale usare per la stampa su tessuto quando si inizia. Ma siamo onesti: ci sono anche dei piccoli strumenti bonus che non sono indispensabili all'inizio, ma… che, diciamolo, ti faranno guadagnare tempo, miglioreranno la qualità e… ti semplificheranno la vita.
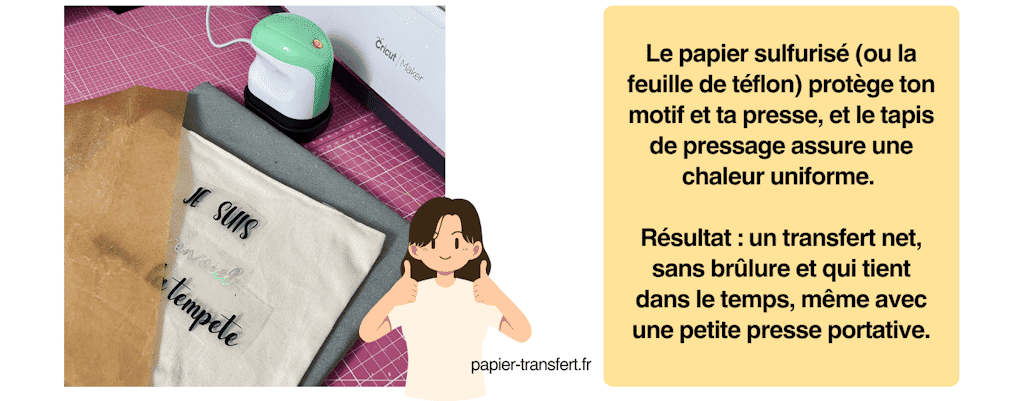
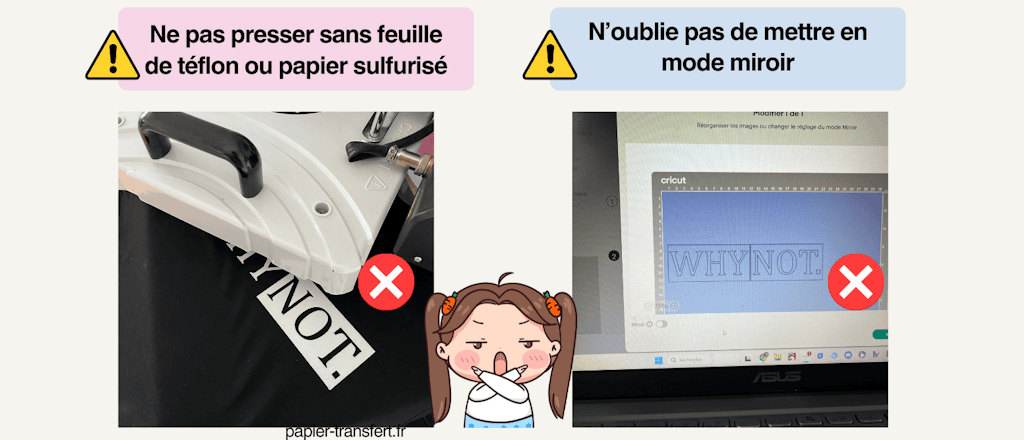
Il foglio di teflon
Il foglio di teflon è una protezione da mettere tra la tua pressa (o il tuo ferro) e il tuo motivo. Evita che il termoadesivo si attacchi o bruci, e prolunga la durata delle tue creazioni. Personalmente, la prima volta che mi sono dimenticata di metterlo… mi sono ritrovata un bel termoadesivo fuso attaccato sulla piastra del ferro
😅
(se capita anche a te, aspetta che si raffreddi completamente per rimuoverlo. Sarà molto più semplice da togliere!).
Trucchetto: se non hai ancora un foglio di teflon, la carta da forno sarà la tua alleata!
Un righello di centratura o una guida di allineamento
Perché un motivo posizionato male può rovinare un intero progetto. Questo righello di centratura ti permette di posizionare le tue creazioni sempre nel punto giusto (ideale per le t-shirt, per esempio).
Dei tessuti "di prova"
Prima di stampare il tuo capo preferito, è meglio allenarti su delle t-shirt basiche, o magari sul tuo grembiule da cucina. Questo ti permette di prendere confidenza e di testare diverse impostazioni senza stress (e di non piangere la tua felpa preferita
😭
).
Tappetino di pressatura
Il tappetino di pressatura si mette tra la tua pressa e il tuo tessuto per distribuire il calore e la pressione in modo uniforme. Protegge sia il tuo tessuto sia il tuo flex, evita i segni indesiderati e assicura un trasferimento netto e duraturo.
PS: il tappetino di pressatura è utile solo se usi una pressa portatile, se usi la pressa a caldo Automagic non ne avrai bisogno!
Questi strumenti non sono obbligatori, ma credimi, fanno tutta la differenza una volta che prendi gusto alla stampa su tessuto. Trasformano un'esperienza a volte un po' approssimativa in un vero piacere creativo.
✨
👉
Ora che abbiamo visto quale materiale usare per la stampa su tessuto, vedremo insieme gli errori frequenti dei principianti da evitare per non perdere tempo (e soprattutto soldi)!
4. Gli errori frequenti da evitare
Quando ci si lancia nella stampa su tessuto, facciamo tutti gli stessi piccoli errori. Ed è normale! Ma se vuoi evitare di perdere tempo (e a volte soldi), ecco le trappole più comuni da evitare.
**❌**Dimenticare di mettere il taglio in modalità specchio
Può sembrare una sciocchezza, ma è un errore molto frequente! Il flex termoadesivo si ritaglia con il lato stampato o lucido rivolto verso il basso, quindi se dimentichi di attivare la modalità specchio prima del taglio, il tuo motivo o il tuo testo risulterà invertito una volta trasferito sul tessuto.
😬
Risultato: il tuo nome, il tuo logo o la tua frase sarà al contrario… e bisognerà rifare tutto. Per evitare questo passo falso, ricordati sempre di attivare la modalità specchio prima di avviare il taglio, soprattutto per i testi o i design asimmetrici.
**❌
Scegliere tessuti di scarsa qualità**
Puoi avere il miglior termoadesivo del mondo, ma se la tua t-shirt è troppo sottile o tagliata male, la resa non sarà mai al top. Investi fin dall'inizio in tessuti decenti: cambia tutto a livello di risultato e di durata.
**❌
Gestire male la temperatura e il tempo di riscaldamento**
Troppo caldo? Il tuo termoadesivo si scioglie. Non abbastanza caldo? Non si attacca bene. È uno degli errori più frustranti. Il segreto: leggere bene le indicazioni fornite con il tuo termoadesivo (ogni tipo ha le sue impostazioni precise).
Da Paper Transfer, tutte le informazioni di riscaldamento sono sulla pagina prodotto di ogni flex!
**❌
Voler andare troppo veloce**
Non vedi l'ora di vedere il tuo motivo sul tuo tessuto? Ti capisco. Ma fare in fretta la scartavetratura o incollare il tuo design storto dà rapidamente una resa amatoriale. Prenditi il tuo tempo, ogni passaggio conta.
**❌**Stirare sul termoadesivo dopo il lavaggio
In tanti pensano che basti stirare direttamente sul motivo per togliere le pieghe del capo. Cattiva idea! Il calore del ferro può far sciogliere o scollare il flex, anche dopo diversi lavaggi.
Anche stirare il capo al rovescio non garantisce sempre la sicurezza del motivo: se la temperatura è troppo elevata o se resti troppo a lungo nello stesso punto, il flex può comunque staccarsi, soprattutto i flex sottili o glitterati.
👉
In breve: resta semplice, scegli del buon materiale e rispetta le basi. Questi errori sono facili da evitare se sai dove fare attenzione.
E per aiutarti a partire bene, ora condividerò qualche consiglio pratico che farà tutta la differenza.
5. Consigli pratici per iniziare bene
Ora che sai quale materiale usare per la stampa su tessuto e quali errori evitare, ecco qualche trucchetto perché i tuoi primi progetti vadano senza stress e con successo.
✅
Inizia in piccolo
Non serve lanciarti su una felpa da 50 € al primo tentativo: privilegia delle t-shirt basiche, delle tote bag o dei cuscini, e comincia con dei piccoli motivi.. In questo modo imparerai a padroneggiare la tua macchina e il flex termoadesivo senza sprecare materiale.
✅
Annota le tue impostazioni
Ogni tipo di flex e ogni tessuto richiede impostazioni precise (temperatura, tempo di riscaldamento, pressione). Un piccolo quaderno dove annoti tutto ti farà guadagnare un sacco di tempo e ti eviterà di rifare gli stessi errori.
PS: Tutte le impostazioni di taglio dei nostri flex (e dei nostri vinili) sono indicate su ogni scheda prodotto. Non esitare a verificare che sia tutto in ordine prima di avviare il taglio!
✅
Prova diversi tipi di flex
Opaco, glitterato, velluto, 3D… Ogni flex ha la sua resa e la sua facilità di applicazione. Prova diversi stili per scoprire ciò che preferisci e ciò che funziona meglio con i tuoi tessuti.
✅
Osa creare e condividere
Non aver paura di lanciarti. Anche se non è perfetto al primo tentativo, è praticando che progredirai. Regala le tue creazioni alla tua famiglia o ai tuoi amici: i loro riscontri saranno preziosi e motivanti.
✅
Prenditi il tuo tempo
La stampa su tessuto richiede un po' di pazienza, soprattutto all'inizio. Ogni passaggio conta: taglio, scartavetratura, posizionamento e trasferimento. Più sarai meticoloso, migliore sarà il risultato finale.
Questi consigli semplici ma efficaci ti permetteranno di trasformare la tua iniziazione alla stampa su tessuto in un'esperienza riuscita e piacevole.
✨

6. Tocca a te!
Allora, ora sai quale materiale usare per la stampa su tessuto e come evitare gli errori da principiante. Con una macchina da taglio, del flex termoadesivo, un tappetino adatto, una pinzetta per la scartavetratura e una pressa, hai già tutto ciò che serve per creare i tuoi primi pezzi unici.
Il resto sono bonus e trucchetti che andranno a migliorare il tuo comfort e la qualità delle tue creazioni, ma l'essenziale è lanciarti e lasciar parlare la tua creatività.
La stampa su tessuto non è complicata: è una tecnica accessibile a tutti, che ti permette di personalizzare i tuoi capi, accessori e regali come desideri. Allora non aspettare oltre, prova, sperimenta e divertiti!
E tu, quale sarà il tuo primo progetto di stampa su tessuto? Condividilo nei commenti o sui nostri social, non vedo l'ora di vedere le tue idee!
💡
Se vuoi andare oltre ed evitare le seccature del principiante, puoi dare un'occhiata al nostro articolo "Tutorial Cricut principianti: la tua prima stampa su tessuto". Credimi, cambia tutto e ti fa guadagnare un sacco di tempo.
FAQ: Stampa su tessuto
Ora hai tutte le chiavi per lanciarti nella stampa su tessuto e scegliere il materiale adatto.
💡
Per rispondere ancora meglio alle tue domande e aiutarti a evitare gli errori più comuni, ecco una FAQ pratica che raccoglie gli interrogativi che si pongono spesso i principianti.
**❓
Cos'è la stampa su tessuto?**
La stampa su tessuto è una tecnica che consiste nel trasferire su un tessuto un motivo ritagliato nel flex termoadesivo grazie al calore, sia con un ferro da stiro, sia con una pressa a caldo. Questo permette di personalizzare t-shirt, tote bag, felpe e molti altri tessuti.
**❓
Quale materiale è indispensabile per iniziare?**
Per partire, hai bisogno di:
-
Una macchina da taglio (Cricut, Silhouette…)
-
Del flex termoadesivo
-
Un tappetino da taglio adatto
-
Una pinzetta per la scartavetratura
-
Un ferro da stiro o pressa a caldo
**❓
Si può fare la stampa su tessuto con un semplice ferro da stiro?**
Sì! Un ferro da stiro può bastare per iniziare, a condizione di rispettare la temperatura, il tempo e la pressione raccomandati per il tuo flex termoadesivo. Per una resa più precisa e duratura, la pressa a caldo resta ideale.
**❓
Quali tipi di tessuti si possono stampare?**
La stampa funziona sulla maggior parte dei tessuti in cotone, poliestere o misto cotone/poliestere. Evita i tessuti molto sottili, elastici o delicati, che rischiano di non sopportare bene il calore.
**❓
Quali sono gli errori da evitare quando si inizia?**
-
Comprare troppo materiale fin dall'inizio
-
Scegliere tessuti di scarsa qualità
-
Gestire male la temperatura, la pressione e il tempo di riscaldamento
-
Voler andare troppo veloce e fare in fretta la scartavetratura o l'incollatura
**❓
Come capire quale flex scegliere?**
La scelta del flex termoadesivo dipende dalla resa che desideri: opaco, glitterato, velluto, olografico… per iniziare, è raccomandato un flex classico di buona qualità. Potrai testare gli altri stili man mano che acquisisci esperienza.
**❓
Si possono lavare i tessuti stampati?**
Sì, i tessuti stampati resistono al lavaggio se rispetti alcune regole: rivoltare il capo, lavare a temperatura moderata, evitare un'asciugatrice troppo calda e non stirare direttamente sul flex per prolungare la durata del motivo.