Conosci quel momento in cui cerchi una borsa pratica per le tue cose di tutti i giorni... e finisci di nuovo per imbatterti in quelle tote bag bianche, senz'anima, che hanno già tutti?
A me è successo. E francamente, avevo voglia di qualcosa che mi somigliasse: una borsa allo stesso tempo pratica e di stile. Non una tote bag banale che dimentichi in fondo all'armadio, ma un accessorio unico, che racconta una storia.
È così che ho iniziato a personalizzare le mie tote bag. E credimi, la prima volta che sono uscita con una di loro, gli sguardi e i complimenti non si sono fatti attendere. Mi hanno chiesto: "Dove l'hai trovata?" E ho fatto quel piccolo sorriso fiero rispondendo: "L'ho fatta io."
E anche tu potresti ottenere esattamente lo stesso effetto (lo facciamo insieme e ti prometto che ne vorrai realizzare altre in seguito)!
Allora non andartene troppo in fretta. Munisciti dei tuoi più bei flex termoadesivi, della tua Silhouette caméo 5, della tua pressa a caldo (o del tuo ferro da stiro) e let's go per scoprire Come personalizzare una tote bag facilmente?!
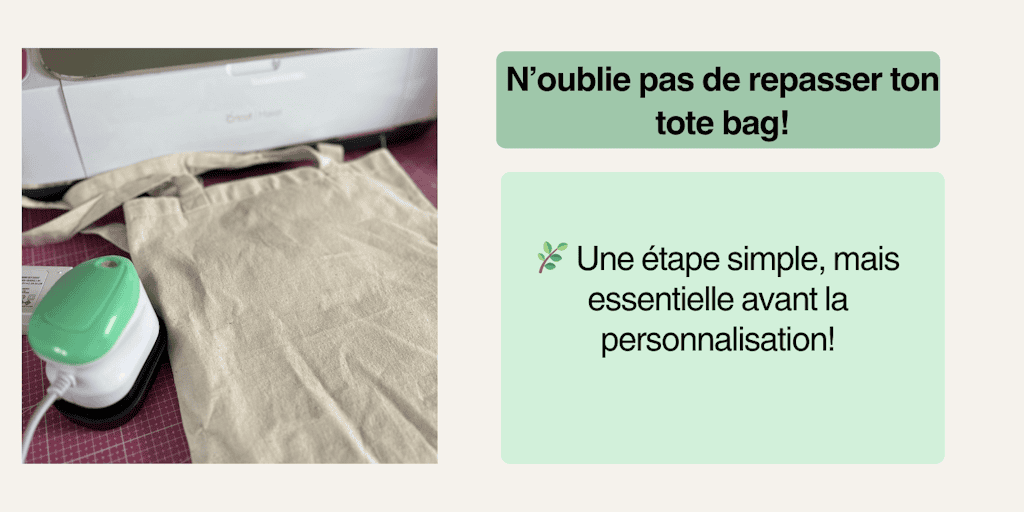
Passaggio 1: Preparare la tua tote bag
Prima ancora di pensare al design o al flex termoadesivo che userai, c'è un passaggio che tutti tendiamo a trascurare: la preparazione della borsa. E credimi, è IL dettaglio che fa la differenza tra una tote bag riuscita e una tote bag che finisce in fondo all'armadio perché il motivo si scolla o si arriccia al primo lavaggio.
Prima di tutto, prendi la tua tote bag di cotone. Spesso esce dal negozio un po' spiegazzata, a volte con piccole irregolarità del tessuto. Stirala con cura. Questo gesto può sembrare banale, ma è essenziale: un tessuto ben liscio permette al tuo motivo di aderire bene e di evitare le pieghe antiestetiche. Immagina di incollare un'etichetta su una superficie tutta piegata... il risultato non sarà mai pulito. Per la tua tote bag è lo stesso: più il tessuto è liscio, più il tuo design risalterà con eleganza.
Poi, parliamo di uno strumento magico che hai sicuramente già a casa: il rullo adesivo (sì, lo stesso che usi per togliere i peli del gatto dai tuoi vestiti). Passalo su tutta la superficie della tua borsa prima di applicare il motivo. Perché? Perché anche se la tua tote bag sembra pulita, possono esserci polveri, microfibre o piccole impurità invisibili a occhio nudo. E queste piccole intruse, una volta intrappolate sotto il flex termoadesivo, creeranno bolle, irregolarità e renderanno persino più fragile l'adesione del motivo.
Consiglio: se la tua tote bag è davvero nuova e rigida, non esitare a passarla velocemente in lavatrice prima di stirarla. Questo ammorbidirà le fibre del cotone e faciliterà l'adesione del flex.
Questo passaggio di preparazione, per quanto semplice sia, è la base assoluta se vuoi che il tuo progetto sia pulito, duraturo e bello. Senza di esso, anche il design più bello può finire rovinato.
👉
L'avrai capito: è la prima chiave per come personalizzare una tote bag con successo.
✂️
Passaggio 2: Scegliere e ritagliare il tuo motivo
È qui che la tua tote bag comincia a prendere vita. È il passaggio più creativo, quello in cui dai un'identità alla tua borsa. Ti starai sicuramente chiedendo: come personalizzare una tote bag perché mi somigli davvero? Tutto comincia dalla scelta del motivo.
🔹
Scegliere il tuo design
La tua tote bag è come una tela bianca. Puoi optare per una frase ispirante che ti motiva ogni mattina, un nome da regalare, un motivo minimalista per un look chic, oppure un disegno divertente e colorato per affermare la tua personalità. Tutto è possibile. Più il tuo motivo ha senso per te (o per la persona a cui lo regali), più la tua tote bag sarà unica.
Consiglio: se sei indecisa, comincia con forme semplici (cuori, stelle, iniziali, piccole citazioni). Sono rapide da realizzare e danno già una resa PAZ-ZESCA!
🔹
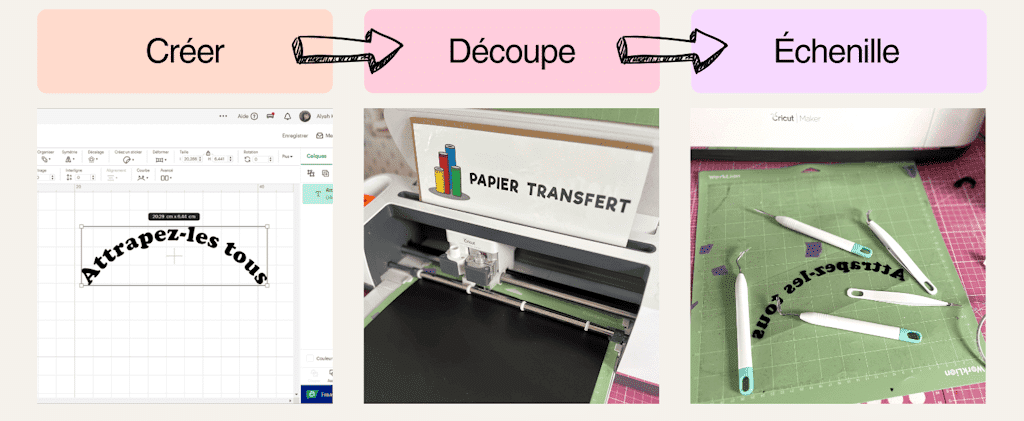
Ritagliare il tuo motivo nel flex
Una volta scelto il tuo design, passa al passaggio tecnico. Per questo, usi del flex termoadesivo che si fissa a caldo sul tessuto. Inseriscilo nella tua macchina da taglio (una Cricut o anche una Silhouette caméo 5) facendo bene attenzione a specchiare il tuo design (ribaltarlo prima del taglio). Se dimentichi questo passaggio, il tuo testo o il tuo motivo verrà fuori al contrario... e credimi, capita più in fretta di quanto si pensi.
🔹
La scartatura, un passaggio chiave
Una volta ritagliato il tuo design, resta il momento delicato: la scartatura. È il fatto di rimuovere tutte le parti del flex di cui non hai bisogno, i piccoli pezzi tra le lettere, l'interno di una "O" o di una "A", i contorni superflui. Per questo, munisciti di un kit di scartatura o, in mancanza, di una pinzetta e di un raccoglitore di scarti. È un passaggio minuzioso, a volte lungo, ma incredibilmente soddisfacente: vedi il tuo motivo apparire a poco a poco, pronto a brillare sulla tua tote bag.
Consiglio da professionista: lavora su una superficie ben illuminata. Alcuni usano persino una tavoletta luminosa per vedere più facilmente le zone da rimuovere. Cambia tutto!
Quando il tuo motivo è finalmente pronto, cominci a visualizzare la resa finale. Lo tieni tra le mani, lo appoggi a vuoto sulla tua tote bag per vedere l'effetto... e ti rendi conto che questa borsa non sarà mai più una tote bag banale. Hai appena superato il secondo passaggio essenziale di come personalizzare una tote bag: trasformare un'idea in un design concreto, unico e pronto per essere applicato.
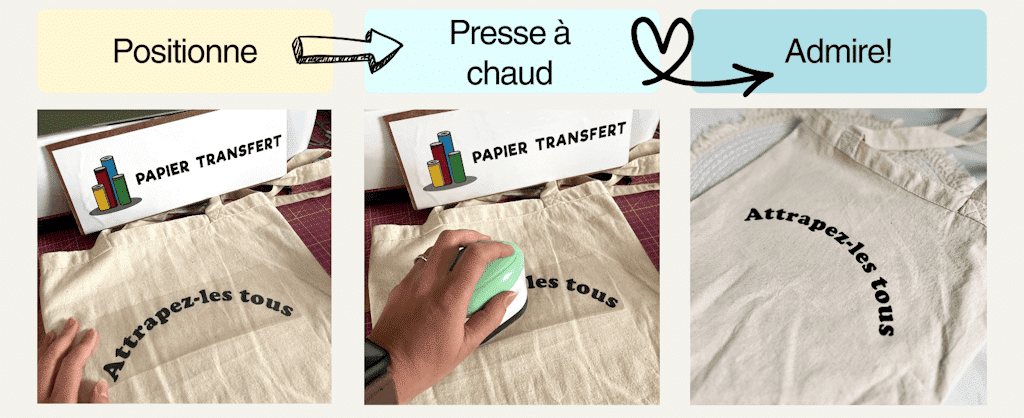
Passaggio 3: Applicare il tuo motivo sulla tote bag
È il momento più emozionante: vedere il tuo motivo prendere vita direttamente sulla tua tote bag. Una volta ritagliato e scartato il tuo design, ora bisogna trasferirlo correttamente sul tuo tessuto.
Posizionare il tuo motivo
Disponi il tuo design nel punto esatto in cui vuoi che appaia. Prenditi il tuo tempo: una tote bag personalizzata è unica, quindi tanto vale che il tuo motivo sia ben centrato e allineato. Puoi anche misurare con un righello o usare del nastro di carta per individuare la zona.
Fissare il motivo con il calore
A seconda del tipo di flex termoadesivo che usi, adatta la temperatura e il tempo di pressatura. La cosa migliore è usare una pressa a caldo piuttosto che un ferro da stiro
-
-
Con un ferro da stiro: impostalo su cotone (senza vapore) e applica una pressione ferma per 15 a 30 secondi su ogni zona del motivo.
-
Con una pressa a caldo: imposta la temperatura (in genere tra 150 e 170°C per il flex termoadesivo) e premi 15 secondi.
-
Lasciare raffreddare e rimuovere la pellicola di plastica
Aspetta qualche secondo (secondo le indicazioni del flex termoadesivo: pelatura a caldo o a freddo) prima di rimuovere il film protettivo. È il momento magico: la tua tote bag è ormai decorata con il tuo design!
👉
Questo passaggio è cruciale, perché una stiratura sbagliata o un calore mal adattato può rovinare il lavoro precedente. Ma una volta che hai preso la mano, personalizzare una tote bag diventa quasi un gioco da ragazzi.
✨
Passaggio 4: Gli errori da evitare nella realizzazione di una tote bag personalizzata
Anche se personalizzare una tote bag sembra semplice, certi piccoli errori possono rovinare in fretta il risultato finale. Niente panico, evitarli è semplicemente una questione di attenzione e di preparazione. Ecco gli errori più frequenti da non commettere!
1️⃣
Trascurare la preparazione della tote bag
Prima di tutto, la tua tote bag deve essere pulita, asciutta e stirata. Le pieghe, le polveri o persino i peli (soprattutto se hai un gatto
🐱
) possono impedire al tuo motivo di aderire correttamente.
👉
Consiglio: passa un rullo adesivo (come quello che si usa per togliere i peli dai vestiti) su tutta la superficie prima di applicare il tuo flex termoadesivo. Vedrai, è magico.
2️⃣
Centrare male il motivo
È l'errore più comune... ma soprattutto il più frustrante (volendo andare troppo in fretta, ho già posato il mio flex storto. E quello è tutto tranne che geniale)! Un motivo un po' troppo a sinistra o un po' troppo in alto, e la tua borsa perde tutto il suo equilibrio visivo.
👉
Per evitarlo: piega la tua tote bag in due per segnare il centro, e fai lo stesso con il tuo motivo. Allinea le due pieghe, e il gioco è fatto! Puoi anche aiutarti con del nastro di carta per tenere il tutto ben fermo prima di premere o persino con un righello di centratura.
3️⃣
Sbagliare la temperatura o la durata
Ogni tipo di flex termoadesivo ha le sue esigenze: alcuni si posano a 150 °C per 15 secondi, altri a 160 °C per 20 secondi. Una temperatura troppo bassa, e il tuo motivo non si attaccherà; troppo alta, e si deformerà o si scollerà al lavaggio (o peggio, può persino fondersi!).
👉
Leggi sempre le istruzioni del tuo flex termoadesivo prima di lanciarti, e fai una prova su un pezzetto di tessuto se non sei sicura del tuo primo utilizzo.
4️⃣
Muovere la pressa a caldo o il ferro da stiro
È un riflesso naturale... ma da bandire qui! Quando stiri un motivo in flex, non bisogna fare avanti e indietro come su una camicia. Bisogna premere con fermezza, senza muoversi, per il tempo indicato. Altrimenti, il tuo motivo rischia di scivolare, di spiegazzarsi o di aderire male!
5️⃣
Rimuovere il film di protezione nel momento sbagliato
Alcuni flex termoadesivi si scollano a caldo, altri a freddo. Se tiri troppo presto (o troppo tardi), il motivo può sollevarsi, scollarsi o persino deformarsi.
👉
Anche qui, le istruzioni sono tue amiche: ti indicano se devi aspettare qualche secondo o rimuovere il film immediatamente dopo la pressatura. Da Paper Transfer, tutte le istruzioni sono annotate su ogni foglio di flex termoadesivo (il che, detto tra noi, ci rende la vita molto più facile).
6️⃣
Toccare il motivo subito dopo
Lascia raffreddare completamente la tua tote bag prima di maneggiarla. Finché la colla non si è indurita, il motivo resta FRAGILE. Una semplice piega nel momento sbagliato può bastare a scollarlo parzialmente.
7️⃣
Dimenticare la fase di manutenzione
Anche una volta finita la tua tote bag, certi errori possono deteriorarla a lungo termine. Evita i lavaggi troppo caldi, l'asciugatrice e la stiratura diretta sul motivo.
👉
Lavala al rovescio, a 30 °C massimo, e lasciala asciugare all'aria aperta. Il tuo design resterà brillante molto più a lungo.
💡
In poche parole: riuscire nella personalizzazione di una tote bag è soprattutto una questione di preparazione, di precisione e di pazienza. Seguendo questi consigli, la tua tote bag avrà una resa professionale, senza stress, senza bolle, e soprattutto... unica nel suo genere!
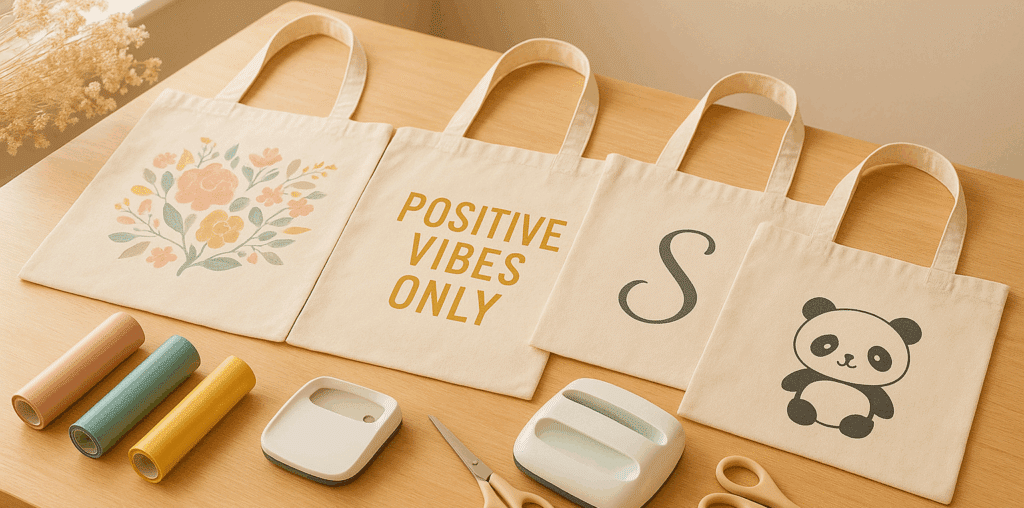
Qualche ispirazione per te
Hai la tua tote bag a portata di mano, sai come personalizzarla... ma sei ancora indecisa sul design? Niente panico, ti darò ispirazione con idee che ho testato e che piacciono ogni volta.
🌸
I motivi floreali
I fiori sono un classico intramontabile. Puoi scegliere piccoli fiori delicati in tonalità pastello per un tocco romantico, oppure fiori tropicali colorati per un effetto vitaminico. Una tote bag fiorita è la compagna perfetta per una passeggiata in città, un'uscita al mercato o persino per la spiaggia. E credimi, ti chiederanno di sicuro dove l'hai comprata.
💬
Le citazioni brevi e ispiranti
Una semplice parola o una frase può cambiare l'energia della tua giornata. "Positive vibes only", "Credi in te", o persino una battuta che ti fa sorridere. Immagina di tirare fuori la tua tote bag ogni mattina e imbatterti in un messaggio motivante: è come una piccola dose di buon umore che porti ovunque con te. E se la regali, è ancora più forte: regali a qualcuno un messaggio pensato appositamente per lui (lei).
🐾
Gli animali troppo carini
Gatto, panda, lama, volpe... o perché no il tuo animale preferito? Gli animali hanno quel piccolo potere di attirare gli sguardi e di far sorridere. Mi ricordo di una tote bag che avevo personalizzato con un gatto minimalista: non conto più il numero di volte in cui mi hanno fermata per strada per dirmi che era adorabile. Se vuoi una tote bag che attiri la simpatia, è la scelta perfetta.
✨
Il design minimalista
A volte, meno è meglio. Un nome, un'iniziale elegante, o persino un semplice simbolo basta a dare stile. La tote bag diventa allora un accessorio sobrio ma chic, che si abbina con tutto. È il tipo di regalo che funziona sempre, perché resta personale senza essere troppo carico.
🎁
Le tote bag personalizzate come regali
È probabilmente il mio utilizzo preferito. Per un compleanno, un addio al nubilato, una festa della mamma, o ancora come regalo di fine anno scolastico per una maestra: ogni tote bag diventa un ricordo prezioso. La persona a cui la regali non vede solo una borsa, vede l'intenzione che c'è dietro. E ogni volta, c'è quel sorriso particolare, quello che dice: "Hai davvero pensato a me." E quello, credimi, non ha prezzo.
Psss: se hai ancora dubbi, fai un giro su Pinterest. Ci troverai un sacco di idee per lanciarti!
E se vuoi regalare una tote bag personalizzata senza farla tu stessa, puoi anche scoprire le creazioni artigianali di Mlle K. Boutique, fatte a mano in Francia con tanta cura.
Personalizzare una tote bag non è soltanto decorare una borsa.
È darle una storia, una personalità, e trasformarla in un accessorio unico che ti somiglia davvero. In pochi passaggi semplici, con un po' di flex termoadesivo e una buona dose di creatività, puoi creare un pezzo che attira gli sguardi e suscita i complimenti.
E la cosa più bella? Non hai bisogno di essere un'esperta. Quello che conta non è la perfezione tecnica, ma l'intenzione, la voglia di creare qualcosa che porta la tua impronta.
Allora, che tu lo faccia per te, per regalarla a qualcuno che ami o per celebrare un evento speciale, ricordati: ogni tote bag che personalizzi racconta una storia. E questa storia è la tua.
❓
FAQ, Tutto quello che c'è da sapere per personalizzare la tua tote bag
1. Posso personalizzare qualsiasi tote bag?
Sì! L'importante è che sia di cotone (o di tessuto adatto al flex). Le borse troppo testurizzate o troppo spesse possono complicare la posa del flex termoadesivo.
2. Serve una macchina speciale per ritagliare il flex termoadesivo?
Una macchina da taglio come la Cricut o la Silhouette caméo 5 facilita enormemente il lavoro. Ma puoi anche ritagliare forme semplici a mano con delle forbici o un taglierino di precisione.
3. Il flex termoadesivo tiene bene nel tempo?
Sì, se lo applichi correttamente con il giusto calore e la giusta pressione. Per prolungare la durata, lava la tua tote bag al rovescio ed evita l'asciugatrice.
4. Posso usare un ferro da stiro invece di una pressa a caldo?
Assolutamente! Un ferro da stiro funziona benissimo, a condizione di disattivare il vapore e di premere con fermezza per qualche secondo su ogni parte del motivo.
5. Quanto tempo ci vuole per personalizzare una tote bag?
In media, meno di 30 minuti. La preparazione (lavaggio, stiratura, pulizia con il rullo adesivo) richiede qualche minuto, poi la scartatura e la posa del flex termoadesivo sono rapide.
6. Si possono mischiare più colori di flex termoadesivo?
Assolutamente! Ed è quello che rende la tua tote bag ancora più unica! Puoi sovrapporre o affiancare diversi colori, facendo attenzione a rispettare bene i tempi di pressatura per ogni strato. Allora non esitare a usare del flex glitterato, del metallizzato, del velluto o persino del flex fluorescente, per
7. Posso regalare una tote bag personalizzata come regalo?
Ma certo! È anzi un'ottima idea: una tote bag con un nome, una citazione o un motivo pensato appositamente per la persona fa sempre piacere e resta un ricordo unico.
Il tutorial è finito, ma l'avventura continua
👇
Condividi la tua tote bag personalizzata sui social con l'hashtag #PapierTransfertDIY e tagga @papiertransfert (o anche sul nostro gruppo Facebook)!
È sempre un vero piacere vedere quello che create con i nostri prodotti
💕