Ti è mai capitato di guardare un oggetto di tutti i giorni pensando: « È pratico, ma gli manca quel qualcosa in più » ? È esattamente così che iniziano la maggior parte dei progetti di personalizzazione.
Una tote bag troppo semplice, una t-shirt senza personalità, una borraccia identica a centinaia di altre… Eppure, con qualche materiale e un po' di immaginazione, è possibile trasformare questi oggetti ordinari in creazioni uniche che riflettono davvero la tua personalità.
La personalizzazione è molto di moda, e non è un caso. Permette di dare una seconda vita a oggetti già esistenti, di creare regali personalizzati e di realizzare decorazioni che non somigliano a nessun'altra. Meglio ancora, non è necessario essere un esperto del fai da te per ottenere un risultato degno di un professionista.
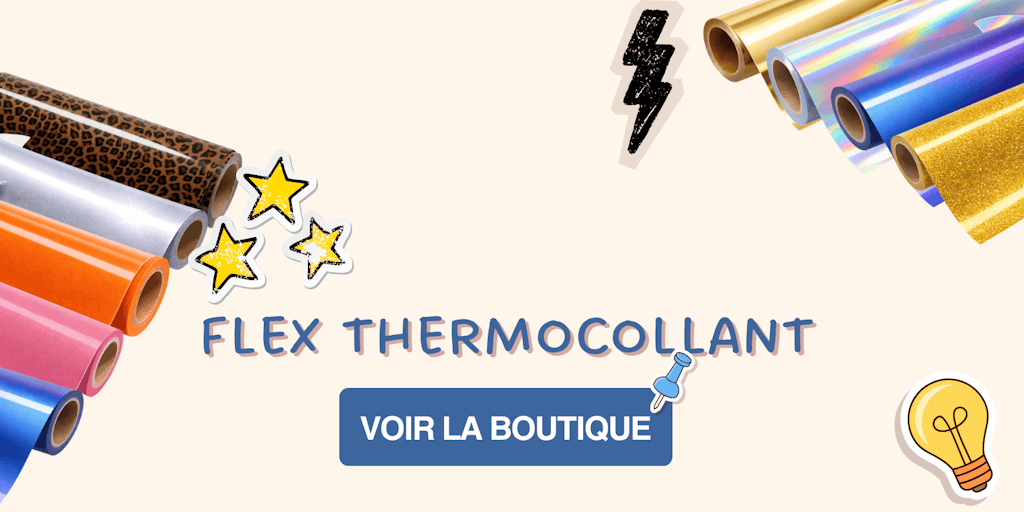
Grazie al flex termoadesivo e al vinile adesivo, due materiali immancabili nell'universo della personalizzazione, diventa facile creare progetti originali direttamente da casa. In poche fasi soltanto, un oggetto banale può diventare un pezzo unico che attira tutti gli sguardi.
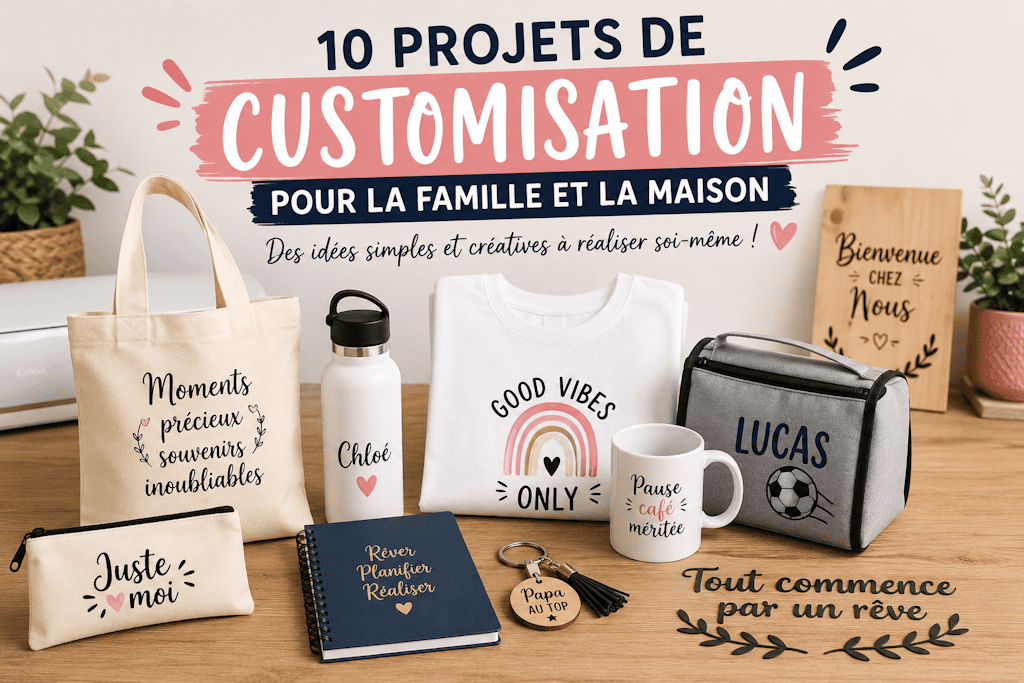
In questo articolo, ti propongo di scoprire 10 idee di progetti di personalizzazione facili da realizzare a casa. Che tu sia alle prime armi o già appassionato di hobby creativi, troverai di sicuro un'idea che ti farà venire voglia di tirare fuori il tuo materiale e di lasciar parlare la tua creatività.
E allora via con i mini tutorial by Alyah !
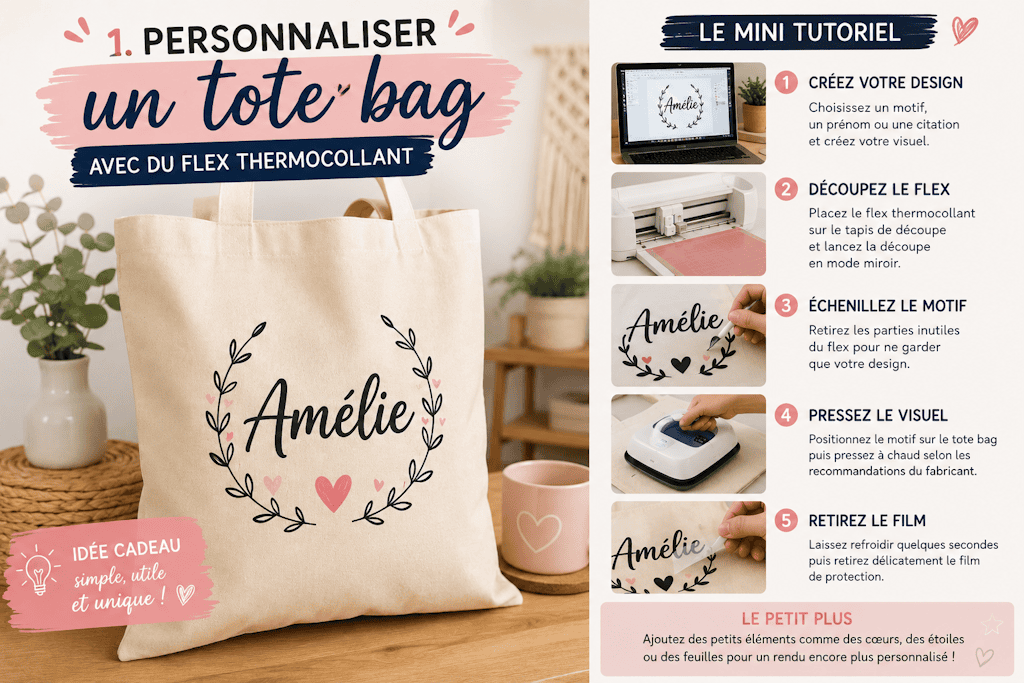
1. Personalizzare una tote bag con un nome o una citazione
La tote bag fa parte dei supporti più popolari nell'universo della personalizzazione. Facile da personalizzare e utile ogni giorno, costituisce un ottimo progetto per iniziare con il flex termoadesivo.
Materiale necessario
-
Una pressa a caldo o un ferro da stiro
-
Un motivo, un nome o una citazione
Mini tutorial
Fase 1: Crea il tuo design
Nel tuo software di creazione, inserisci un nome, una citazione o scegli un motivo semplice. Ricordati di adattare le dimensioni alla tote bag.
Fase 2: Taglia il flex
Posiziona il tuo flex termoadesivo sul tappetino da taglio e avvia il taglio in modalità specchio.
Fase 3: Scarta il motivo
Rimuovi delicatamente le parti inutili del flex in modo da conservare solo il tuo design.
Fase 4: Posiziona sulla tote bag
Metti la tua creazione nel punto desiderato e verifica l'allineamento prima della pressatura.
Fase 5: Applica il calore
Usa una pressa a caldo o un ferro da stiro rispettando le indicazioni del produttore. Una volta raffreddato, rimuovi la pellicola di protezione.
Il tocco in più
Per un risultato ancora più di tendenza, abbina un nome a una piccola illustrazione come un fiore, un cuore o un ramo di eucalipto. Otterrai una tote bag unica, perfetta da regalare o da portare con te ogni giorno.
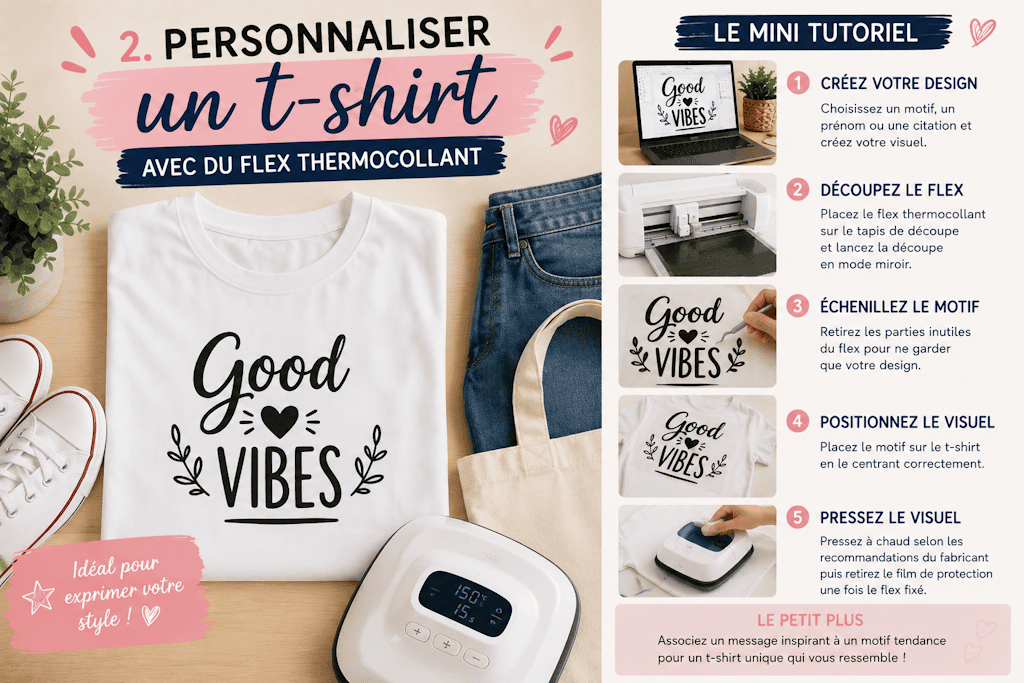
2. Personalizzare una t-shirt con un design unico
Hai una t-shirt in tinta unita che dorme in fondo all'armadio ? Con un po' di flex termoadesivo, puoi darle una seconda vita e creare un capo che non somiglia a nessun altro.
Materiale necessario
-
Una pressa a caldo o un ferro da stiro
-
Un design, un testo o un'illustrazione
Mini tutorial
Fase 1: Scegli la tua grafica
Seleziona un motivo, una citazione ispirante o un'illustrazione che ti piace. I design semplici offrono spesso i risultati migliori.
Fase 2: Taglia il flex
Posiziona il flex sul tuo tappetino da taglio e avvia il taglio in modalità specchio, così che il motivo sia nel verso giusto dopo il trasferimento.
Fase 3: Scarta la tua creazione
Rimuovi tutte le parti inutili del flex in modo da far apparire chiaramente il tuo design.
Fase 4: Posiziona il motivo
Metti la grafica al centro della t-shirt o sul petto a seconda dell'effetto desiderato. Prenditi il tempo di verificare l'allineamento.
Fase 5: Pressa il flex
Applica il calore raccomandato dal produttore per il tempo indicato. Lascia raffreddare se necessario poi rimuovi la pellicola di trasporto.
Il tocco in più
Per una resa ancora più originale, combina più colori di flex oppure usa un flex glitterato, velluto o olografico. Una semplice frase può così diventare il dettaglio che attira immediatamente lo sguardo.
3. Creare una borraccia personalizzata per tutta la famiglia
Le borracce sono diventate indispensabili ogni giorno. A scuola, allo sport, in ufficio o in giro, ci accompagnano ovunque. Personalizzandole con del vinile adesivo, ognuno può facilmente riconoscere la propria pur sfoggiando uno stile unico.
Materiale necessario
- Una borraccia pulita e asciutta
- Del vinile adesivo
- Una macchina da taglio
- Della carta transfer
- Un kit per la scartatura
- Una spatola in plastica
Mini tutorial
Fase 1: Prepara il tuo design
Scegli un nome, un soprannome o un piccolo motivo. Per una borraccia, i design semplici e i caratteri leggibili sono spesso i più efficaci.
Fase 2: Taglia il vinile
Posiziona il vinile adesivo sul tuo tappetino da taglio poi avvia il taglio con le impostazioni adatte.
Fase 3: Scarta il motivo
Rimuovi delicatamente le parti inutili in modo da conservare solo il design da applicare sulla borraccia.
Fase 4: Usa la carta transfer
Applica la carta transfer sulla tua creazione poi liscia con cura affinché il vinile aderisca correttamente.
Fase 5: Posa il design sulla borraccia
Posiziona il tuo motivo sulla borraccia, liscia con la spatola per evitare le bolle d'aria poi rimuovi delicatamente la carta transfer.
Il tocco in più
Per una borraccia ancora più originale, aggiungi piccole illustrazioni legate alle passioni del suo proprietario: un pallone per uno sportivo, un fiore per un'amante della natura oppure una corona per un bambino. Una personalizzazione semplice che trasforma una borraccia ordinaria in un accessorio unico.

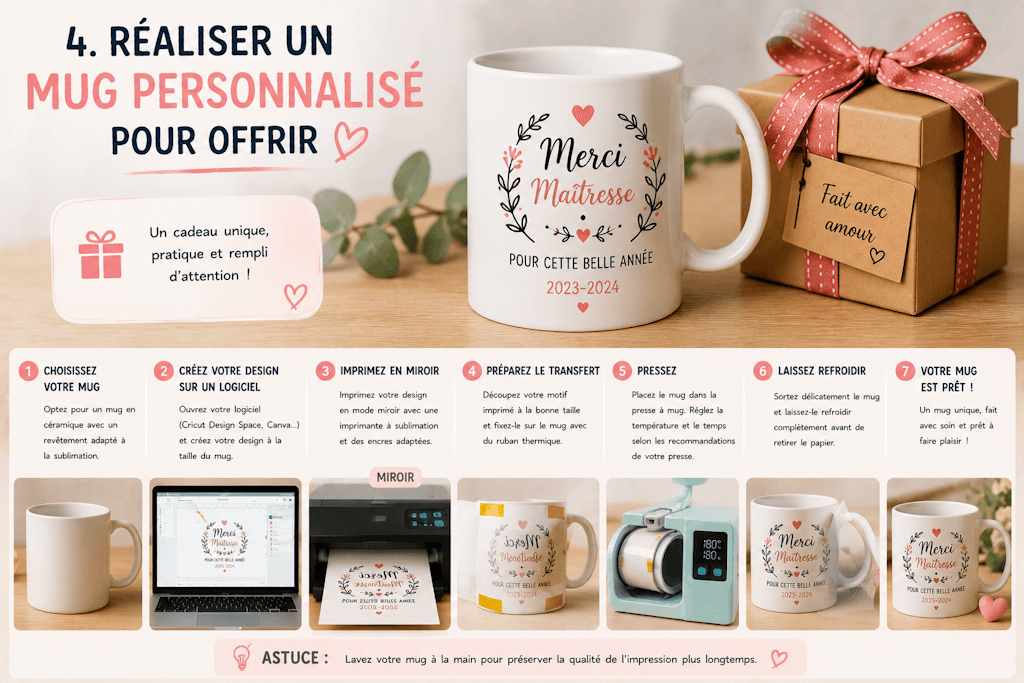
4. Realizzare un mug personalizzato da regalare
Trovare un regalo allo stesso tempo utile, originale ed economico non è sempre facile. Eppure, il mug personalizzato resta una garanzia. Che sia per un compleanno, la festa della mamma, la festa del papà o semplicemente per fare un piacere, permette di creare un regalo unico in poche fasi.
Materiale necessario
- Un mug compatibile con la sublimazione
- Della carta per sublimazione
- Una stampante a sublimazione
- Una pressa per mug
- Un design personalizzato
Mini tutorial
Fase 1: Crea la tua grafica
Prepara il tuo design inserendo un nome, una foto, una citazione o un'illustrazione a seconda dell'occasione.
Fase 2: Stampa la tua creazione
Stampa la grafica sulla carta per sublimazione con le impostazioni adatte alla tua stampante.
Fase 3: Posiziona il design
Metti la carta intorno al mug poi fissala con dell'adesivo termico per evitare qualsiasi spostamento durante il trasferimento.
Fase 4: Avvia la pressatura
Inserisci il mug nella pressa per mug e applica le impostazioni raccomandate per il tuo materiale.
Fase 5: Rimuovi la carta
Una volta terminato il ciclo, lascia raffreddare leggermente poi rimuovi delicatamente la carta per sublimazione per scoprire il risultato.
Il tocco in più
Crea un mug perfettamente adatto al suo destinatario: una foto di famiglia per i nonni, una citazione spiritosa per un amico o un design ispirante per accompagnare il caffè del mattino. Un oggetto di tutti i giorni che diventa rapidamente un ricordo prezioso.
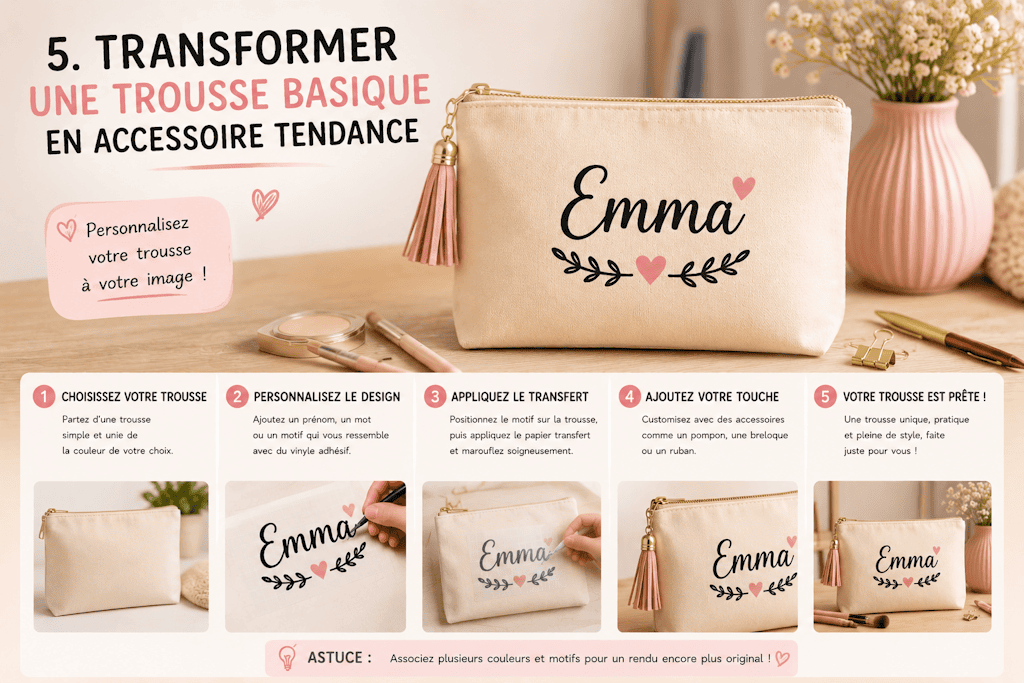
5. Trasformare un astuccio basic in un accessorio di tendenza
Un astuccio in tinta unita può diventare rapidamente un accessorio unico grazie a qualche pezzo di flex termoadesivo. È un progetto semplice, veloce e ideale per personalizzare il materiale scolastico, l'attrezzatura per gli hobby creativi o il proprio beauty case.
Materiale necessario
-
Una pressa a caldo o un ferro da stiro
-
Un motivo, un nome o una citazione
Mini tutorial
Fase 1: Scegli la tua personalizzazione
Seleziona un nome, delle iniziali o un piccolo motivo che corrisponda all'uso dell'astuccio.
Fase 2: Taglia il flex
Posiziona il tuo flex termoadesivo sul tappetino da taglio e avvia il taglio in modalità specchio.
Fase 3: Scarta il tuo design
Rimuovi le parti inutili del flex in modo da conservare solo il motivo finale.
Fase 4: Posiziona la grafica
Metti il design sull'astuccio avendo cura di centrarlo correttamente.
Fase 5: Applica il calore
Pressa secondo le indicazioni del produttore poi rimuovi la pellicola di protezione una volta che il flex è fissato correttamente.
Il tocco in più
Per un astuccio ancora più originale, abbina un nome a una piccola illustrazione che ne rappresenti la funzione: un pennello per il trucco, una matita per la scuola o un paio di forbici per gli appassionati di cucito. Un semplice astuccio diventa così un accessorio interamente personalizzato.
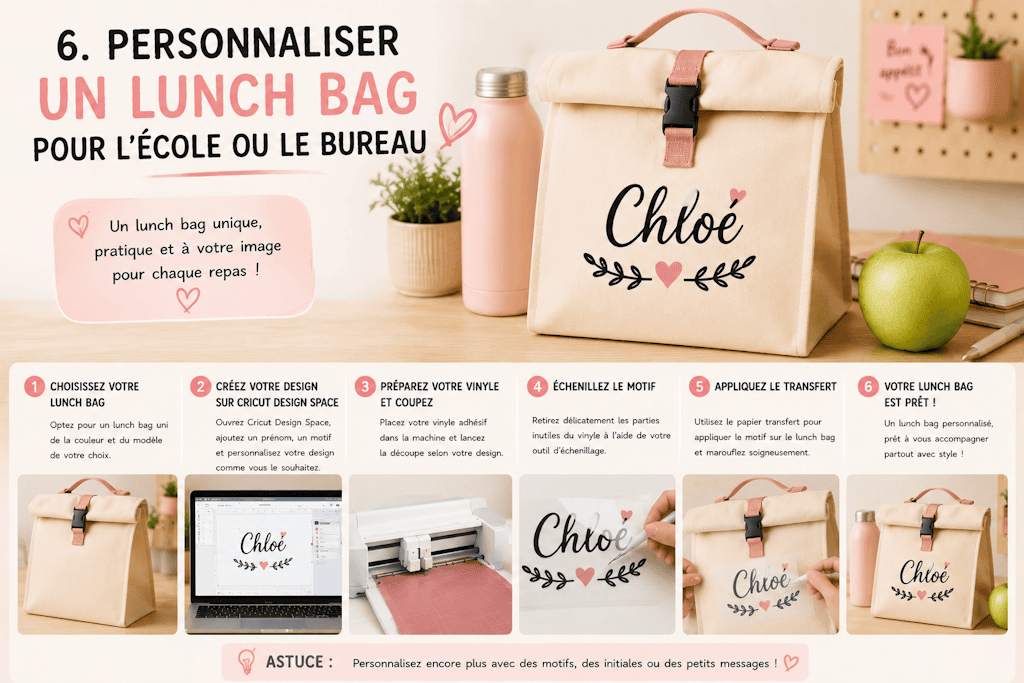
6. Personalizzare un lunch bag per la scuola o l'ufficio
Pratico per trasportare il proprio pasto, il lunch bag è diventato un immancabile di tutti i giorni. Personalizzandolo, ottieni un accessorio allo stesso tempo utile, estetico e facilmente identificabile, che sia per un bambino a scuola o un adulto al lavoro.
Materiale necessario
-
Un lunch bag
-
Una pressa a caldo o un ferro da stiro
-
Un nome, un'illustrazione o una citazione
Mini tutorial
Fase 1: Prepara il tuo design
Scegli una personalizzazione adatta all'utilizzatore: nome, personaggio preferito, illustrazione o piccolo messaggio motivante.
Fase 2: Taglia il flex
Posiziona il flex termoadesivo sul tuo tappetino da taglio poi avvia il taglio in modalità specchio.
Fase 3: Scarta il motivo
Rimuovi delicatamente tutte le parti inutili in modo da conservare unicamente il design da trasferire.
Fase 4: Posiziona la personalizzazione
Metti la tua creazione sul lunch bag verificando che sia ben dritta e centrata.
Fase 5: Pressa la grafica
Applica il calore raccomandato per fissare durevolmente il flex sul tessuto.
Il tocco in più
Per i bambini, aggiungi un nome accompagnato da una piccola illustrazione divertente. Per gli adulti, prediligi un design minimalista con delle iniziali o una citazione elegante. Una personalizzazione semplice che trasforma un accessorio di tutti i giorni in un oggetto unico.
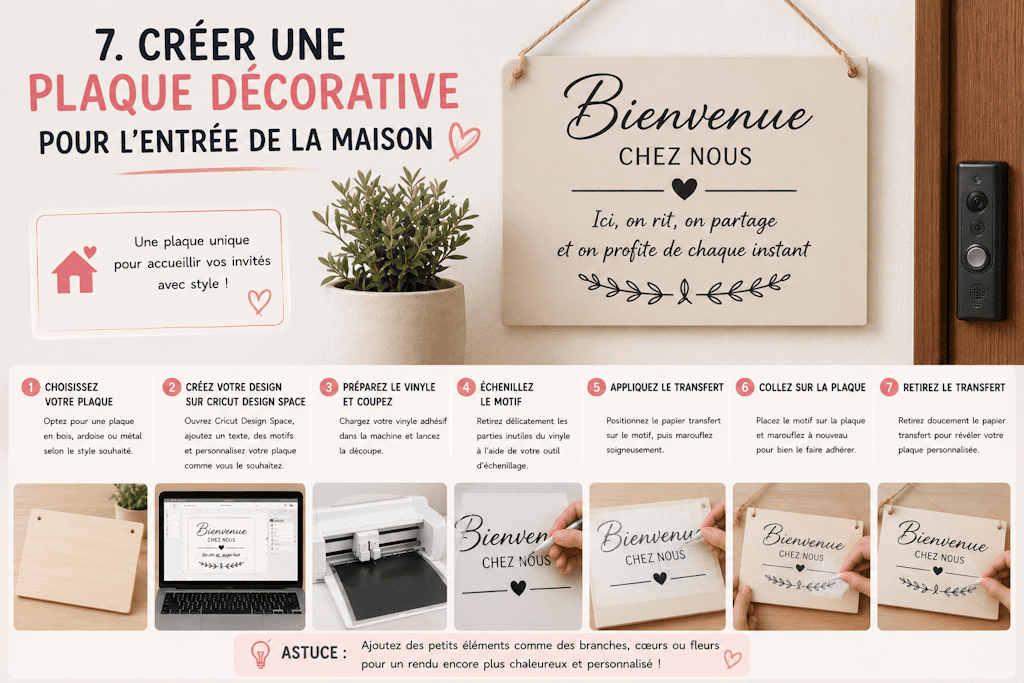
7. Creare una targa decorativa per l'ingresso di casa
L'ingresso è la prima cosa che scoprono i tuoi ospiti. Allora perché non dargli un tocco personale con una targa decorativa unica ? Questo progetto di personalizzazione è ideale per mostrare un cognome di famiglia, un messaggio di benvenuto o una citazione che ti somiglia.
Materiale necessario
-
Una targa in legno
-
Del vinile adesivo
-
Della carta transfer
Mini tutorial
Fase 1: Progetta la tua grafica
Crea un design con il nome della tua famiglia, una frase di benvenuto o un motivo decorativo in armonia con i tuoi interni.
Fase 2: Taglia il vinile
Posiziona il tuo vinile adesivo sul tappetino da taglio poi avvia il taglio con le impostazioni adatte.
Fase 3: Scarta la tua creazione
Rimuovi le parti inutili del vinile in modo da conservare solo il testo o il motivo desiderato.
Fase 4: Prepara il trasferimento
Applica la carta transfer sul tuo design poi liscia con cura.
Fase 5: Incolla sulla targa
Posiziona il motivo sulla targa, liscia con la spatola poi rimuovi delicatamente la carta transfer.
Il tocco in più
Aggiungi qualche elemento decorativo come foglie, fiori o motivi geometrici per dare più carattere alla tua creazione. Collocata in un ingresso o su una porta, questa targa porterà immediatamente un tocco caldo e personalizzato alla tua decorazione.
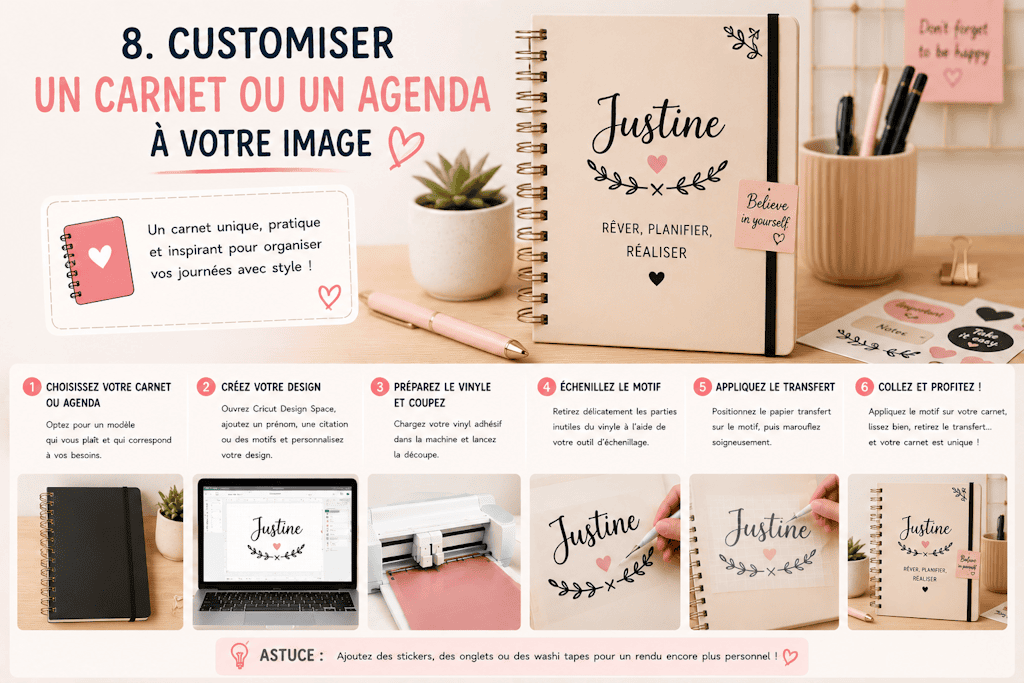
8. Personalizzare un quaderno o un'agenda a tua immagine
Che sia per prendere appunti, organizzare le giornate o annotare le idee creative, un quaderno o un'agenda ci accompagna spesso tutto l'anno. Tanto vale allora farne un oggetto che ci somiglia davvero grazie a un tocco di personalizzazione.
Materiale necessario
-
Del vinile adesivo
-
Della carta transfer
Mini tutorial
Fase 1: Scegli la tua personalizzazione
Puoi aggiungere il tuo nome, le tue iniziali, una citazione motivante o anche un motivo decorativo in accordo con il tuo stile.
Fase 2: Taglia il vinile
Posiziona il vinile adesivo sul tuo tappetino da taglio e avvia il taglio con le impostazioni adatte.
Fase 3: Scarta il tuo design
Rimuovi con cura le parti inutili in modo da conservare unicamente il motivo da applicare.
Fase 4: Usa la carta transfer
Applica la carta transfer sulla tua creazione e liscia per facilitare la posa.
Fase 5: Personalizza il tuo quaderno
Posiziona il motivo sulla copertina, liscia con una spatola poi rimuovi delicatamente la carta transfer.
Il tocco in più
Per una resa ancora più elegante, abbina un nome a una piccola illustrazione minimalista come un ramo di eucalipto, una stella o un motivo floreale. Otterrai un quaderno unico che farà venire voglia di scrivere e di organizzare i propri progetti ogni giorno.
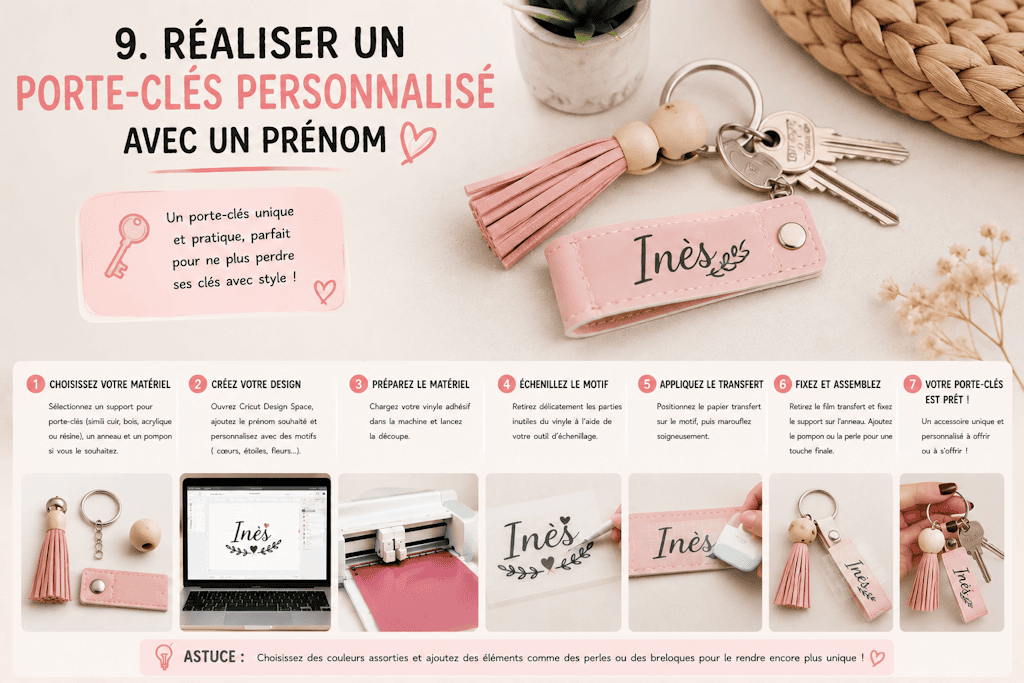
9. Realizzare un portachiavi personalizzato con un nome
Piccolo per le sue dimensioni, ma grande per il suo effetto, il portachiavi personalizzato è uno dei progetti di personalizzazione più semplici da realizzare. È anche un'ottima idea regalo per un compleanno, una festa o semplicemente per fare un piacere a una persona cara.
Materiale necessario
-
Un portachiavi grezzo in acrilico, legno o similpelle
-
Della carta transfer
Mini tutorial
Fase 1: Crea il tuo design
Scegli un nome, delle iniziali o un piccolo simbolo che rappresenterà la persona a cui è destinato il portachiavi.
Fase 2: Taglia il vinile
Posiziona il vinile sul tuo tappetino da taglio poi avvia il taglio con le impostazioni adatte.
Fase 3: Scarta la tua creazione
Rimuovi le parti inutili del vinile in modo da conservare solo la tua personalizzazione.
Fase 4: Prepara il trasferimento
Applica la carta transfer sul motivo poi liscia con cura per facilitare la posa.
Fase 5: Personalizza il portachiavi
Posiziona il design sul supporto, liscia con la spatola poi rimuovi delicatamente la carta transfer.
Il tocco in più
Aggiungi una piccola illustrazione legata alla passione del destinatario: una zampa per un amante degli animali, un pallone per uno sportivo o un cuore per un regalo pieno di attenzione. Nonostante la sua semplicità, questo progetto fa sempre il suo bell'effetto e permette di creare un oggetto davvero unico.
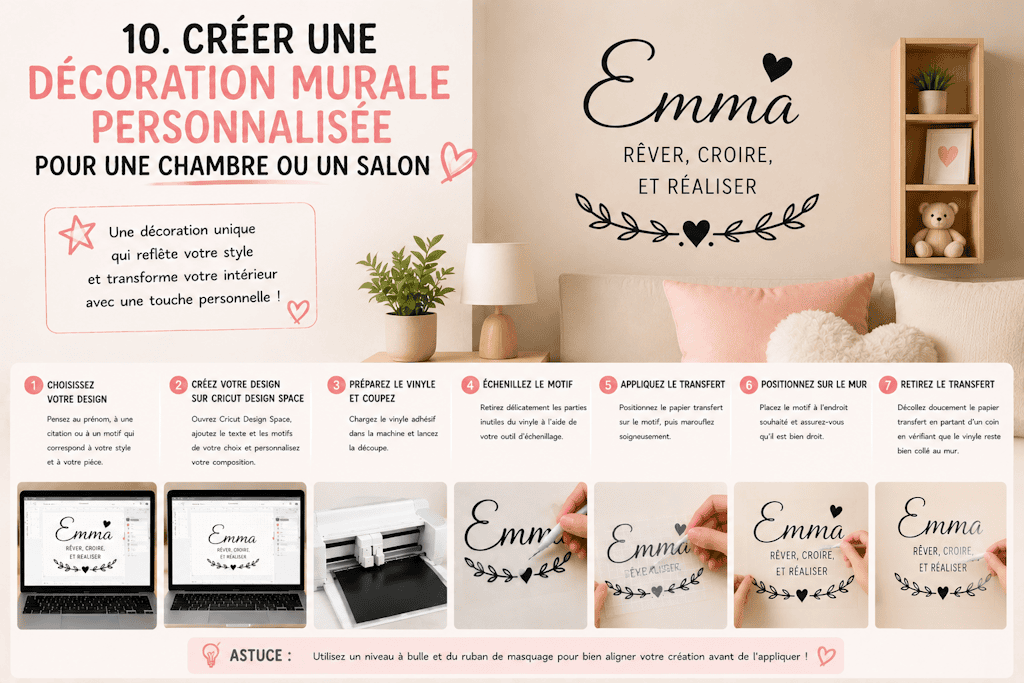
10. Creare una decorazione murale personalizzata per una camera o un soggiorno
A volte basta un semplice elemento decorativo per trasformare completamente l'atmosfera di una stanza. Grazie al vinile adesivo, è possibile realizzare facilmente una decorazione murale unica che riflette la tua personalità e si integra perfettamente nei tuoi interni.
Materiale necessario
-
Del vinile adesivo
-
Della carta transfer
-
Un motivo, una citazione o un nome
Mini tutorial
Fase 1: Scegli la tua decorazione
Seleziona una citazione ispirante, un nome, una data importante o un motivo decorativo adatto alla stanza che desideri abbellire.
Fase 2: Taglia il vinile
Posiziona il vinile adesivo sul tuo tappetino da taglio poi avvia il taglio secondo le impostazioni raccomandate.
Fase 3: Scarta la tua creazione
Rimuovi delicatamente le parti inutili in modo da conservare solo il design finale.
Fase 4: Prepara il trasferimento
Applica la carta transfer sul tuo motivo poi liscia con cura per assicurare una buona adesione.
Fase 5: Installa la tua decorazione
Posiziona il design direttamente sul muro o sul tuo supporto decorativo, liscia con la spatola poi rimuovi delicatamente la carta transfer.
Il tocco in più
Le citazioni funzionano particolarmente bene in un soggiorno, mentre i nomi o i motivi delicati sono perfetti per una camera di un bambino. Puoi anche creare una composizione che unisce testo e illustrazioni per ottenere una decorazione totalmente unica e personalizzata.
La personalizzazione è molto più di una semplice attività creativa. È un modo per trasformare oggetti ordinari in creazioni uniche che raccontano una storia, riflettono una personalità o segnano un evento importante.
Come hai potuto scoprire attraverso questi 10 progetti, non è necessario essere un esperto del fai da te per ottenere un risultato professionale. Con qualche strumento, un po' di ispirazione e materiali adatti come il flex termoadesivo o il vinile adesivo, è possibile personalizzare una moltitudine di oggetti di tutti i giorni.
Dalla tote bag alla t-shirt, passando per la borraccia, il lunch bag o ancora la decorazione murale, ogni progetto offre l'occasione di dare libero sfogo alla propria creatività realizzando al tempo stesso oggetti unici e utili.
E allora, quale sarà il tuo prossimo progetto di personalizzazione ? Una cosa è certa: una volta che si comincia a personalizzare le proprie creazioni, diventa difficile fermarsi, tante sono le possibilità.