Es gibt Ideen, die ein bisschen durch Zufall entstehen.
Eines Morgens, beim Wäschefalten (ja, dieser Moment, in dem alle Socken durcheinandergeraten), kam mir ein ganz einfacher Gedanke: Sie sehen alle gleich aus. Ich bin ein großer Fan von ganz schlichten weißen Socken. Aber… sie haben alle dieselbe Form. Dieselbe Farbe. Dieselbe Langeweile. Und trotzdem trägt man sie jeden Tag.
Da kam mir die Idee. Nicht, etwas Kompliziertes zu erschaffen. Kein großes Projekt. Einfach nur… einen Basic verwandeln. Ein Paar Socken. Ein kleines Wort. Ein Vorname. Ein Detail. Etwas, das alles verändert. Die Art von Personalisierung, die einen zum Lächeln bringt, wenn man sie anzieht. Oder die Eindruck macht, wenn man sie verschenkt. Und vor allem etwas, das einfach umzusetzen ist, selbst als Anfänger.
Denn ja, anders als man denken könnte, braucht das Personalisieren von Socken weder kompliziertes Material noch fortgeschrittene Fähigkeiten.
Mit Flexfolie zum Aufbügeln und ein paar gut beherrschten Schritten (die ich dir hier natürlich erkläre) lässt sich ein sauberes, langlebiges und wirklich hochwertiges Ergebnis erzielen.
In diesem Artikel zeige ich dir, wie du deine Socken ganz einfach personalisierst, Schritt für Schritt, ohne dir das Leben schwer zu machen und mit einem Ergebnis, das nicht nach "schnell selbst gemacht" aussieht.
Also los gehtsssss!
1. Warum sollte man seine Socken personalisieren?
Man denkt nie wirklich darüber nach. Socken kauft man im Set, oft ohne nachzudenken. Sie sind praktisch, unauffällig… und vor allem völlig austauschbar.
Bis zu dem Moment, in dem eine verschwindet, in dem sich alles in der Schublade vermischt, oder wenn man mehrere identische Paare hat, ohne zu wissen, wem sie gehören. Kurz gesagt, nichts wirklich Neues.
Und trotzdem ist es genau diese Banalität, die Socken zu einem I-DE-A-LEN Objekt zum Personalisieren macht!
Seine Socken zu personalisieren bedeutet nicht einfach nur, ein Motiv hinzuzufügen. Es bedeutet, einen Alltagsgegenstand in etwas Wiedererkennbares, Persönliches, ja sogar Emotionales zu verwandeln. Ein Vorname, ein Datum, ein ausgewähltes Wort… und schon wird die Socke einzigartig. Es ist einfach, aber es verändert alles (und es verhindert schon morgens Streit zwischen den Kindern darüber, dass das eine die Socken des anderen geklaut hat. Und da spreche ich ja aus eigener Erfahrung!).
Es ist außerdem eine Geschenkidee, die zugleich erschwinglich und originell ist. Anders als bei anderen, schon oft gesehenen Objekten bleiben personalisierte Socken nützlich, leicht an die jeweilige Person anzupassen und schnell umzusetzen. Sie eignen sich für eine Geburt, einen Geburtstag, ein Pärchengeschenk oder einfach, um mit einer persönlichen Aufmerksamkeit eine Freude zu machen.
Wenn du personalisierte Produkte herstellst oder verkaufst, ist das ebenfalls ein interessantes Objekt, das du nutzen kannst. Die Grundkosten sind niedrig, die Umsetzung ist schnell und der wahrgenommene Wert ist gut. Es ist typischerweise die Art von Produkt, die du leicht testen kannst, ohne dein Angebot zu verkomplizieren.
Was diese Personalisierung schließlich wirklich zugänglich macht, ist die Verwendung von Flexfolie zum Aufbügeln. Du musst weder Experte sein noch eine komplette Werkstatt haben. Mit dem richtigen Material (und die Flexfolie zum Aufbügeln von Paper Transfer ist garantiert von guter Qualität!) und ein paar gut beherrschten Schritten ist es absolut möglich, ein sauberes und langlebiges Ergebnis zu erzielen, schon bei den ersten Kreationen.
2. Das nötige Material, um seine Socken zu personalisieren
Bevor du loslegst, musst du eine einfache Sache verstehen: Die Qualität des Ergebnisses hängt genauso von deiner Technik ab wie von dem Material, das du verwendest. Aber gute Nachricht, du brauchst keine komplizierte Ausstattung. Allerdings musst du von Anfang an die richtigen Entscheidungen treffen, um die klassischen Fehler zu vermeiden.
Alles beginnt mit den Socken. Sie sind nicht alle gleich. Für ein sauberes Ergebnis solltest du ein überwiegend aus Baumwolle bestehendes Material bevorzugen, mit einer recht glatten Oberfläche und einer angemessenen Dicke. Umgekehrt machen zu dehnbare, zu stark gerippte oder zu synthetische Stoffe die Anwendung schwieriger und weniger langlebig. Dieses Detail erscheint banal, aber es wirkt sich direkt auf den Halt der Flexfolie zum Aufbügeln aus.
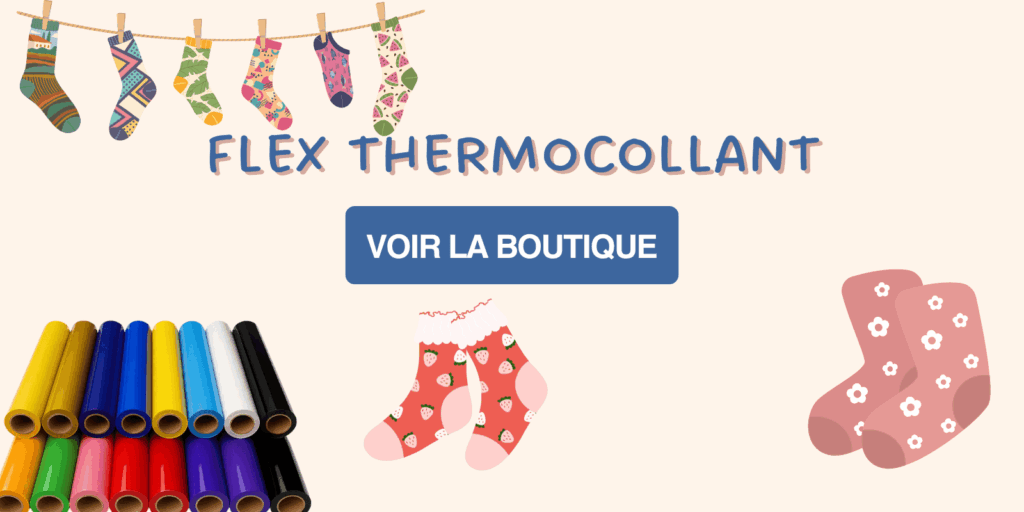
Genau das ist die Flexfolie zum Aufbügeln, das zentrale Element. Sie ist es, die deinem Design Leben einhaucht. Sie lässt sich sehr leicht zuschneiden und wird dann mit Hitze auf dem Textil fixiert, für ein sauberes und präzises Ergebnis. Aber Achtung, nicht jede Flexfolie ist gleich. Ein Produkt von schlechter Qualität kann schlecht haften, sich schnell ablösen oder nach ein paar Wäschen rissig werden. Und dann ist die ganze Zeit, die du in dieses Projekt gesteckt hast, im Eimer… Deshalb solltest du von Anfang an in eine zuverlässige Flexfolie zum Aufbügeln investieren, um diese Art von Problemen zu vermeiden.
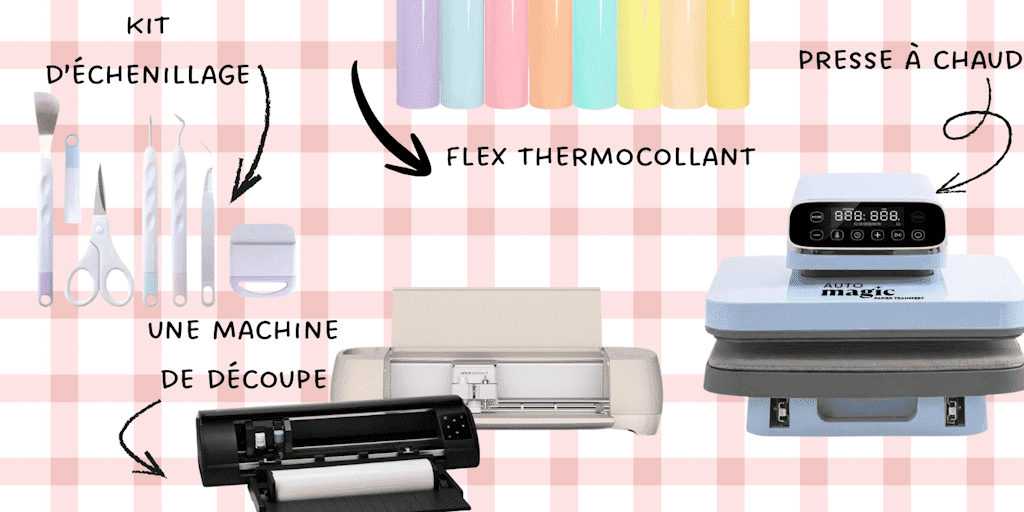
Für den Zuschnitt hast du zwei Möglichkeiten. Du kannst eine Schneidemaschine verwenden, wie eine Cricut Maker 4 oder auch eine Silhouette Cameo 5, die eine präzise und schnelle Arbeit ermöglicht, vor allem, wenn du regelmäßig kreieren (oder deine Produkte zum Verkauf anbieten) möchtest. Ansonsten bleibt für einfache Designs auch der Zuschnitt von Hand möglich. Die Wahl hängt vor allem von deinem Verwendungszweck und deinem Anspruchsniveau ab.
Dann kommt das Aufbügeln. Um die Flexfolie zu fixieren, brauchst du entweder eine Hitzepresse oder ersatzweise ein einfaches Bügeleisen. Die Presse liefert ein gleichmäßigeres Ergebnis, aber das Bügeleisen reicht für den Anfang aus, wenn du gewissenhaft bist. In jedem Fall sind drei Elemente beim Erhitzen der Flexfolie zum Aufbügeln entscheidend: die Temperatur, der Druck und die Pressdauer. Eine falsche Einstellung kann das Ergebnis ruinieren, selbst mit gutem Material und allen besten Absichten der Welt.
Schließlich gibt es ein oft vergessenes, aber wesentliches Detail: die Unterlage im Inneren der Socke. Das mag dumm und nutzlos erscheinen, aber… ein Stück Karton hineinzuschieben sorgt für eine schön ebene Oberfläche, verhindert, dass die Flexfolie zum Aufbügeln an der Rückseite haften bleibt (und dabei gleichzeitig die beiden Seiten der Socke miteinander verbindet) und verbessert die Haftung insgesamt.
Mit diesen Elementen hast du eine solide Grundlage, um unter guten Bedingungen zu arbeiten. Der nächste Teil wird noch konkreter: Wir gehen zu den Schritten über, um deine Socken ganz einfach und ohne Fehler zu personalisieren! Und dafür gibt es nichts Besseres als ein TUTORIAL by Alyah haha!
3. Die Schritte, um seine Socken ganz einfach zu personalisieren
Sobald das Material bereit ist, kommt es ganz auf die Ausführung an. Der Ablauf ist einfach, aber um ein sauberes und langlebiges Ergebnis zu erzielen, zählt jeder Schritt. Also halt dich gut fest, wir machen uns zu jedem Schritt Notizen!
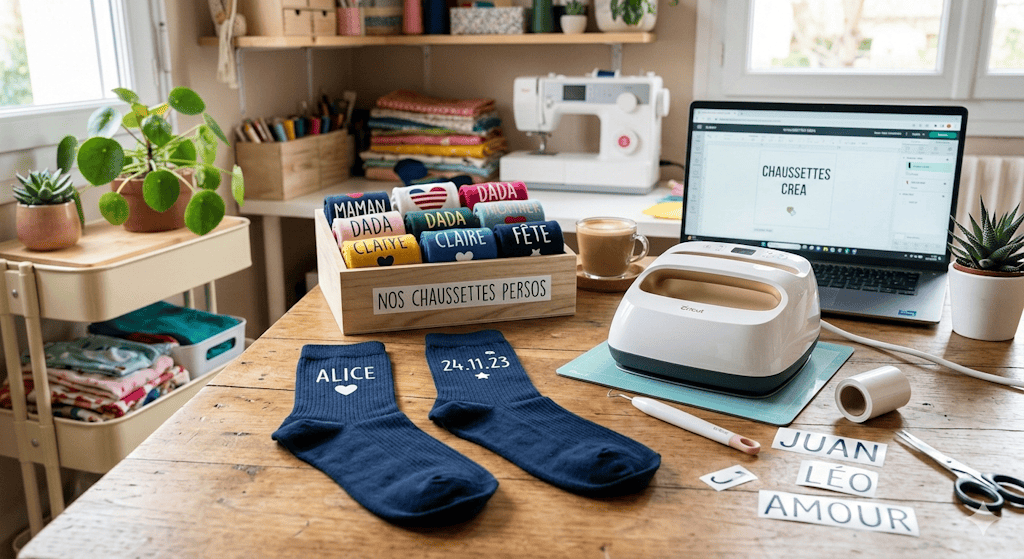
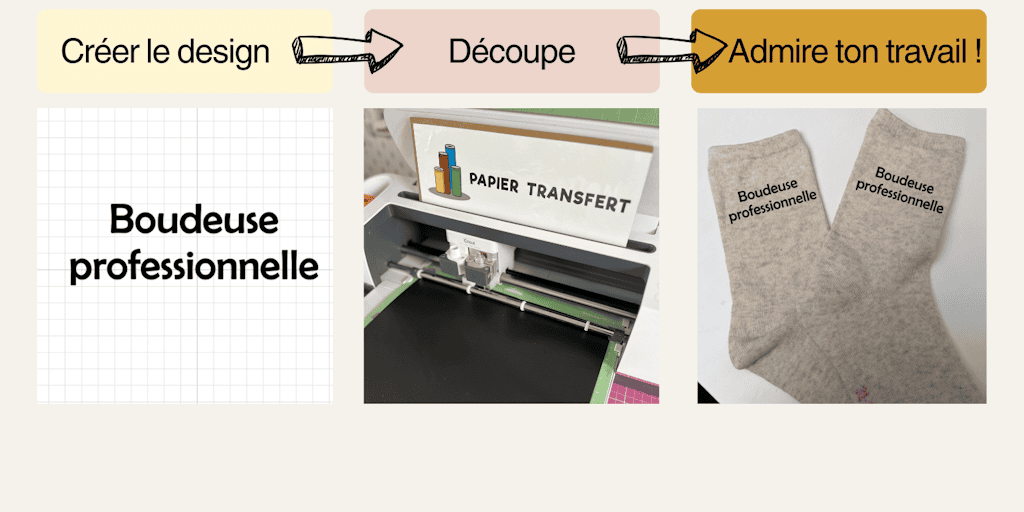
Alles beginnt mit dem Design. Ob du einen Vornamen, Initialen oder ein kleines Wort wählst, das Wichtigste ist, lesbar zu bleiben. Auf einer Socke ist die Fläche klein und leicht dehnbar, ein zu feines oder zu detailliertes Motiv kommt also möglicherweise schlecht zur Geltung.
Danach gehst du zum Zuschnitt der Flexfolie zum Aufbügeln über. Lege sie richtig auf (glänzende Seite gegen die Trägerfolie) und schneide dein Motiv im Spiegelmodus zu. Achtung, es ist superwichtig, den Spiegelmodus einzustellen, sonst wird dein Design beim Aufpressen verkehrt herum sein! Wenn du von Hand arbeitest, bleib bei etwas Einfachem, um ein sauberes Ergebnis zu behalten. Es ist ein schneller Schritt, aber ein wichtiger: Ein ungenauer Zuschnitt wird sich am Ende zwangsläufig zeigen.
Dann kommt das Entgittern, das heißt das Entfernen des überschüssigen Materials, sodass nur noch dein Design übrig bleibt. Nimm dir hier Zeit. Vor allem aber brauchst du superhilfreiche Werkzeuge wie das Entgitter-Set. Das ist oft der Unterschied zwischen einem sauberen und einem unsauberen Ergebnis. Jedes Detail zählt!
Sobald dein Design bereit ist, bereite die Socke vor. Lege eine Unterlage hinein, um eine schön ebene Oberfläche zu haben (ich persönlich nehme ein Stück Karton von einem Pappkarton), glätte den Stoff und positioniere dein Motiv an der gewünschten Stelle. Überprüfe kurz die Ausrichtung, denn ein schlecht platziertes Design fällt sofort auf, aber um das zu vermeiden, kannst du ein Ausrichtungslineal verwenden (das ist wirklich superpraktisch!).
Anschließend kannst du zum Aufbügeln übergehen. Ob du eine Hitzepresse oder ein Bügeleisen verwendest, halte dich gut an die empfohlenen Einstellungen: Temperatur, Druck und Pressdauer. Wenn du mit dem Bügeleisen arbeitest, vermeide es, es zu bewegen, und übe einen gleichmäßigen Druck aus. Das Ziel ist, dass die Flexfolie richtig am Textil haftet. Aber vor allem: Verwende keinen Dampf! NIEMALS! Sonst kannst du einfach alles von vorne anfangen (und wenn man das vermeiden kann).
Sobald du fertig bist, lass es ein paar Sekunden abkühlen und ziehe dann die Schutzfolie vorsichtig ab. Überprüfe, dass alles gut fixiert ist und sich kein Teil ablöst. Wenn nötig, gib noch einen leichten Hitzestoß darauf (mit einer Teflonfolie zwischen deinem Motiv und der Hitzequelle, sonst klebt die Flexfolie direkt an deiner Hitzepresse).
Um schließlich den Halt über die Zeit zu gewährleisten, lass die Socke mindestens 24 Stunden ruhen, bevor du sie wäschst. Bevorzuge danach eine schonende Wäsche und vermeide den Wäschetrockner. Das sind einfache Details, aber sie machen auf Dauer den ganzen Unterschied.
Mit diesen Schritten kannst du deine Socken ganz einfach personalisieren, selbst als Anfänger. Im Folgenden schauen wir uns an, wie man mit wirklich interessanten Personalisierungsideen noch weiter geht, ob zum Verschenken oder zum Verkaufen.
4. Personalisierungsideen, die einen echten Mehrwert bringen
Sobald die Technik beherrscht ist, lautet die eigentliche Frage nicht mehr "wie macht man das", sondern "was soll man kreieren". Denn am Ende ist es nicht die Socke, die den Unterschied macht, sondern die Botschaft, die du vermittelst. Das ist es, was aus einer simplen Personalisierung etwas macht, das im Gedächtnis bleibt… oder sich verkauft.
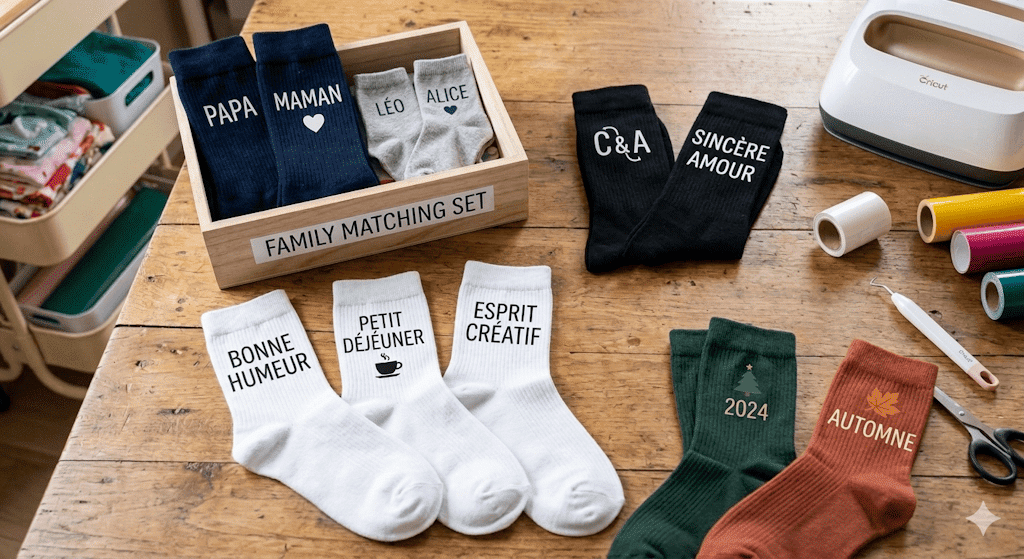
Vornamen und Initialen bleiben eine solide Grundlage. Das ist einfach, aber es funktioniert immer. Es ermöglicht, ein Paar leicht zu identifizieren, Vermischungen zu vermeiden und vor allem etwas Persönliches zu schaffen, ohne zu übertreiben. Das eignet sich besonders für Kinder, Geschenke zur Geburt oder sogar Sets für eine ganze Familie.
Du kannst auch mit kurzen Botschaften spielen. Manchmal reichen ein paar gut gewählte Worte völlig aus. Ein Stimmungswort, ein kleiner Satz oder ein Augenzwinkern können der Kreation Charakter verleihen. Das Ziel ist nicht, zu übertreiben, sondern ins Schwarze zu treffen, mit etwas Lesbarem und Wirkungsvollem.
Eine weitere interessante Idee ist, aufeinander abgestimmte Sets zu erstellen. Socken im Duo oder in einer Serie anzubieten, ermöglicht es, über das einzelne Objekt hinauszugehen. Ob für ein Paar, ein Elternteil und sein Kind oder Geschwister, du schaffst eine Stimmigkeit, fast eine kleine Geschichte. Und wenn du verkaufst, ist das auch eine gute Möglichkeit, Sets statt eines einzelnen Produkts anzubieten.
Du kannst auch rund um thematische Kollektionen arbeiten. Deine Kreationen an bestimmte Zeitpunkte im Jahr, an Ereignisse oder an Jahreszeiten anzupassen, ermöglicht es, dein Angebot zu erneuern und dabei eine stimmige Linie beizubehalten. Das ist ein einfacher Ansatz, um deinen Kreationen Rhythmus zu verleihen und etwas immer Aktuelles anzubieten.
Der wichtigste Punkt bleibt schließlich oft der am meisten vergessene: an den Verwendungszweck zu denken, bevor man an das Design denkt. Frag dich, noch bevor du etwas kreierst, wozu dieses Paar Socken dienen soll. Ist es ein Geschenk? Ein Alltagsprodukt? Ein symbolisches Objekt? Je mehr deine Personalisierung mit ihrem Verwendungszweck übereinstimmt, desto treffender und wirkungsvoller wird sie sein.
Seine Socken zu personalisieren bedeutet nicht, wahllos Ideen aneinanderzureihen. Es bedeutet, einfache, stimmige und für eine konkrete Absicht durchdachte Entscheidungen zu treffen. Im Folgenden schauen wir uns die zu vermeidenden Fehler an, um ein sauberes und langlebiges Ergebnis zu gewährleisten.
5. Die zu vermeidenden Fehler für ein sauberes und langlebiges Ergebnis
Seine Socken zu personalisieren ist zugänglich, aber bestimmte Fehler können das Ergebnis schnell ruinieren.
Und es sind oft dieselben, die immer wieder vorkommen, vor allem als Anfänger.
Sie zu kennen heißt schon, sie zu vermeiden.
Ein ungeeignetes Textil wählen
Nicht alle Socken reagieren gleich auf Hitze und Flexfolie zum Aufbügeln.
Ein zu dehnbarer, zu dicker oder überwiegend synthetischer Stoff kann eine gute Haftung verhindern, das Design beim Tragen verformen und zwangsläufig den Halt über die Zeit verringern…
Von Anfang an ein geeignetes Material zu bevorzugen, ermöglicht es, diese Art von Problem zu vermeiden (und sich nebenbei die Haare zu raufen haha).
Die Einstellungen für Temperatur und Druck vernachlässigen
Das Aufbringen der Flexfolie zum Aufbügeln beruht nicht allein auf der Hitze.
Drei Elemente müssen beherrscht werden:
-
die Temperatur
-
die Pressdauer
-
der Druck
Eine zu niedrige Temperatur verhindert, dass die Flexfolie zum Aufbügeln richtig haftet.
Umgekehrt kann eine zu hohe Temperatur das Textil beschädigen (und die Flexfolie zum Aufbügeln verbrennen…).
Ebenso führt ein unzureichender Druck zu einem fragilen Ergebnis, das sich schnell ablösen kann. Und dann kann man der Personalisierung schon nach der ersten Wäsche "Bye bye" sagen.
Die Unterlage im Inneren der Socke vergessen
Es ist ein einfaches, aber wesentliches Detail.
Ohne Unterlage:
-
ist die Oberfläche nicht eben
-
ist der Druck schlecht verteilt
-
kann die Flexfolie abzeichnen oder an der Rückseite haften
Einen Karton hineinzulegen, ermöglicht es, das Endergebnis deutlich zu verbessern.
Ein zu komplexes Design wählen
Eine Socke bietet nicht dieselbe Fläche wie ein T-Shirt oder ein Stoffbeutel.
Ein zu feines, zu überladenes oder zu detailliertes Design kann:
-
den Zuschnitt erschweren
-
das Entgittern schwierig machen
-
die Lesbarkeit beeinträchtigen
Besser ist es, einfache, klare und an den Untergrund angepasste Motive zu bevorzugen.
Nach dem Aufbringen zu schnell vorgehen
Sobald die Flexfolie aufgebracht ist, ist es wichtig, das Textil "ruhen" zu lassen.
Eine zu schnelle Wäsche kann:
-
die Haftung schwächen
-
die Lebensdauer des Aufdrucks verringern
Es wird empfohlen, vor der ersten Wäsche mindestens 24 Stunden zu warten und danach Folgendes zu bevorzugen:
-
eine Wäsche bei niedriger Temperatur
-
ein auf links gedrehtes Textil
-
den Verzicht auf den Wäschetrockner
Eine Flexfolie von schlechter Qualität verwenden
Das ist ein häufiger Fehler, oft verbunden mit dem Wunsch zu sparen.
Eine Flexfolie von unzureichender Qualität kann:
-
schlecht haften
-
rissig werden
-
schon nach den ersten Wäschen an Halt verlieren
Bei dieser Art von Projekt spielt die Qualität des Materials eine zentrale Rolle für das Endergebnis.
Bei Paper Transfer ist die Flexfolie zum Aufbügeln eine Qualitätsgarantie. Probieren heißt Lieben!
Diese Fehler zu vermeiden, reicht schon aus, um ein sauberes, langlebiges und stimmiges Ergebnis zu gewährleisten.
Mit einer guten technischen Grundlage, geeignetem Material und durchdachten Design-Entscheidungen wird die Personalisierung von Socken zu einer einfachen, effektiven und zugänglichen Praxis.
Seine Socken zu personalisieren mag auf den ersten Blick belanglos erscheinen.
Und doch ist es genau die Art von Projekt, die zeigt, dass man mit wenig Mitteln etwas wirklich Anderes schaffen kann.
Aus einem einfachen Alltagsgegenstand kannst du ein nützliches, persönliches und optisch wirkungsvolles Ergebnis erzielen.
Der Schlüssel liegt nicht in der Komplexität, sondern in der Ausführung:
ein gutes Textil, eine Flexfolie von guter Qualität, ein passendes Design… und vor allem eine sorgfältige Anwendung.
Es ist außerdem ein hervorragender Einstieg, wenn du in die Textilpersonalisierung einsteigen oder ein neues Produkt testen möchtest, ohne dir die Produktion zu verkomplizieren.
Ob zum Verschenken, zum Kreieren oder zum Verkaufen, personalisierte Socken haben einen klaren Vorteil:
Sie sind zugänglich, schnell umzusetzen und leicht abwandelbar.
Jetzt bleibt nur noch, in die Praxis überzugehen.
FAQ: Socken personalisieren
Hält Flexfolie zum Aufbügeln gut auf Socken?
Ja, vorausgesetzt, man hält sich an die richtigen Schritte.
Eine korrekte Anwendung (Temperatur, Druck, Zeit) ermöglicht es, einen widerstandsfähigen Halt zu erzielen, selbst nach mehreren Wäschen.
Kann man ein Bügeleisen statt einer Hitzepresse verwenden?
Ja, das ist absolut möglich.
Ein Bügeleisen reicht für den Anfang aus, vorausgesetzt, man übt einen festen und gleichmäßigen Druck aus, ohne Bewegungen.
Die Hitzepresse liefert dennoch ein gleichmäßigeres Ergebnis, aber vor allem eine erleichterte Anwendung der Flexfolie zum Aufbügeln.
Welche Art von Socken sollte man wählen?
Es wird empfohlen, Socken zu verwenden, die:
-
überwiegend aus Baumwolle bestehen
-
eine recht glatte Oberfläche haben
-
weder zu dünn noch zu dick sind
Diese Eigenschaften erleichtern die Haftung der Flexfolie zum Aufbügeln und verbessern den Halt über die Zeit.
Muss man warten, bevor man die personalisierten Socken wäscht?
Ja. Es wird empfohlen, nach dem Aufbringen mindestens 24 Stunden zu warten, bevor man zum ersten Mal wäscht.
Danach sollte man, um den Aufdruck zu schonen, bei niedriger Temperatur waschen, die Socken auf links drehen und den Wäschetrockner vermeiden.
Kann man ohne Schneidemaschine personalisieren?
Ja, das ist durchaus möglich. Für einfache Designs ist ein manueller Zuschnitt möglich.
Eine Schneidemaschine ermöglicht jedoch eine Zeitersparnis und eine bessere Präzision, vor allem für detailliertere Kreationen.
Ist Flexfolie zum Aufbügeln für Anfänger geeignet?
Absolut, es ist sogar eine der zugänglichsten Techniken.
Mit etwas Übung und indem man die Schritte korrekt befolgt, ist es möglich, schon bei den ersten Umsetzungen ein sauberes Ergebnis zu erzielen.
Wenn du Anfänger bist, fang einfach an, teste, passe an… und verbessere deine Kreationen nach und nach.
So erhältst du immer sauberere und professionellere Ergebnisse.
Zeig uns übrigens ruhig, was du umsetzt, indem du deine Kreationen teilst und uns mit @papiertransfert markierst!