Du hast wahrscheinlich gerade einen Silhouette-Schneideplotter gekauft und möchtest dein erstes Motiv oder Logo schneiden. Keine Sorge, du bist auf der richtigen Seite 😉
Heute zeigen wir dir die Grundeinstellungen der Software Silhouette Studio, damit du dein erstes Werk mit der Maschine schneiden kannst!✨
Die Zutaten
Für dieses Tutorial brauchst du:
- Die Software Silhouette Studio herunterladen
- Deinen Silhouette-Cameo-Schneideplotter bereithalten
- Das Logo, das du schneiden möchtest, im PNG-Format herunterladen
Schritt 1: Dein Logo in Silhouette Studio einfügen
Nachdem du die Software Silhouette Studio installiert und deinen Computer mit deinem Schneideplotter verbunden hast, fangen wir mit den ernsten Dingen an!
Zuerst musst du das Logo, das du schneiden möchtest, in die Software einfügen. Dafür hast du zwei Möglichkeiten:
Methode 1
Wenn dein Design oder Logo nur aus Text besteht, kannst du das Motiv direkt in der Software neu erstellen:
Um Text zu schreiben, klicke auf die Schaltfläche mit dem Buchstaben „A“ links auf dem Bildschirm, wähle anschließend oben auf der Seite die gewünschte Schriftart aus und klicke dann in das Silhouette-Raster. Jetzt kannst du den gewünschten Satz schreiben 😊.
Im zweiten Fall, wenn dein Logo komplexer ist, musst du es im PNG-Format in die Software einfügen:
Methode 2
Klicke oben rechts auf dem Bildschirm auf „Datei“ und dann auf die Schaltfläche „Öffnen“. So kannst du das Logo, das du erstellt hast, auf deinem Computer suchen.
Nach diesem Schritt ist das Logo in der Software eingefügt, aber es ist noch nicht verwendbar, da es nicht vektorisiert ist!
Was ist Vektorisierung? : Ein PNG-Bild ist pixelig. Wenn wir ein PNG-Bild mit unserer Maschine schneiden möchten, ist der Schnitt nicht geradlinig, da er dem Pfad der Bildpixel gefolgt ist.
Nach der Vektorisierung hat das Motiv keine Pixel mehr, der Schnitt des Motivs ist also perfekt geradlinig.
Beachte, dass es bei Methode 1 nicht nötig ist, den Text zu vektorisieren, da die Software das für uns übernimmt!
WICHTIG⚠️ : Wenn dein Motiv eine zu geringe Bildauflösung hat, kann es bei der Vektorisierung nicht korrekt freigestellt werden. Achte also immer auf eine gute Bildauflösung.
Um dein Logo zu vektorisieren, klicke auf die schmetterlingsförmige Schaltfläche rechts auf deinem Bildschirm.
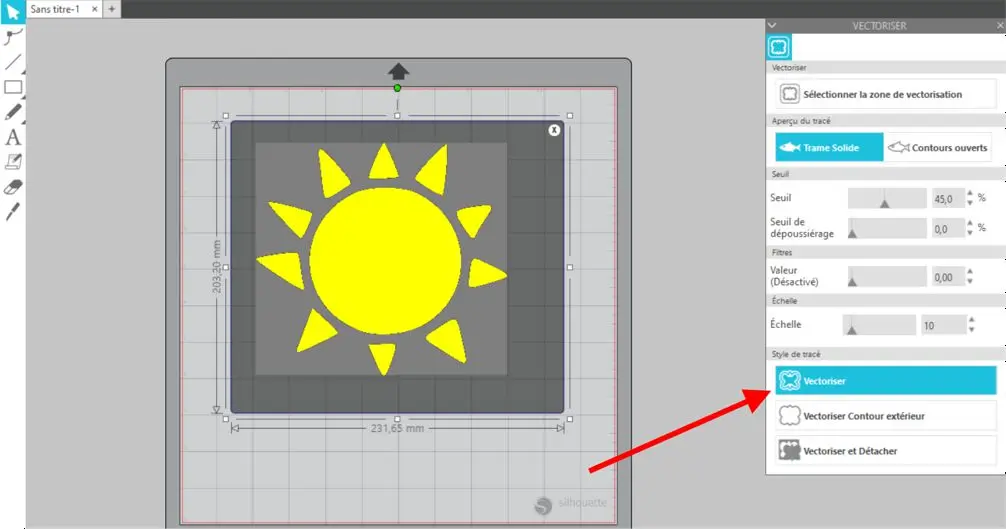
Erfasse dein gesamtes Logo im Vektorisierungsraster, indem du die linke Maustaste durchgehend gedrückt hältst, und klicke anschließend auf die Schaltfläche „Vektorisieren“, und schon ist es geschafft!
Dieser Vorgang ist sehr einfach, allerdings ist die Vektorisierung nicht immer perfekt, und die Vektorisierung mit Silhouette Studio kann manchmal bestimmte Details des Motivs vernachlässigen. Du kannst dir den Blogbeitrag über die Vektorisierung mit der Software Inkscape für eine genauere Vektorisierung ansehen.
Schritt 2: Einstellungen des Motivs
Sobald dein Logo vektorisiert ist, kannst du verschiedene Einstellungen in der Software Silhouette Studio vornehmen. Ändere zuerst die Größe des Logos und platziere es an der richtigen Stelle im Rahmen (in der Regel oben links, wo der Schnitt erfolgt).
Wenn du mit Aufbügelflex arbeitest, ist es unbedingt erforderlich, dein Logo im „Spiegel“-Modus einzustellen, da die Maschine die Logos „verkehrt herum“ schneidet. Man muss sie also um sich selbst drehen, damit sie beim Aufbügeln richtig herum erscheinen.
Klicke dazu mit der rechten Maustaste auf dein Logo und dann auf „Horizontal spiegeln“, und das Logo macht eine Pirouette!
Jetzt kannst du oben rechts auf dem Bildschirm auf die Schaltfläche „SENDEN“ klicken, um zum nächsten Schritt überzugehen ➡️
Silhouette Studio ist eine umfassende Software, die eine Vielzahl unterschiedlicher Spielereien für das Logo-Design bietet. Wir haben die wichtigsten gesehen, aber es steht dir frei, sie alle auszuprobieren!
Kommen wir nun zum Kern der Sache: den Schnitteinstellungen!
Schritt 3: Schnitteinstellungen
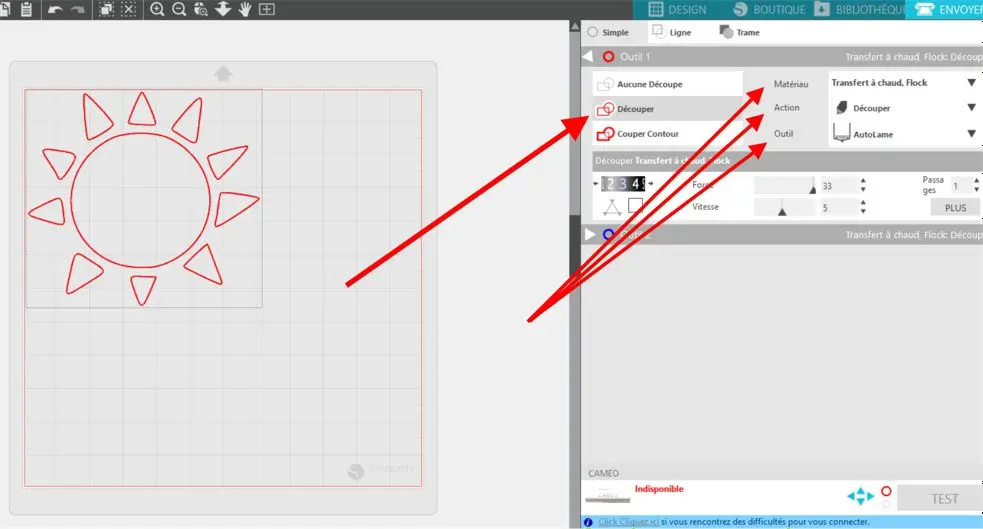
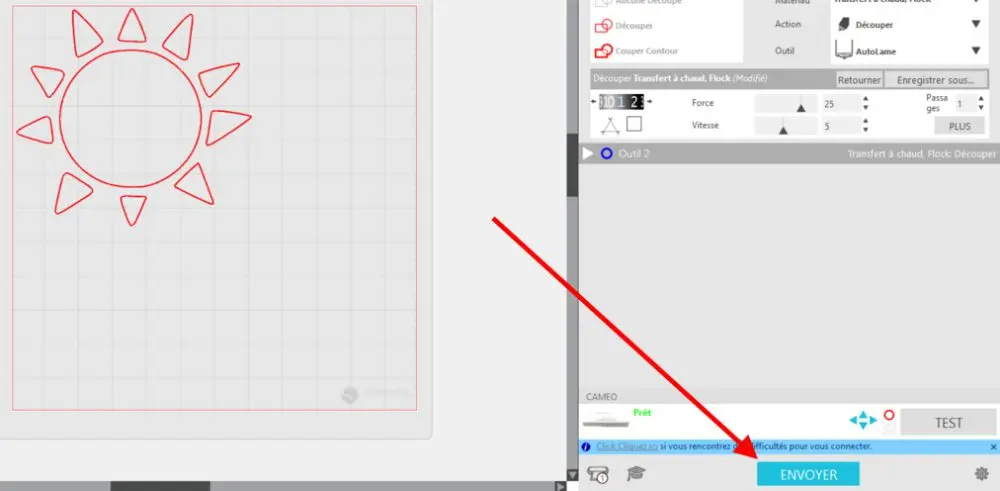
Schaltfläche Material, Aktion und Werkzeug
- Klicke im ersten weißen Kasten auf „Schneiden“.
- Wähle im Reiter „Material“ die Option „Thermotransfer, Flock“
- Klicke im Reiter „Aktion“ auf „Schneiden“
- Klicke im Reiter „Werkzeug“ auf „Autoblade“ (das gängigste), wenn du ein automatisches Messer hast, andernfalls klicke auf „Silhouette-Messer“.
Höhe, Kraft und Geschwindigkeit des Messers
Die Aufbügelflexe auf dem Markt haben alle mehr oder weniger unterschiedliche Messereinstellungen.
Deshalb nehmen wir in diesem Tutorial als Beispiel die Schnitteinstellungen des Standard-Aufbügelflex der Marke Paper Transfer.
Das schwarze Rädchen entspricht der Höhe des Messers. Wir empfehlen immer, eine Messerhöhe von 1 (maximal 2) beizubehalten, wenn du Flex schneidest, denn eine zu hohe Messerhöhe könnte deine Schneidematte und sogar noch schlimmer deine Maschine beschädigen…
Die Kraft entspricht dem Druck, der auf den Träger ausgeübt wird, um ihn besser zu schneiden. Kurz gesagt: Wenn es dir nicht gelingt, dein Flexpapier zu schneiden, ist es sinnvoller, die Kraft des Messers zu erhöhen als seine Höhe.
Wie oben erwähnt, variiert die Krafteinstellung je nach den verschiedenen Flex-Arten. Für den Standard-Flex aus unserem Sortiment empfehlen wir dir, eine Kraft zwischen 21 und 25 zu wählen.
Wenn du einen Flex einer anderen Marke schneidest (das ist nicht schlimm, niemand ist perfekt 🙄), dann empfehlen wir dir, mit einer Kraft von 25 zu beginnen. Wenn das Messer den Kunststoff des Flex durchsticht, verringere bitte die Kraft ⬇️, wenn das Messer nicht tief genug schneidet, erhöhe die Kraft ⬆️.
Was die Schnittgeschwindigkeit angeht, empfehlen wir, die Standardgeschwindigkeit (5) beizubehalten.
Schließlich ist es nicht nötig, mehrere Schnittdurchgänge an deinem Logo durchzuführen, wenn du die richtigen Einstellungen hast. Wir empfehlen dir daher, die Anzahl der Durchgänge bei 1 zu belassen.
Die Einstellungen sind endlich fertig 🤩. Jetzt kannst du dein Motiv schneiden, indem du auf „SENDEN“ klickst!
Wir hoffen, dass dir dieses Tutorial nützlich war. Das Schneiden von Motiven mit der Software Silhouette Studio wird für dich bald ein Kinderspiel sein!
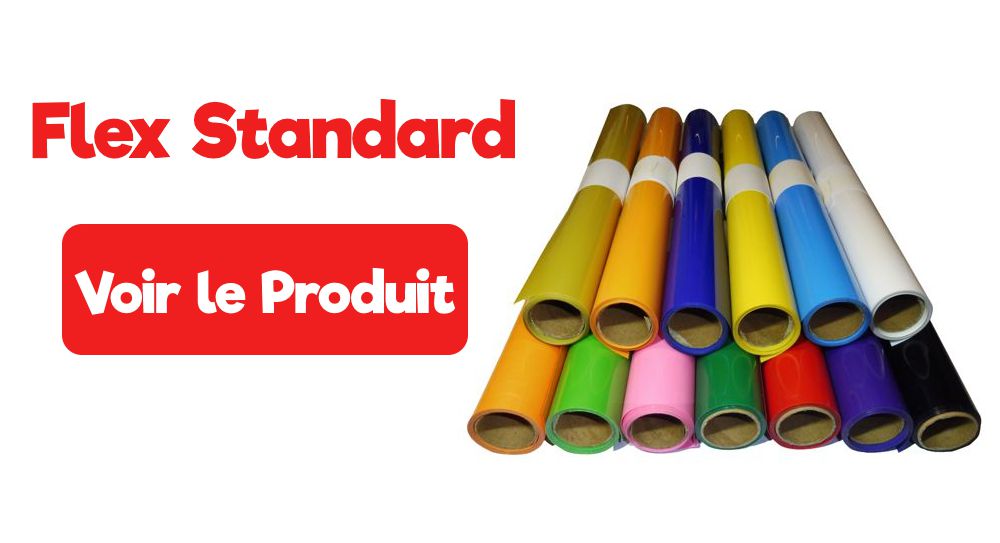
Um unseren Standard-Flex auszuprobieren, warte nicht länger und klicke auf den Link unten!😉
Ich will den Standard-Flex!
Produktvorteil:
✔️ Einfaches Entgittern und Schneiden
✔️ Kompatibel mit allen Silhouette-Schneideplottern
✔️ Schnelles Aufbringen (15 Sekunden)
✔️ Bestes Preis-Leistungs-Verhältnis