Jedes Jahr das gleiche Ritual: Man holt die Kartons vom Dachboden, packt die Girlanden aus und entdeckt diese mit der Zeit etwas matt gewordenen Weihnachtskugeln wieder.
Doch dieses Mal hatte ich Lust auf etwas anderes. Auf einen Baum, der eine Geschichte erzählt, meine. Nicht einfach nur eine schnell im Supermarkt gekaufte Deko, sondern etwas Persönlicheres, etwas Authentischeres.
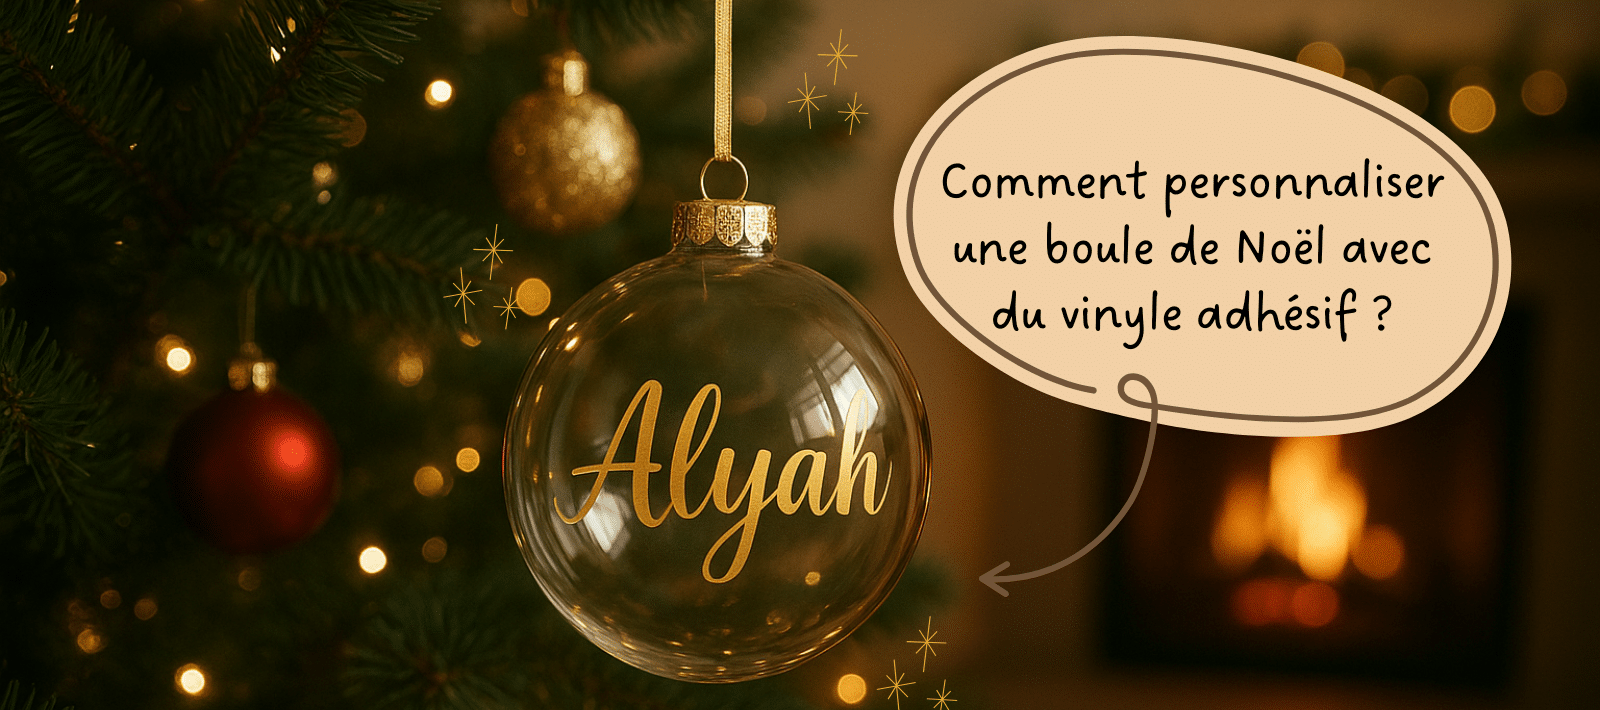
So habe ich entdeckt, wie man eine Weihnachtskugel personalisiert mit Klebevinyl. Und ehrlich gesagt hat das alles verändert.
Ich hatte nicht nur Spaß am Gestalten, sondern habe meinem Baum auch wieder Leben eingehaucht. Jede Kugel trägt jetzt einen Vornamen, ein Datum, ein Motiv oder ein liebes Wort. Eine echte Mischung aus Emotionen und Kreativität.
Wenn auch du einen Baum möchtest, der deine Welt widerspiegelt, wirst du dieses einfache und schnelle Tutorial lieben!
Also bleib dran, ich zeige dir Schritt für Schritt, wie man eine Weihnachtskugel personalisiert, mit leicht erhältlichem Material und einem Ergebnis, das den zauberhaftesten Weihnachtsschaufenstern in nichts nachsteht.
🎁
Halte dein Klebevinyl bereit, deine Silhouette Cameo 5 (oder deine Cricut) und eine gute Tasse heiße Schokolade (ja, das gehört einfach dazu!): Wir legen gemeinsam los und schauen, wie man eine Weihnachtskugel personalisiert, um eine einzigartige Deko zu kreieren, die zu 100 % du ist!
🌟
- Warum solltest du deine Weihnachtskugeln personalisieren?
Bevor ich dir zeige, wie man eine Weihnachtskugel personalisiert, lass mich dir eine Frage stellen:
Was macht Weihnachten für dich so besonders?
Für manche ist es der Duft des frisch aufgestellten Baums. Für andere der Moment, in dem die Lichter angehen und sich das Zuhause in einen gemütlichen Kokon verwandelt (ich gebe zu, das ist einer meiner LIEBLINGSmomente!).
Aber im Grunde ist es das, was Weihnachten magisch macht: die Details. Diese kleinen Gesten, die eine schlichte Deko in eine Erinnerung voller Bedeutung verwandeln.
Genau das ermöglicht die Personalisierung.
Wenn du lernst, wie man eine Weihnachtskugel personalisiert, fügst du nicht einfach nur einen Vornamen oder ein Datum auf einem Objekt hinzu: Du hältst einen Moment fest, eine Emotion, eine Geschichte. DEINE Geschichte...
Die erste Kugel „Baby Kaylah, 2022“, die mit dem Namen deines Partners oder die, die du deiner Patentante schenkst... jede wird zu einem Symbol des Teilens.
Und seien wir ehrlich: Deinen Baum mit deinen eigenen Kreationen geschmückt zu sehen, das ist doch ein kleiner Stolz, oder?
Zu lernen, wie man eine Weihnachtskugel personalisiert, heißt auch, die Freude am Selbermachen wiederzuentdecken, die wir manchmal vergessen haben, weil wir immer fertige Weihnachtskugeln kaufen.
Es heißt, langsamer zu machen, sich Zeit zum Gestalten zu nehmen und in jedes Detail ein Stück von sich selbst zu legen.
Und schließlich gibt es diese einzigartige Zufriedenheit: sagen zu können „Das habe ich selbst gemacht“.
Und glaub mir, wenn deine Liebsten deine personalisierten Kugeln sehen, werden sie dich alle fragen, wie man eine Weihnachtskugel personalisiert wie du!
🎨
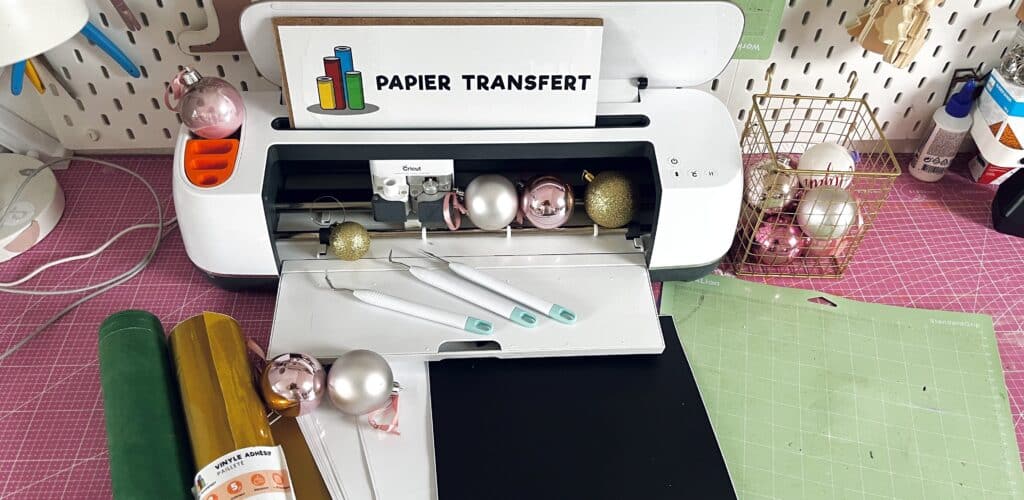
- Das unverzichtbare Material, um eine Weihnachtskugel zu personalisieren
Bevor du loslegst und lernst, wie man eine Weihnachtskugel personalisiert, brauchst du das richtige Material. Du brauchst kein Künstleratelier, nur ein paar gut ausgewählte Basics, damit deine Kreation genauso schön wie haltbar wird.
Als ich anfing zu lernen, wie man eine Weihnachtskugel personalisiert, dachte ich, es würde kompliziert werden und ich bräuchte eine Tonne Werkzeug... In Wirklichkeit braucht es nur wenig für ein verblüffendes Ergebnis. Hier ist, was ich dir empfehle
👇
🪄
Das Grundmaterial:
-
Weihnachtskugeln: aus durchsichtigem Kunststoff, aus Glas oder sogar aus Acryl. Am besten glatt, damit das Vinyl perfekt haftet.
-
Permanentes Klebevinyl: das ist das Schlüsselelement. Du kannst je nach deinem Stil ein glänzendes, mattes, glitzerndes oder verchromtes Vinyl wählen (oder sogar mehrere verschiedene Vinyle für ein noch FUNigeres Ergebnis verwenden!).
-
Transferfolie: Sie ermöglicht es dir, dein Motiv aufzubringen, ohne es zu verformen.
-
Cricut oder eine Silhouette Cameo 5: ideal für präzise Schnitte, vor allem wenn du mehrere Kugeln personalisieren möchtest.
-
Entgitter-Set: um die Rückstände nach dem Schneiden zu entfernen und dein Vinyl ohne Blasen gut aufzukleben.
-
Weiches Tuch: um die Oberfläche deiner Kugel zu reinigen, bevor du dein Vinyl aufbringst (ein entscheidender Schritt für die Haltbarkeit).
-
Bänder, Schleifen, Glitzer: für deinen festlichen letzten Schliff
🎀
All dieses Material ist leicht zu finden, und wenn du ein professionelles Ergebnis möchtest, empfehle ich dir wärmstens das hochwertige Klebevinyl, das bei Paper Transfer erhältlich ist. Es lässt sich perfekt schneiden, löst sich nicht ab und sein Ergebnis ist einfach UMWERFEND im Licht des Weihnachtsbaums!
✨
Was ich daran liebe, wie man eine Weihnachtskugel personalisiert, ist, dass es kein „richtig“ oder „falsch“ gibt: Es ist DEIN Stil, DEINE Vorstellungskraft, DEIN Weihnachten.
Ob du nun schickes Gold, traditionelles Rot oder ein modernes Design wählst, das Wichtigste ist die Freude daran, etwas zu erschaffen, das zu dir passt.
✂️
- Wie man eine Weihnachtskugel mit Klebevinyl personalisiert, die Schritt-für-Schritt-Anleitung
Jetzt, wo du dein ganzes Material hast, ist es Zeit, zur Praxis überzugehen
✨
Ich zeige dir Schritt für Schritt, wie man eine Weihnachtskugel personalisiert, selbst wenn es dein allererstes Mal ist. Du wirst sehen, es ist viel einfacher, als man denkt, und das Ergebnis ist magisch.
🎁
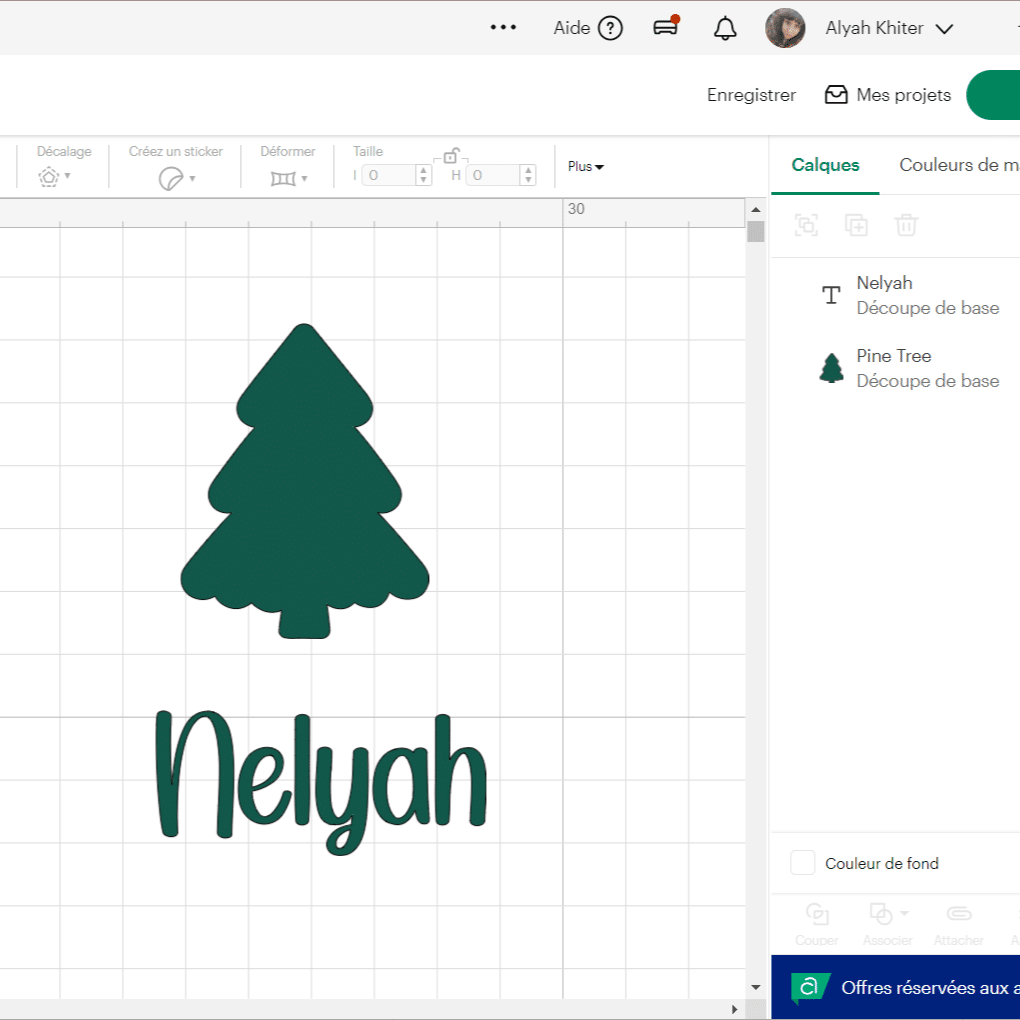
Schritt 1: Dein Design vorbereiten
Stell dir zuallererst das Endergebnis vor. Möchtest du eine schlichte Kugel mit nur einem Vornamen? Einen inspirierenden Spruch? Oder ein verspielteres Design mit Sternen, Schneeflocken oder sogar einer kleinen Illustration?
Hier fängt alles an: die Kreativität.
Als ich gelernt habe, wie man eine Weihnachtskugel personalisiert, habe ich schnell verstanden, dass die Wahl des Designs alles verändert.
Für ein harmonisches Ergebnis denk an die Größe deiner Kugel: Je kleiner sie ist, desto feiner und besser lesbar muss dein Motiv sein.
Nutze deine Software (wie Cricut Design Space oder Silhouette Studio), um dein Visual zu erstellen, oder wähle eine bereits fertige Vorlage, wenn du schneller vorankommen möchtest (und dir damit gleichzeitig das Leben leichter machen willst!).
Kleiner Tipp: Bleib stimmig mit dem Rest deiner Baumdeko. Eine goldene Kugel mit glänzendem weißem Schriftzug kann zum Beispiel einen echten Wow-Effekt in einer holzigen oder natürlichen Umgebung machen
🌲
✨
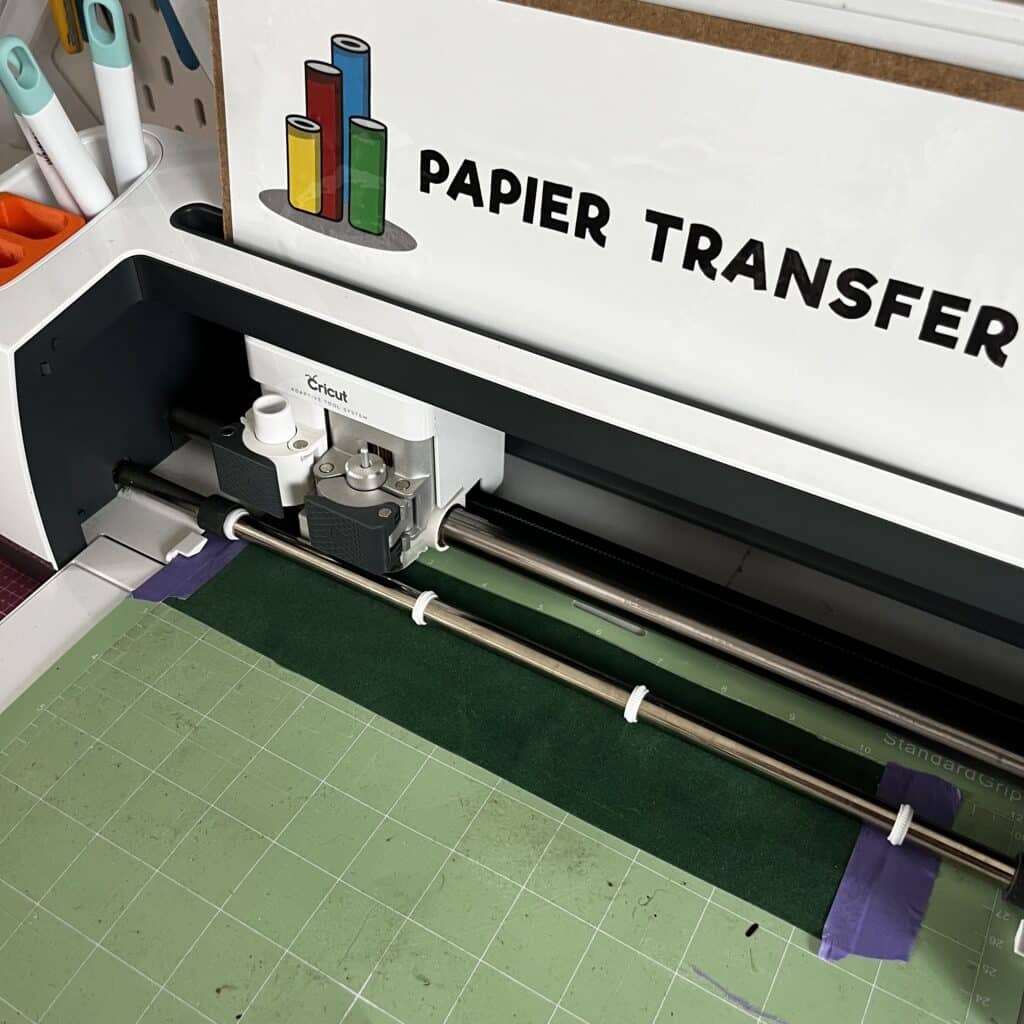
Schritt 2: Das Vinyl schneiden
Das ist der befriedigendste Moment!
Lege dein Klebevinyl auf deine Schneidematte und starte den Schnitt.
Wenn du keine Maschine hast, keine Panik: Bewaffne dich mit Geduld. Du kannst dein Motiv von Hand ausschneiden, ganz sanft, mit einem Präzisionsmesser.
Als ich anfing zu lernen, wie man eine Weihnachtskugel personalisiert, habe ich oft ein entscheidendes Detail vergessen: die Einstellung der Klinge.
Zu viel Druck, und das Vinyl reißt. Zu wenig, und es schneidet nicht vollständig durch.
Mach immer einen kleinen Test an einer Ecke, bevor du dein echtes Motiv schneidest, das erspart dir eine Menge Frust (bei Paper Transfer sind alle Einstellungen vermerkt!).
Um bei diesem traditionellen Weihnachtsstil zu bleiben, habe ich das dunkelgrüne Samtvinyl gewählt (unter uns, es ist wirklich WUNDERSCHÖN, findest du nicht?)
Sobald der Schnitt fertig ist, entgittere dein Vinyl: Entferne die kleinen überflüssigen Teile mithilfe einer Pinzette oder eines Entgitter-Werkzeugs. Jetzt beginnt dein Motiv, lebendig zu werden!
🌟
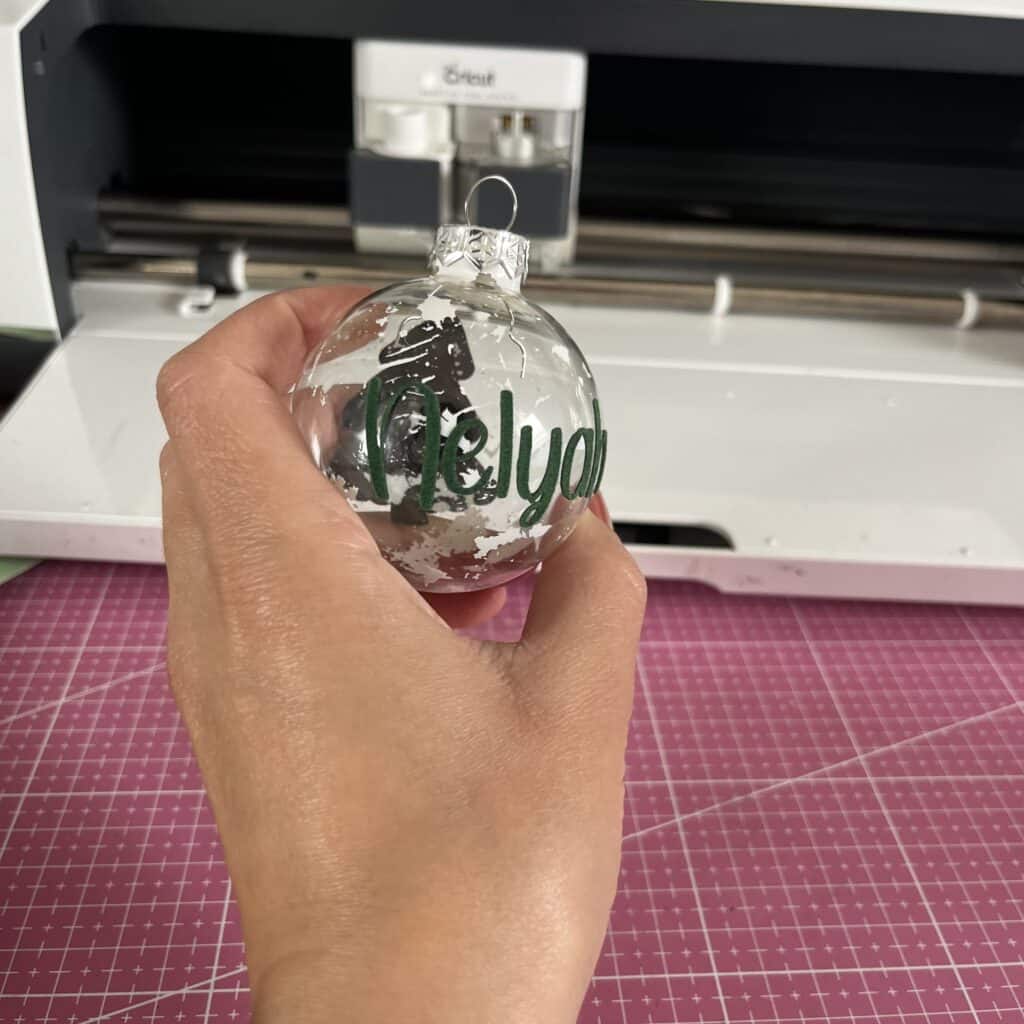
Schritt 3: Das Vinyl auf der Weihnachtskugel anbringen
Hier passiert die Magie
💫
Reinige zuallererst deine Kugel mit einem weichen Tuch.
Bringe dann die Transferfolie (Transfertape) auf dein ausgeschnittenes Motiv auf und klebe es vorsichtig auf deine Kugel.
Benutze deinen Rakel oder deinen Finger, damit das Vinyl gut haftet, ohne Blasen.
Als ich zum ersten Mal lernte, wie man eine Weihnachtskugel personalisiert, hatte ich bei diesem Schritt ein bisschen Angst: „Und wenn ich es schief aufklebe?“
😅
Aber ehrlich, selbst wenn dein Schriftzug nicht perfekt gerade ist, ist das nicht schlimm.
Das ist der Charme des Selbstgemachten: Jede Kugel ist einzigartig, genau wie du.
Sobald das Vinyl gut sitzt, ziehe vorsichtig die Transferfolie ab... und bewundere es!
Dein Design glänzt, das Vinyl schmiegt sich perfekt an die runde Oberfläche an: Du hast gerade deine erste personalisierte Kugel kreiert
🎉
Ich für meinen Teil habe eine durchsichtige Kugel mit weißen Tupfen gewählt. Ich finde sie wirklich originell und wirklich anders als das, was man normalerweise sieht!
🎀
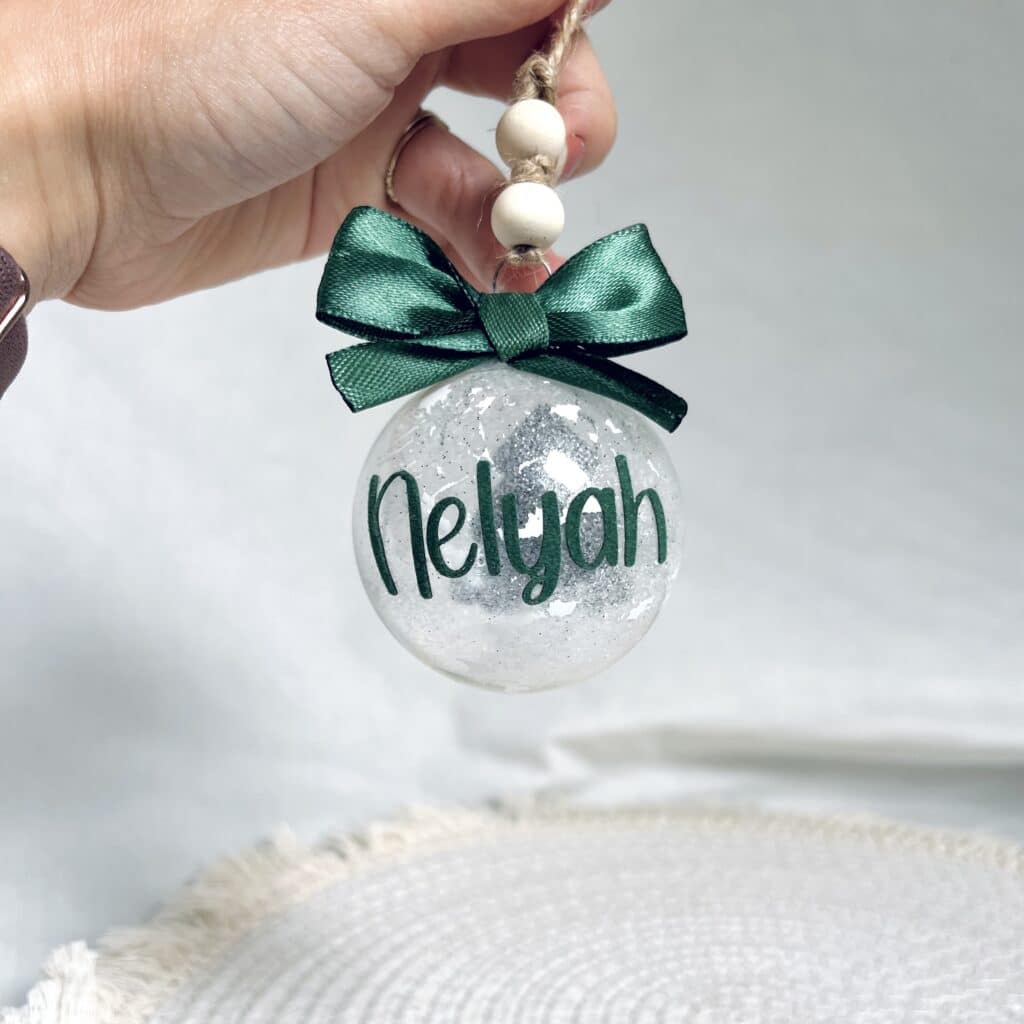
Schritt 4: Den letzten Schliff hinzufügen
Du kannst jetzt ein hübsches passendes Band, etwas Glitzer oder sogar ein kleines Etikett mit dem Vornamen oder dem Datum hinzufügen (das ist top, wenn du sie deinen Liebsten schenken möchtest!).
Es sind solche Details, die deinen Baum einzigartig machen und dafür sorgen, dass dich alle fragen werden, wie man eine Weihnachtskugel personalisiert so hübsch.
Und siehe da, du hast gerade gelernt, wie man eine Weihnachtskugel personalisiert mit Klebevinyl, ganz einfach, stressfrei und mit einem Ergebnis, das eines Schaufensters würdig ist.
Glaub mir, du wirst die Weihnachtsdeko nie wieder mit denselben Augen sehen
🎄
Ich für meinen Teil habe mich für eine Schleife in der gleichen Farbe wie das Vinyl entschieden und die Weihnachtskugel mit weißem Glitzer gefüllt, um sie noch festlicher zu machen (ich liebe es, Glitzer in mein Leben zu bringen!)
💡
- Design-Ideen, um deine Weihnachtskugel zu personalisieren
Jetzt, wo du weißt, wie man eine Weihnachtskugel personalisiert, kommt der spaßigste Teil: das Design!
🎨
Das ist der Moment, in dem du deiner Vorstellungskraft freien Lauf lässt. Ob du nun eher minimalistisch, traditionell oder völlig zauberhaft bist, es gibt tausendundeine Möglichkeiten, jede Kugel einzigartig zu machen.
Als ich anfing zu erkunden, wie man eine Weihnachtskugel personalisiert, wurde mir schnell klar, dass jeder Stil eine andere Geschichte erzählt. Manche mögen liebevolle, familiäre Botschaften, andere bevorzugen elegante oder geradezu originelle Motive.
Hier sind ein paar Ideen, die dich inspirieren sollen
👇
🎁
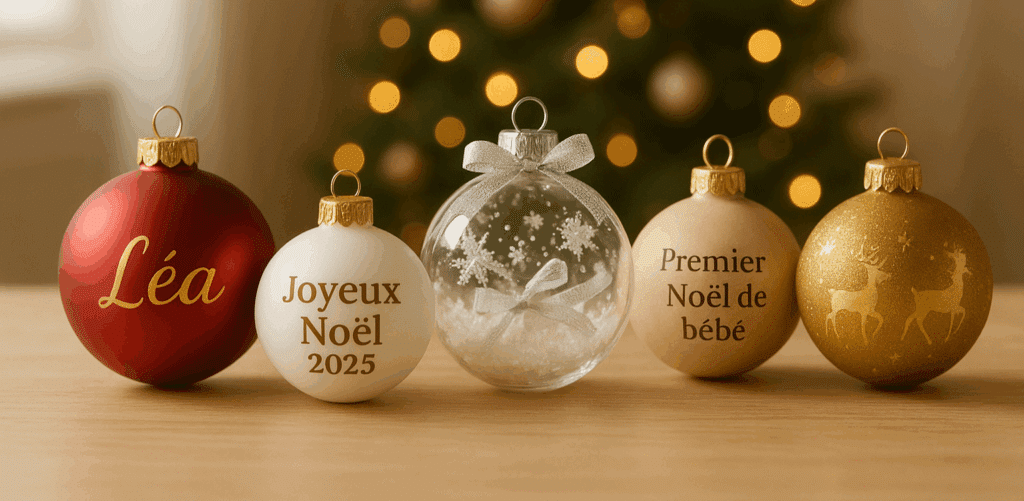
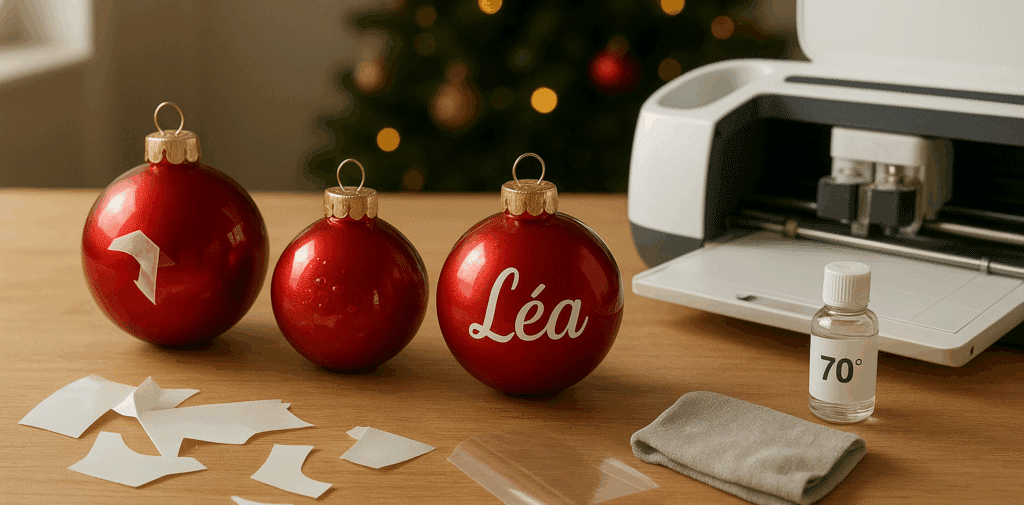
1. Die Vornamen, ein zeitloser Klassiker
Eine Kugel mit dem Vornamen jedes Familienmitglieds ist eine sichere Sache.
Stell dir deinen Baum vor, voll mit Kugeln „Papa“, „Mama“, „Léa“, „Adam“... jeder sucht seine eigene und lächelt, wenn er sie entdeckt.
Das ist übrigens eine ausgezeichnete Idee, wenn du deinen Liebsten eine selbstgemachte Kreation schenken möchtest.
✨
2. Die Sprüche und kleinen lieben Worte
Ein einfacher Satz wie „Frohe Weihnachten“, „Winterzauber“ oder „Mein erstes Weihnachten“ verleiht deiner Deko sofort Charme.
Wenn man lernt, wie man eine Weihnachtskugel personalisiert, entdeckt man, dass ein paar Worte eine schlichte Kugel in eine Botschaft voller Emotion verwandeln können.
🌲
3. Die illustrierten Motive
Schneeflocken, Rentiere, Tannenbäume, Sterne oder Schneemänner: Die in Vinyl ausgeschnittenen Motive sorgen für einen unglaublich professionellen Effekt.
Du kannst sie mit einem Vornamen oder einem Datum mischen, für ein noch persönlicheres Ergebnis.
Und wenn du noch weiter gehen möchtest beim wie man eine Weihnachtskugel personalisiert, denk an goldene oder silberne Motive, die im Licht der Girlanden funkeln.
🎀
4. Die Farbthemen
Wähle eine Palette: Rot und Gold für einen traditionellen Stil, Weiß und Silber für ein schickes Weihnachten oder Beige und Holz für eine natürliche Stimmung.
Wenn man lernt, wie man eine Weihnachtskugel personalisiert, versteht man schnell, dass die Stimmigkeit der Farben das gesamte visuelle Ergebnis deines Baums verändert.
🌟
5. Die Erinnerungskugeln
Und wenn du aus jeder Kugel ein kleines Stück Erinnerung machen würdest?
Eine Kugel „Babys erstes Weihnachten“, „Unser erstes Weihnachten zu zweit“...
Es sind diese kleinen Details, die dafür sorgen, dass jede Deko zu einem Schatz wird, den man Jahr für Jahr wieder hervorholt.
Was ich am meisten daran mag, wenn man sich fragt, wie man eine Weihnachtskugel personalisiert, ist, dass es keine Grenzen gibt.
Du kannst mit einem einfachen Vornamen anfangen und mit einem echten Miniaturkunstwerk enden.
Das Ganze besteht darin, mit dem Herzen zu gestalten
❤️
⚠️
- Die Fehler, die du vermeiden solltest, wenn du eine Weihnachtskugel personalisierst
Auch wenn wie man eine Weihnachtskugel personalisiert einfach erscheint, gibt es ein paar klassische Fallen, in die man leicht tappt (ja, auch ich bin da durch
😅
).
Und oft sind es kleine Details, die den ganzen Unterschied zwischen einer perfekten Kugel und einer Kugel ausmachen, die... sagen wir mal, ein bisschen schief geraten ist.
Damit dir diese kleinen Pannen erspart bleiben, hier die Fehler, die du auf keinen Fall machen solltest
👇
❌
- Vergessen, die Oberfläche zu reinigen
Das ist Fehler Nummer eins. Bevor du dein Vinyl aufbringst, reinige deine Kugel gut mit einem weichen Tuch und etwas Alkohol.
Eine schlecht entfettete Oberfläche bedeutet ein Vinyl, das sich nach ein paar Tagen ablöst.
Wenn man lernt, wie man eine Weihnachtskugel personalisiert, merkt man schnell, dass die Vorbereitung genauso wichtig ist wie das Gestalten.
⚙️
- Das falsche Vinyl verwenden
Nicht alle Vinyle sind gleich!
Für wie man eine Weihnachtskugel personalisiert braucht es ein permanentes Klebevinyl, vor allem wenn deine Kugel dazu bestimmt ist, angefasst oder von einem Jahr zum nächsten gelagert zu werden.
Temporäre Vinyle eignen sich besser für kurzlebige Projekte (wie Fensterscheiben oder Wände).
Wähle also immer ein hochwertiges Vinyl, wie die auf Paper Transfer angebotenen, die dafür gemacht sind, zu halten und Feuchtigkeit zu widerstehen.
💨
- Sich beim Anbringen überstürzen
Ach... die berühmte Ungeduld des „Ich will das Ergebnis sofort sehen“
😅
Ich verstehe dich! Aber wenn man lernt, wie man eine Weihnachtskugel personalisiert, entdeckt man, dass Präzision der Schlüssel ist.
Nimm dir Zeit, dein Vinyl sanft aufzubringen, ohne Blasen oder Falten. Benutze deine Transferfolie und drücke gut auf jeden Buchstaben.
✂️
- Vergessen, den Schnitt zu testen
Bevor du deinen echten Schnitt startest, mach immer einen kleinen Test an einem Stück Vinyl.
Jede Maschine hat ihre Einstellungen, und ein Millimeter Unterschied kann alles verändern.
Als ich gelernt habe, wie man eine Weihnachtskugel personalisiert, habe ich mehrere Bögen wegen einer einfachen falschen Klingeneinstellung verschwendet. Seitdem teste ich systematisch (und das spart mir wahnsinnig viel Zeit).
5. Zu viel auf einmal wollen
Manchmal will man so sehr, dass es perfekt wird, dass man das Design überlädt: zu viel Text, zu viele Motive, zu viel Glitzer.
Aber die Schönheit einer personalisierten Kugel liegt oft in ihrer Schlichtheit.
Wenn du beherrschst, wie man eine Weihnachtskugel personalisiert, verstehst du, dass weniger mehr ist. Ein gut zentrierter Vorname, eine harmonische Farbe, und schon ist es geschafft.
Jeder Fehler ist eine Lektion, und genau das macht DIY so erfüllend.
Also lass dich nicht entmutigen, wenn deine erste Kugel nicht perfekt ist! Du wirst sehen, schon ab der zweiten weißt du genau, wie man eine Weihnachtskugel personalisiert mit Selbstvertrauen und Stil
🎨
🎁
- Warum solltest du ein hochwertiges Klebevinyl wählen?
Wenn man lernt, wie man eine Weihnachtskugel personalisiert, merkt man schnell, dass das Geheimnis eines makellosen Ergebnisses nicht nur die Technik ist... es ist auch die Qualität des Vinyls, das man verwendet.
Ich habe das im ersten Jahr, in dem ich meine Kugeln personalisieren wollte, auf die harte Tour gelernt:
Ich hatte ein minderwertiges Vinyl gekauft, das sich nach ein paar Tagen ablöste. Das Ergebnis? Stunden an Arbeit vergeudet und halb abgeblätterte Kugeln am Baum.
😅
Seitdem habe ich meine Methode geändert (aber vor allem meinen Lieferanten!).
Als ich die Vinyle von Paper Transfer entdeckte, habe ich endlich verstanden, was zugängliche professionelle Qualität bedeutet.
💎
Ein sauberer Schnitt, selbst bei kleinen Motiven
Wenn du weißt, wie man eine Weihnachtskugel personalisiert, bemerkst du sofort den Unterschied:
Das Vinyl von Paper Transfer lässt sich schneiden, ohne zu haken, selbst bei feinen Buchstaben oder komplexen Formen.
Das Ergebnis ist sauber, präzise und vor allem lässt es sich ohne Blasen anbringen.
✨
Eine perfekte Haftung auf allen Oberflächen
Ob deine Kugel aus Glas, Kunststoff oder Acryl ist, das Vinyl haftet problemlos.
Und vor allem: Es bleibt an Ort und Stelle.
Schluss mit Deko, die sich nach zwei Tagen ablöst. Du kannst deine Kugel jedes Weihnachten wieder hervorholen, sie wird immer genauso schön sein.
🎨
Farben, die deine Deko aufwerten
Glänzendes Gold, intensives Rot, perlmuttweiß, silberner Glitzer... jeder Vinylton wurde so gestaltet, dass deine Kugel im Licht des Baums hervorsticht.
Und wenn du beherrschst, wie man eine Weihnachtskugel personalisiert, machen diese Details den ganzen Unterschied: Dein Baum wird zu einem Kunstwerk.
Ein Vinyl, das sich leicht anbringen lässt, sogar für Anfänger·innen
Du musst kein·e DIY-Profi sein, um ein verblüffendes Ergebnis zu erzielen.
Die Vinyle von Paper Transfer lassen sich leicht handhaben, sanft auftragen und verzeihen kleine Fehler.
Genau das braucht man, wenn man zum ersten Mal lernt, wie man eine Weihnachtskugel personalisiert.
Sich für Paper Transfer zu entscheiden, heißt, sich für Qualität, Haltbarkeit und die Zufriedenheit des „Wow“-Moments am Ende zu entscheiden.
Und ehrlich, deinen Baum mit deinen eigenen Kreationen glänzen zu sehen, das ist das schönste Geschenk, das du dir dieses Jahr machen kannst
🎄
🎁 Jetzt bist du dran, für ein zu 100 % personalisiertes Weihnachten!
Und siehe da, du weißt jetzt, wie man eine Weihnachtskugel personalisiert, ganz einfach, mit Klebevinyl und ein bisschen Kreativität 🎨. Ob du nun einen Vornamen, einen lieben Spruch oder einen einfachen goldenen Stern gewählt hast, du hast gerade eine gewöhnliche Deko in eine einzigartige, handgemachte Erinnerung verwandelt.
Was an dieser Technik magisch ist: Sie ermöglicht es dir, eine Spur von dir in jedem Winkel des Baums zu hinterlassen. Jede Kugel wird zu einem kleinen Augenzwinkern an deine Welt, an deine Familie, an deinen Stil. Und ehrlich, das ist der Geist von Weihnachten: das Teilen, die Kreativität und die kleinen Details, die die Augen zum Leuchten bringen ✨
Also, jetzt, wo du weißt, wie man eine Weihnachtskugel personalisiert, bist du dran, ins Handeln zu kommen!
👉 Hol dein Vinyl, deinen Rakel und deine Vorstellungskraft heraus und zeig uns deinen schönsten Baum!
Vergiss nicht, deine Kreation in den sozialen Netzwerken zu teilen und @papiertransfert.fr zu markieren, wir lieben es, eure Ideen und eure personalisierten Versionen zu entdecken 💫
Und wenn du noch weiter gehen möchtest, entdecke unsere anderen DIY-Weihnachtstutorials auf Paper Transfer 🎄